TPIRFanSteve@legacy41965143 (talk | contribs) |
PhantomCaleb (talk | contribs) m (Text replace - "[[Ball & Chain Trooper" to "[[Ball and Chain Soldier") |
||
| Line 1: | Line 1: | ||
| + | {{Boss |
||
| − | [[File:Yetoahearts.jpg|right|thumb|[[Yeto]] and [[Yeta]], the "Recovery Heart fountain"]]'''Recovery Hearts''' are omnipresent items in [[The Legend of Zelda (Series)|''The Legend of Zelda'' series]]. |
||
| + | |name = Darkhammer |
||
| + | |type = mini |
||
| + | |image = [[File:Darkhammer.png|250px]] |
||
| + | |imageback = |
||
| + | |title = |
||
| + | |race = Unknown <small>(possibly [[Lizalfos]])</small> |
||
| ⚫ | |||
| + | |dungeon = [[Snowpeak Ruins]] |
||
| + | |weakness = Tail |
||
| + | |reward = [[Ball and Chain]] |
||
| + | |strategy = |
||
| + | }} |
||
| + | The '''Darkhammer''' is the mini-boss of the [[Snowpeak Ruins]] in ''[[The Legend of Zelda: Twilight Princess|Twilight Princess]]''. When defeated, the creature drops the [[Ball and Chain]] (not in a [[Treasure Chest]]), an item usable by [[Link]]. Following that, Link may proceed to open a chest [[Yeta]] thinks contains the [[Big Key]], but really has [[Ordon Goat Cheese]]. |
||
| + | This is likely to be a reference to ''[[The Legend of Zelda: A Link to the Past|A Link to the Past]]'', in which [[Princess Zelda]], imprisoned in a cell in the dungeon of Hyrule Castle, is guarded by a [[Ball and Chain Soldier|knight wielding a ball and chain]]. Upon defeating the knight, Link receives the Big Key. |
||
| − | ==Location and Uses== |
||
| − | [[File:Recover heart.png|30px|left]] |
||
| − | Hearts aid [[Link]] by replenishing his life energy by one heart at a time. They can be found anywhere in [[Hyrule]], [[Koholint Island]], [[Termina]], [[Labrynna]], [[Holodrum]], the [[Great Sea]], the [[World of the Ocean King]], and [[Skyloft]]. Recovery Hearts are uncovered in pots, jars, tall [[grass]], defeated enemies, under rocks and, in many instances, they can even be purchased from shops. They appear as small, floating, red hearts. |
||
| + | Darkhammer has a somewhat reptilian appearance, particularly with his tail, and is possibly a relative of [[Lizalfos]]. [[Hyrule Historia]] concept art appears to back up this theory. |
||
| − | ===Life Meter=== |
||
| − | In various ''The Legend of Zelda'' games, Link can extend his life energy from three to twenty hearts. In others, the maximum is 14 or 16. The only game where Link doesn't have his health represented by hearts is ''[[Zelda II: The Adventure of Link|The Adventure of Link]]'', where it's represented by rectangular segments (the game still features [[Heart Container]]s to increase the life meter, however). |
||
| + | ==Strategy== |
||
| − | ''[[The Legend of Zelda: Phantom Hourglass| Phantom Hourglass]]'' introduced a Green Recovery Heart. These replenished the endurance of the [[S. S. Linebeck]] and were only found while traveling the [[Great Sea]]. These same types of Recovery Hearts are used in ''[[The Legend of Zelda: Spirit Tracks|Spirit Tracks]]'' to heal the [[Spirit Train]]. |
||
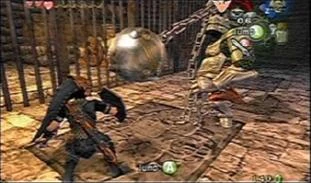
| + | [[File:Darkhammer_Battle.jpg|thumb|left|Link fighting Darkhammer ([[Nintendo Gamecube]] version)]] |
||
| + | Darkhammer will continuously guard his body with his massive Ball and Chain. In order to defeat him, Link must use one of four strategies. The first is to [[Clawshot]] a target behind him as soon as he motions to throw his weapon. He will then pause to pull in his weapon, giving Link the opportunity to slash at his exposed tail. The second is a quicker, but much riskier way. Link waits until a split second before his weapon lands, and then rolls behind him, swinging Link's sword at his tail. The third technique is to instantly kill him by using [[Hidden Skill#Mortal Draw|Mortal Draw]] on his tail. However, the timing required makes it tricky to perform. A fourth is to simply run behind while he swings his weapon over his head, and slash his tail repeatedly. The blows will stun him and keep him from attacking. |
||
| + | ===Midna's hints=== |
||
| + | *''Doesn't he know how dangerous that is, swinging a big metal ball around in such a small place? It's too dangerous to get close to him, so let's use the ceiling to get over to his other side!'' -At the beginning of the battle |
||
| + | *''Hey, look at his backside... He's covered in strong armor all over, but his tail's exposed! After he throws that ball, do you think you could get behind him and whack his tail over and over?'' -After he throws the ball the first time |
||
| + | *''That's the way! Go for him after he throws that ball!'' -Remainder of battle |
||
| ⚫ | |||
| − | == |
+ | ==Trivia== |
| + | *The Darkhammer resembles the [[Darknut]] miniboss within the [[Temple of Time (Dungeon)|Temple of Time]], not only by the "Dark" prefix, but also because of its heavy armor suit and large weapon of choice. It's Japanese name ends with {{Japanese|ナック|Nakku}}, same as Darknuts and [[Iron Knuckle]]s, also implying a relationship to both enemies. |
||
| − | {{Main|Oxygen Gauge}} |
||
| + | *The Darkhammer also resembles [[Doomknocker]], a bulky armored knight from ''[[Zelda II: The Adventure of Link|The Adventure of Link]]'' who fights with a flying spiked club. |
||
| − | In both ''[[The Legend of Zelda: Ocarina of Time|Ocarina of Time]]'' and ''[[The Legend of Zelda: Majora's Mask|Majora's Mask]]'', '''oxygen''' is measured according to Link's life meter. When he is exposed for too long underwater, or enters a very hot environment, a timer appears. Before it runs out, the young hero must either rise to surface or exit from the hot area, depending on the area; otherwise, he will die. How long the time will be depends on the current life meter (not only the maximum capacity, but also the current amount of hearts). For every eighth of a heart Link has, he will have one second on the timer. For example, if he enters [[Death Mountain Crater]] with a three-heart meter unharmed, then he will have 24 seconds to exit from there. The timer remains unaffected by the [[Enhanced Defense]] upgrade. |
||
| + | *As stated above, the Darkhammer resembles the [[Ball and Chain Soldier]], which is a recurring enemy in [[The Legend of Zelda (Series)|''The Legend of Zelda'' series]]. |
||
| − | |||
| + | *Similar to the [[Iron Knuckle]], the Darkhammer stands lifelessly when Link finds it. It then comes to life when Link attempts to exit the room. |
||
| − | === As a Gesture of Gratitude or Love === |
||
| + | *The Darkhammer is the only Miniboss to be defeated in a single hit with the [[Mortal Draw]]. [[Ook]], [[Dangoro]], and the [[Deku Toad]] are all fought before the Mortal Draw can be learned, while the [[Death Sword]], Temple of Time [[Darknut]], [[Aeralfos]], and [[Phantom Zant]] take strangely minor damage from the attack. |
||
| − | One humorous moment in ''[[The Legend of Zelda: Twilight Princess|Twilight Princess]]'' occurs when Link defeats the boss of the Snowpeak Ruins, [[Blizzeta]], who is actually [[Yeta]], the wife of [[Yeto]]. After she is restored, Yeto rushes to Yeta's side and the pair share a romantic moment. At this point, forty recovery hearts burst from the pair, as well as a [[Heart Container]]. They also appear near [[Honey and Darling]] in ''[[The Legend of Zelda: Majora's Mask|Majora's Mask]]'', although Link is unable to collect these Hearts. |
||
| − | |||
| − | Another moment occurs in ''[[The Legend Of Zelda: Ocarina Of Time|Ocarina of Time]]'': as Link and Zelda reach specific floors in [[Ganon's Castle]], Zelda becomes trapped in a ring of fire and two [[Stalfos]] appear. The only way to free Zelda is to defeat both foes; once this occurs, she thanks Link and drops a few Recovery Hearts. |
||
| − | |||
| ⚫ | |||
==Gallery== |
==Gallery== |
||
<gallery> |
<gallery> |
||
| + | File:TPDarkhammerConcept1.jpg|Concept art of Darkhammer from [[Hyrule Historia]] |
||
| − | File:RecoveryHeart.png|Recovery Heart Sprite from ''[[The Legend of Zelda (Game)|The Legend of Zelda]]'' |
||
| + | File:TPDarkhammerConcept2.jpg|Concept art of Darkhammer from [[Hyrule Historia]] |
||
| − | File:RecoveryHeartArtwork.png|Recovery Heart Artwork from ''[[The Legend of Zelda (Game)|The Legend of Zelda]]'' |
||
| − | File:Recovery Heart Sprite LttP.gif|Recovery Heart Sprite from ''[[The Legend of Zelda: A Link to the Past|A Link to the Past]]'' |
||
| − | File:Recovery Heart MC.gif|Recovery Heart Sprite from ''[[The Legend of Zelda: The Minish Cap|The Minish Cap]]'' |
||
| ⚫ | |||
| − | File:Hearts SS.png|Recovery Hearts from ''[[The Legend of Zelda: Skyward Sword|Skyward Sword]]'' |
||
</gallery> |
</gallery> |
||
| + | |||
<br> |
<br> |
||
{{Names |
{{Names |
||
|English= |
|English= |
||
| + | |Japanese= {{Japanese|ハンマーナック|Hanmānakku|Hammerknuckle}} |
||
| − | |Japanese= |
||
| − | |Spanish= |
+ | |Spanish= |
|Spanish(LA)= |
|Spanish(LA)= |
||
|Spanish(SP)= |
|Spanish(SP)= |
||
| − | |French= |
+ | |French= |
| − | |French(CA)= |
+ | |French(CA)= |
| − | |French(FR)= |
+ | |French(FR)= {{Exp|Hammerman|Marteleur}} |
| − | |German= |
+ | |German= Armoralfos |
|Italian= }} |
|Italian= }} |
||
| + | {{KnightEnemy}} |
||
| − | [[Category:Health Restoring Items]] |
||
| + | [[Category:Mini-Bosses]] |
||
| − | {{Pickups}} |
||
| + | {{de}} |
||
Revision as of 15:07, 20 August 2012
Template:Boss The Darkhammer is the mini-boss of the Snowpeak Ruins in Twilight Princess. When defeated, the creature drops the Ball and Chain (not in a Treasure Chest), an item usable by Link. Following that, Link may proceed to open a chest Yeta thinks contains the Big Key, but really has Ordon Goat Cheese.
This is likely to be a reference to A Link to the Past, in which Princess Zelda, imprisoned in a cell in the dungeon of Hyrule Castle, is guarded by a knight wielding a ball and chain. Upon defeating the knight, Link receives the Big Key.
Darkhammer has a somewhat reptilian appearance, particularly with his tail, and is possibly a relative of Lizalfos. Hyrule Historia concept art appears to back up this theory.
Strategy
Link fighting Darkhammer (Nintendo Gamecube version)
Darkhammer will continuously guard his body with his massive Ball and Chain. In order to defeat him, Link must use one of four strategies. The first is to Clawshot a target behind him as soon as he motions to throw his weapon. He will then pause to pull in his weapon, giving Link the opportunity to slash at his exposed tail. The second is a quicker, but much riskier way. Link waits until a split second before his weapon lands, and then rolls behind him, swinging Link's sword at his tail. The third technique is to instantly kill him by using Mortal Draw on his tail. However, the timing required makes it tricky to perform. A fourth is to simply run behind while he swings his weapon over his head, and slash his tail repeatedly. The blows will stun him and keep him from attacking.
Midna's hints
- Doesn't he know how dangerous that is, swinging a big metal ball around in such a small place? It's too dangerous to get close to him, so let's use the ceiling to get over to his other side! -At the beginning of the battle
- Hey, look at his backside... He's covered in strong armor all over, but his tail's exposed! After he throws that ball, do you think you could get behind him and whack his tail over and over? -After he throws the ball the first time
- That's the way! Go for him after he throws that ball! -Remainder of battle
Trivia
- The Darkhammer resembles the Darknut miniboss within the Temple of Time, not only by the "Dark" prefix, but also because of its heavy armor suit and large weapon of choice. It's Japanese name ends with Template:Japanese, same as Darknuts and Iron Knuckles, also implying a relationship to both enemies.
- The Darkhammer also resembles Doomknocker, a bulky armored knight from The Adventure of Link who fights with a flying spiked club.
- As stated above, the Darkhammer resembles the Ball and Chain Soldier, which is a recurring enemy in The Legend of Zelda series.
- Similar to the Iron Knuckle, the Darkhammer stands lifelessly when Link finds it. It then comes to life when Link attempts to exit the room.
- The Darkhammer is the only Miniboss to be defeated in a single hit with the Mortal Draw. Ook, Dangoro, and the Deku Toad are all fought before the Mortal Draw can be learned, while the Death Sword, Temple of Time Darknut, Aeralfos, and Phantom Zant take strangely minor damage from the attack.
Gallery
- TPDarkhammerConcept1.jpg
Concept art of Darkhammer from Hyrule Historia
- TPDarkhammerConcept2.jpg
Concept art of Darkhammer from Hyrule Historia
| Language | Name | |
|---|---|---|
Template:KnightEnemy