PhantomCaleb (talk | contribs) m (Text replace - "Category:(.*) in Zelda II:" to "Category:\1 in") |
PhantomCaleb (talk | contribs) m (Text replace - "[[Ball & Chain Trooper" to "[[Ball and Chain Soldier") |
||
| Line 1: | Line 1: | ||
| − | {{UpdateHH}} |
||
{{Place |
{{Place |
||
| − | |name = |
+ | |name = Chambers of Insight |
| − | |image = [[File: |
+ | |image = [[File:Chambers of Insight.png]] |
| − | |caption = |
+ | |caption = The Chambers of Insight from the overworld |
| + | |game = ''[[The Legend of Zelda: Four Swords|Four Swords]]'' |
||
| − | |game = ''[[The Legend of Zelda (Game)|The Legend of Zelda]]''<br> ''[[Zelda II: The Adventure of Link|The Adventure of Link]]''<br> ''[[The Legend of Zelda: A Link to the Past |A Link to the Past]]''<br> ''[[The Legend of Zelda: Ocarina of Time |Ocarina of Time]]''<br> ''[[The Legend of Zelda: The Wind Waker |The Wind Waker]]''<br> ''[[The Legend of Zelda: Four Swords |Four Swords]]''<br> ''[[The Legend of Zelda: Four Swords Adventures |Four Swords Adventures]]''<br> ''[[The Legend of Zelda: The Minish Cap |The Minish Cap]]''<br> ''[[The Legend of Zelda: Twilight Princess |Twilight Princess]]''<br> ''[[The Legend of Zelda: Spirit Tracks|Spirit Tracks]]''<br>''[[The Legend of Zelda: Skyward Sword|Skyward Sword]]'' |
||
| + | |other = |
||
| − | |inhab = [[Ancient Robot]]s<br>[[Anouki]]<br>[[Deku]]<br>[[Fairy|Fairies]]<br>[[Gerudo]]<br>[[Goron]]s<br>[[Human]]s<br>[[Hylian]]s<br>[[Kikwi]]s<br>[[Kokiri]]<br>[[Lokomo]]<br>[[Minish]]<br>[[Mogma]]s<br>[[Oocca]]<br>[[Parella]]<br>[[Sheikah]]<br>[[Wind Tribe]]<br>[[Zora]]s<br>[[Zuna]]<br> |
||
| + | |inhab = [[Stray Fairy|Stray Fairies]] |
||
| − | |items = |
||
| − | | |
+ | |items = [[Bomb]]s<br>[[Boomerang]]<br>[[Gnat Hat]]<br>[[Magnetic Glove]]<br>[[Roc's Feather#Roc's Cape|Roc's Cape]]<br>[[Shield]] |
| + | |related = |
||
| − | |||
| + | |theme music = |
||
| − | '''Hyrule''' (Pronounced {{IPA|ˈhаɪ ruːl}}, {{Respell|HIGH|r'''oo'''l}}), once known only as the '''Surface''', is the name of the magical kingdom that serves as the iconic setting for a majority of the games in the ''Zelda'' series. It is usually depicted as a beautiful and prosperous land blessed with deep forests, tall mountains, vast lakes, a barren desert, great cities, villages, and many ancient temples hidden throughout.<ref>{{cite|Long ago, there existed a kingdom where a golden power lay hidden. It was a prosperous land blessed with green forests, tall mountains, and peace.|Introduction|The Wind Waker}}</ref><ref>{{cite|In the kingdom of Hyrule there is a great castle, and around it is Castle Town, a community far bigger than our little village. ...And far bigger than Hyrule is the rest of the world the gods created.|Rusl|Twilight Princess}}</ref><ref>{{cite|It was another world entirely... The antithesis of Hyrule, where the sun shines bright.|Midna|Twilight Princess}}</ref><ref>{{cite|Long ago, in the beautiful kingdom of Hyrule surrounded by mountains and forests... legends told of an omnipotent and omniscient Golden Power that resided in a hidden land.|Introduction|A Link to the Past}}</ref><ref>{{cite manual|quote=Hyrule is a land rich in beauty.|game=Ocarina of Time|page=7}}</ref> |
||
| − | |||
| − | Once ruled by the goddess [[Hylia]] as an unnamed land in ancient times, it became established as the Kingdom of Hyrule by the descendants of her [[Princess Zelda#Skyward Sword|mortal incarnation]], the sacred bloodline that would go on to become known as the [[Royal Family of Hyrule]]. At the northern centre of Hyrule is seated [[Hyrule Castle]], where the family reside, and a [[Hyrule Castle Town|bustling town]] surrounded by a stonewall, populated mostly by the [[Hylian]]s and a variety of shops. To the west of the kingdom can often be seen a desert, forests to the south and south-east and a mountain range to the east and north-east. |
||
| − | |||
| − | The kingdom has its own long and unique [[Zelda Timeline#Chronology of the Legend of Zelda Series|history]] with many wars and conflicts over the [[Triforce]], deities, legendary relics, historical heroes and villains.<ref>{{cite|When all was chaos, the goddesses descended and gave order and life to the world. They granted power equally to all who dwelt in the light, and then returned to the heavens.|Lanayru|Twilight Princess}}</ref><ref name=gdtoot>{{cite|Before time began, before spirits and life existed... Three golden goddesses descended upon the chaos that was Hyrule... Din, the goddess of power... Nayru, the goddess of wisdom... Farore, the goddess of courage... Din... With her strong flaming arms, she cultivated the land and created the red earth. Nayru... Poured her wisdom onto the earth and gave the spirit of law to the world. Farore... With her rich soul, produced all life forms who would uphold the law.|Great Deku Tree|Ocarina of Time}}</ref> It is connected to a variety of different realms via magical artifacts and portals, including but not limited to the [[Sacred Realm]], the [[Twilight Realm]], and its own parallel world, [[Termina]]. The story of the Sacred Realm and the Triforce would shape Hyrule's future in the centuries that followed its establishment, becoming the basis of its providence.<ref name=gdt>{{cite|The three great goddesses, their labors completed, departed for the heavens. And golden sacred triangles remained at the point where the goddesses left the world. Since then, the sacred triangles have become the basis of our world's providence. And, the resting place of the triangles has become the Sacred Realm.|Great Deku Tree|Ocarina of Time}}</ref> It is also home to a multitude of different races and tribes, each inhabiting a different part of the country and sometimes protecting its legendary relics and guarding its temples.<ref>{{cite manual|quote=In addition to the Hylians, many diverse groups of people dwell in this country.|game=Ocarina of Time|page=7}}</ref> |
||
| − | |||
| − | After the birth of the [[Gerudo]] thief from the western desert, [[Ganon|Ganondorf]], who wishes to conquer the kingdom for himself using the Triforce's tremendous power,<ref name=zeldaoot>{{cite|What Ganondorf is after must be nothing less than the Triforce of the Sacred Realm. He must have come to Hyrule to obtain it! And, he wants to conquer Hyrule... no, the entire world!|Princess Zelda|Ocarina of Time}}</ref> a [[Link|young hero]] clad in a green tunic and armed with the legendary [[Master Sword]] will often rise up to save the land from destruction and defeat him. The hero is often assisted in this effort by the kingdom's young princesses, traditionally named [[Princess Zelda|Zelda]]. This would become a repeated history that would doom Hyrule on several occasions, one account resulting in its destruction by the [[Great Flood]]. Following the flood, it was succeeded by a new kingdom named after it. |
||
| − | |||
| − | {{OTOC}} |
||
| − | {{clear|left}} |
||
| − | ==Appearances by Game== |
||
| − | {{main|Hyrule/Appearances by Game}} |
||
| − | Hyrule has appeared multiple times throughout the series as the setting for most installments in one form or another. Starting with the original ''The Legend of Zelda'' and extending to even the most recent installment in the series, ''[[The Legend of Zelda: Skyward Sword|Skyward Sword]]''<ref>{{cite web|quote=Even something as simple as the aiming, which is handled not necessarily with a pointer but by moving your hand around, just like you would aim an item in real life, will make it that much easier for you to feel like you're in that world of Hyrule and experiencing the adventure that Link is, because you're so connected to what's going on.|url=http://www.joystiq.com/2010/06/16/interview-nintendos-shigeru-miyamoto-on-3ds-retro-zelda-and/|title=joystiq's Interview with Shigeru Miyamoto|site=joystiq.com}}</ref><ref>{{cite web|quote=Aonuma says that the scene which concludes the trailer, in which Link leaps off a cliff into a sea of clouds, is an important story point. Instead of being raised in a village on the ground, he's been brought up in a town called Skyloft, which is a floating island. He's lived his life in the clouds, and has only recently "discovered" the land below, which he finds has been overrun with evil forces. You spend the game going back and forth between these two regions: Skyloft, and the ground below.|url=http://kotaku.com/5564576/live-from-nintendos-e3-briefing|site=kotaku.com}}</ref> |
||
| − | , the land has undergone many great aesthetic and design changes. |
||
| − | |||
| − | ==History== |
||
| − | {{main|Zelda Timeline}} |
||
| − | Hyrule's history is long and storied, beginning with the [[Golden Goddesses]] creating the [[World of The Legend of Zelda|larger world]] that it resides in and spanning three separate timelines. Eternal and constant throughout the history of Hyrule is the presence of a [[Link|hero]] sometimes chosen by the Goddesses themselves to fight the various people and creatures that threaten to destroy or dominate the land. |
||
| − | |||
| − | ===Major Conflicts=== |
||
| − | Several of the wars in Hyrule's history were fought over possession of the Triforce or dominion over the Sacred Realm, others were fought over ownership of the kingdom and its sacred artefacts, or simply desire to destroy it in spite and hatred. Places such as the [[Shadow Temple]] and the [[Arbiter's Grounds]] in [[Gerudo Desert]] serve as evidence and reminders of the kingdom's bloody history of greed and hatred. |
||
| − | |||
| − | * '''[[Zelda Timeline#The Era of Chaos|The Era of Chaos]]''': Shortly before the Kingdom of Hyrule was established, there was an era of chaos with chaotic wars being fought over ownership of the Triforce. The conflict lasted long enough to be considered an era of its own, but was put to an end when the ancient sage [[Rauru]] sealed the sacred relic within the Sacred Realm and built the [[Temple of Time]] around its only entrance: the former location of the [[Sealed Temple]]. With the chaotic era at an end, the land entered an [[Zelda Timeline#The Era of Prosperity|era of prosperity]] and Hyrule was established by the descendants of the goddess Hylia, who once herself ruled over the land. This conflict took place many years after the events of ''Skyward Sword'' and before the the War of the Bound Chest. |
||
| − | * '''[[War of the Bound Chest]]''': During the early development of Hyrule as a kingdom, the [[Hero of Men]] fought many evil creatures during ancient times using the [[Picori Blade]] and the [[Light Force]] given to him by the [[Picori]]. He sealed the evil monsters inside of the Bound Chest using the blade and the force. The Picori Blade was enshrined by the Royal Family of Hyrule and the Light Force was sealed within Hyrule's [[Princess Zelda#War of the Bound Chest Princess|princess]] at the time. An annual [[Picori Festival|festival]] would be held in Hyrule in response to the events of the war. It took place hundreds of years before the events of ''The Minish Cap''. |
||
| − | * '''[[Hyrulean Civil War]]''': This war was begun for unknown reasons, but it was said according to the [[Great Deku Tree]] to be a horrific and prolonged war that resulted in the unification of the country under the banner of the Royal Family. Towards the end of the war, Link's mother was badly injured, but managed to reach the forbidden [[Kokiri Forest]], where she entrusted her baby, the future [[Link#Ocarina of Time|Hero of Time]], in the care of the Great Deku Tree before passing away. |
||
| − | [[File:War before Imprisoning War.jpg|right|thumb|The Knights of Hyrule fight]] |
||
| − | * '''[[Imprisoning War]]''': When word of the Sacred Realm, the hidden location of the Triforce, broke out, lustful people took up war and began to enter it, evil began pouring fourth from the entrance. The [[Knights of Hyrule]] were nearly wiped out during the ensuing conflict, but the [[Sage|Seven Sages]], at the command of the [[King of Hyrule]], were able to seal the entrance to the [[Sacred Realm]], which had previously been transformed into the [[Dark World]], when Ganondorf entered it and obtained the Triforce of Power from the [[Temple of Light]]. It took place years after the [[Zelda Timeline#Decline Timeline|Decline Timeline]] ending of ''Ocarina of Time'' and an unknown period of time before ''A Link to the Past''. |
||
| − | [[File:War for the Triforce.png|thumb|left|Official art of the Imprisoning War, depicting the knights fighting.]] |
||
| − | * '''[[Interloper War]]''': When the [[Dark Interlopers]] attempted to seize control of the Sacred Realm and claim the Triforce for themselves, the [[Light Spirits]] intervened and sealed them away in the Twilight Realm, outside of which they could only exist as shadows. It took place some time before the events of ''Twilight Princess''. |
||
| − | * '''[[Zant's Invasion of Hyrule]]''': Hyrule was invaded by an evil [[Twili]] named [[Zant]], who seized control of the Twilight Realm and covered Hyrule in [[Twilight]] on the order of his dark master, Ganondorf, who returned to haunt Hyrule once following his failed execution in the Arbiter's Grounds. It took place hundreds of years after the [[Zelda Timeline#The Child Timeline|Child Timeline]] ending of ''Ocarina of Time'' and the events of ''[[The Legend of Zelda: Majora's Mask|Majora's Mask]]'', an unknown amount of time after the Interloper War, and during the events of ''Twilight Princess''. |
||
| − | * '''[[Great Flood]]''': Hyrule was invaded once again by Ganondorf, who broke out of his seal in the Sacred Realm, and was subsequently buried beneath a deluge of rainwater by the Golden Goddesses in an attempt to stop him dominating the kingdom when the Hero of Time failed to appear once more. The Goddesses instructed those chosen to move to the kingdom's mountaintops that would become the islands of the [[Great Sea]]. It took place many years after the [[Zelda Timeline#Adult Timeline|Adult Timeline]] ending of ''Ocarina of Time'' and centuries before the events of ''The Wind Waker''. |
||
| − | *'''[[Spirit War]]''': Long before the events of ''Spirit Tracks'', war broke out between the [[Spirits of Good]] and the Demon King [[Malladus]]. This resulted in the Demon King being imprisoned beneath the earth by the [[Spirit Tracks (Rails)|Spirit Tracks]] and the [[Tower of Spirits]]. Wearied from the war, the Spirits of Good entrusted the land to [[Tetra]] and the other Hyrulean settlers before returning to the heavens. The new kingdom of Hyrule was re-established in this land many years after the Great Flood that destroyed the original Hyrule in the Adult Timeline. |
||
| − | |||
| − | ===Theology=== |
||
| − | [[File:Goddesses.jpg|thumb|right|200px|A Hylian manuscript of the Golden Goddesses and the creation of Hyrule and the Triforce.]] |
||
| − | Hyrule is known to be a polytheistic society, and the greatest of the deities worshiped by the Hyruleans are the three [[Golden Goddesses]]: [[Din (Goddess)|Din]] the Goddess of Power, [[Nayru (Goddess)|Nayru]] the Goddess of Wisdom, and [[Farore (Goddess)|Farore]] the Goddess of Courage. These three goddesses are the most highly-revered of all deities throughout the entire realm of Hyrule, as they were responsible for the creation of Hyrule and all who live in it. The people have also been known to worship the essences of these goddesses, which live within the almighty relic the goddesses created, the mythical [[Triforce]]. The goddesses have answered the prayers of the people at dark times of Hyrule's history, such as drowning Hyrule beneath the [[Great Flood]] to save its people from destruction at Ganon's hands and sending the [[Light Spirits]] to imprison the [[Dark Interlopers]] within the confines of the [[Twilight Realm]] to save Hyrule's people from their wicked reign. |
||
| − | |||
| − | The Golden Goddesses are not the only deities worshiped. The [[Zora]]s worship their patron deity, the great fish [[Lord Jabu-Jabu]], going so far as to accord him a special place of honor in their society.<ref>{{cite|Lord Jabu-Jabu is the patron deity of the Zoras.|Zora|Ocarina of Time}}</ref> They are also known to use the [[Water Temple]] to worship water spirits.<ref>{{cite|At the lake bottom there is a Water Temple used to worship the water spirits. The Zoras are guardians of the temple.|Kaepora Gaebora|Ocarina of Time}}</ref> The [[Kokiri]] pay homage to the great forest spirit known as the [[Great Deku Tree]] and hold him in the highest regard as both their father and protector.<ref>{{cite|The Great Deku Tree is our father, the forest guardian, and he gave life to all of us Kokiri!|Kokiri girl|Ocarina of Time}}</ref> The [[Gerudo]] are known to worship the mysterious [[Goddess of the Sand]], to whom they dedicated the construction of the [[Spirit Temple]].<ref>{{cite|One inside a goddess of the sand...|Sheik|Ocarina of Time}}</ref><ref>{{cite|I once heard a mysterious bird say..."Go, young man. Go to the Desert Goddess with an ocarina."|Saria|Ocarina of Time}}</ref> There have also been other deities, such as the aforementioned Light Spirits, that are also worshiped by the people as the guardian deities of their respective provinces. |
||
| − | |||
| − | [[File:TempleofTime.jpg|thumb|left|The Temple of Time|150px]] |
||
| − | Several houses of worship and temples exist in Hyrulean society. Hyrule has been known to have temples dedicated to each of several different elements, each with a caretaker [[Sage]] that is guardian of the temple.<ref>{{cite|When evil rules all, an awakening voice from the Sacred Realm will call those destined to be Sages, who dwell in the five temples.|Sheik|Ocarina of Time}}</ref> The most well known of these Sages are the Seven Sages: [[Rauru]] in the [[Temple of Light]] at the heart of the [[Sacred Realm]], [[Saria]] in the [[Forest Temple (Ocarina of Time)|Forest Temple]] deep within the [[Lost Woods]], [[Darunia]] in the [[Fire Temple (Ocarina of Time)|Fire Temple]] on Death Mountain, [[Princess Ruto|Ruto]] in the [[Water Temple]] deep beneath Lake Hylia, [[Impa]] in the [[Shadow Temple]] residing in the graveyard in the shadow of Death Mountain, [[Nabooru]] in the [[Spirit Temple]] far across the desert in the [[Desert Colossus]], and [[Princess Zelda]] in the [[Temple of Time]]. The Temple of Time's architecture also draws from Gothic cathedral architecture, and acts as the primary gateway to the Sacred Realm. The [[Earth Temple (The Wind Waker)|Earth Temple]] and the [[Wind Temple]] house the Sages whose prayers power the [[Master Sword]] and grant it the [[Power to Repel Evil]].<ref>{{cite|The fact that the Master Sword lost the power to repel evil suggests to me that something has happened to the sages who |
||
| − | infused the blade with the gods' power. The sages should be here in Hyrule...in the Wind Temple to the north and the Earth Temple to the south, praying to the gods.|King of Red Lions|The Wind Waker}}</ref> |
||
| − | |||
| − | Several towns in ''[[Zelda II: The Adventure of Link|The Adventure of Link]]'' have churches, and a lone priest that resides at the [[Sanctuary]] in ''[[The Legend of Zelda: A Link to the Past|A Link to the Past]]'' helped smuggle Zelda out of Agahnim's clutches. [[Renado]] is the village shaman of [[Kakariko Village]] in ''[[The Legend of Zelda: Twilight Princess|Twilight Princess]]'' and the unofficial leader of the village. These figures, alongside the Sages, act as chief members of Hyrule's theological sphere. |
||
| − | {{clear}} |
||
| − | |||
| − | ==Governance== |
||
| − | {{main|Royal Family of Hyrule}} |
||
| − | {{ImageCaption |
||
| − | |image = File:Crest of Hyrule.png |
||
| − | |size = 160px |
||
| − | |align = right |
||
| − | |caption = The crest of the Hyrulean Royal Family. |
||
| − | |captionalign = center |
||
}} |
}} |
||
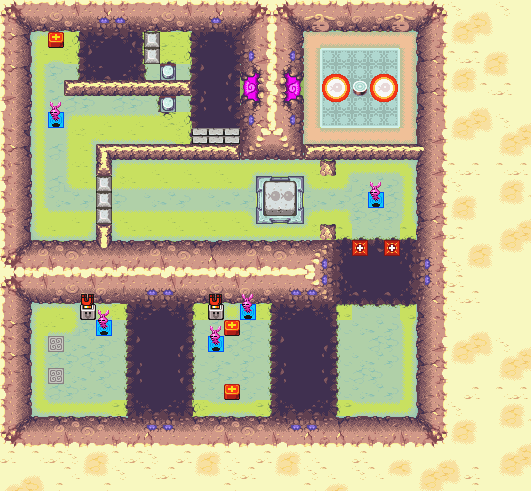
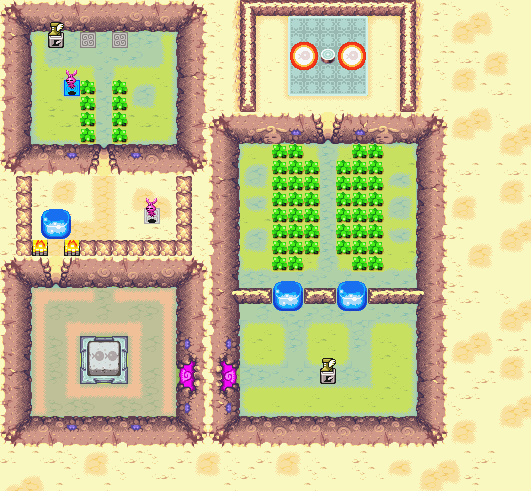
| + | '''Chambers of Insight''' is a practice stage in ''[[The Legend of Zelda: Four Swords|Four Swords]]''. The stage features various areas to practice with the game's many items as well as earn the different techniques that will be needed to complete each level and to defeat certain enemies. Throughout the stage are [[Stray Fairy|Stray Fairies]] that will give the [[Links]] tips on how to complete their adventure.<ref>{{cite|Welcome to our cave, young heroes! You will find many traps and puzzles in the areas ahead. We will give you advice that will aid you on your quest. Do not fail to heed it.|Stray Fairy|FS}}</ref> All of the Links must stand on the warp zones to be transported to the training area they wish to go to.<ref>{{cite|When each of you stands on a red warp zone, all will be transported to another floor, where you will learn about many items. Begin by standing on the warp zones ahead.|Stray Fairy|FS}}</ref> In the middle of the chamber is a test that the Links can take to prove the skills they have learned.<ref>{{cite|Have you learned much? If so, you should be ready for the test below.|Stray Fairy|FS}}</ref> The mini-boss that must be defeated at the end is an Ice [[Wizzrobe]]. |
||
| − | Hyrule's form of government has remained relatively consistent throughout its history, with an ancient monarchy, the Royal Family of Hyrule, ruling over the lower-caste citizens of the kingdom from Hyrule's capital city, [[Hyrule Castle Town]]. The Royal Family itself rules from the seat of government in the land of Hyrule, [[Hyrule Castle]], the namesake of the capital. The government is typically headed by the [[King of Hyrule]], and his heir in most depictions of Hyrule is his daughter or descendant, [[Princess Zelda]]. In some cases, Zelda herself has ruled over the land as matriarch of the Royal Family as well, such as during the Twili invasion of Hyrule. Hyrule is typically divided into various provinces and most of the various races pledge their allegiance to the central government headed by the Royal Family. Each race has its own local government and the individual tribal leaders, but all races pledge their overall allegiance to the Royal Family as kingdom of Hyrule citizens . |
||
| + | The Chambers of Insight can be exited at any time by standing on the warp zones in the southern portion.<ref>{{cite| The one below will take you back to the map.|Stray Fairy|FS}}</ref> |
||
| − | Hyrule has faced many coups throughout its history, but ultimately the Royal Family is usually restored to power through the efforts of Hyrule's hero, Link. |
||
| − | {{clear}} |
||
| − | == |
+ | ==Overview== |
| + | [[File:Chambers of Insight Map.png|right|250px||A map of the main chamber|thumb]] |
||
| − | {{main|Soldier}} |
||
| + | ===First Warp Zone=== |
||
| − | [[File:Hylianguard.png|right|100px]] |
||
| + | [[File:Chambers_of_Insight_Map-1.png|right|250px||The first warp zone|thumb]] |
||
| − | The Hyrulean [[Soldier]]s make up the bulk of Hyrule's military forces. |
||
| + | The First Warp Zone of the Chambers of Insight teaches the Links about the basic techniques of gameplay, such as gathering [[Rupee]]s and pressing switches to open doors. |
||
| − | Despite their duty to protect the peace, the guards have a poor reputation and a tendency towards cowardice,<ref>{{cite|And here I was, thinking Hyrule was empty of men of valor...|Ashei|Twilight Princess}}</ref> they will shrink in fear whenever [[Wolf Link]] passes by them. The guards have been unsuccessful in defending Hyrule in more recent games, falling to the army led by Ganondorf in ''Ocarina of Time'' as well as being overpowered by the forces of twilight led by [[Zant]]. Due to their minor inefficiencies, they often are unable to prevent [[Stealth Missions|infiltration]] of even Hyrule Castle. However, they have not always been cowardly; they have valiantly defended Princess Zelda from Zant's forces even as the Throne Room of Hyrule Castle underwent the twilight invasion of ''Twilight Princess''; and while trying to prevent [[Vaati]] from blasting open the Bound Chest in ''The Minish Cap''. |
||
| + | ====Techniques Learned==== |
||
| − | {{Image |
||
| + | *[[File:Rupee 5.gif]] The [[Rupee]]s gathered are pooled in a single wallet.<ref>{{cite|The lovely jewel you have found is a Rupee. Your Rupees are counted in the bottom-right corner of your screen. The Rupees each of you gather are pooled in a single wallet for all.|Stray Fairy|FS}}</ref> |
||
| − | |image=BlueKnight.png |
||
| + | **If a Link dies, he can be revived for 50 Rupees, although the cost will increase each time a Link fails.<ref>{{cite|If one of you fails in your quest, he can be revived for 50 Rupees. But the cost for revival will increase each time on of you fails...|Stray Fairy|FS}}</ref> |
||
| − | |type= caption |
||
| + | **The Link that gathers the most Rupees will be acknowledged as the greatest hero by the Stray Fairies.<ref>{{cite|And while there is one wallet, your individual efforts are being watched by us fairies. And your efforts shall certainly be rewarded. He who gathers the most Rupees will be acknowledged as the greatest hero.|Stray Fairy|FS}}</ref> |
||
| − | |align=left |
||
| + | *The three different types of Mystical Seeds: [[Armor Seed]], [[Razor Seed]], [[Pegasus Seed]].<ref>{{cite|The mystical seeds you see will increase your power by two levels. Razor Seeds increase sword power. Armor Seeds increase defense. Pegasus Seeds increase speed.|Stray Fairy|FS}}</ref> |
||
| − | |caption=A Knight of Hyrule |
||
| + | **[[File:Armor Seed FS.gif]] Armor Seeds increase defense. |
||
| − | }} |
||
| + | **[[File:Razor Seed FS.gif]] Razor Seeds increase offense. |
||
| − | However, these guards were also very wary of when evil took over their kingdom. When Vaati impersonated King [[Daltus]], the guards who dissented were turned to stone.<ref>{{cite|He's taken over the castle! One by one, he turned us all to stone. Everyone, cursed by his evil magic...|Guard|The Minish Cap}}</ref> When the guards would not follow an evil ruler, they were brainwashed into doing so.<ref>{{cite|After Agahnim took over, everyone began to act strangely. I suppose it's only a matter of time before I'm affected, too.|Guard|A Link to the Past}}</ref> In ''A Link to the Past'', the dark wizard Agahnim took over the country through much cunning and deceit; one of the first things he did was take over Hyrule's military force using his powerful magic. The guards are shown to be freed of this spell when Link destroys Agahnim and returns the Royal Family to power. Although the guards are mostly concentrated in the Hyrulean capital city Hyrule Castle Town, they are seen spread out all across the kingdom as well. |
||
| + | **[[File:Pegasus Seed FS.gif]] Pegasus Seeds increase speed. |
||
| + | *A [[switch]] must be pressed by a Link to move traps or stones.<ref>{{cite|The [switches] that you see on the ground are switches. Step on the switches to move traps and stones. A switch only operates while one of you standing on it.|Stray Fairy|FS}}</ref> |
||
| + | *Blocks can be moved by pressing the Control Pad in the direction the Links wish to move the block.<ref>{{cite|There are some blocks you can push. If you see a conspicuous block, press [the control pad] in the direction you want to push the block.|Stray Fairy|FS}}</ref> |
||
| + | **Big blocks can only be moved when everyone cooperates.<ref>{{cite|Everyone will have to cooperate to push big blocks.|Stray Fairy|FS}}</ref> |
||
| + | *[[File:Rupee Shard.gif]] When four [[Rupee Shard]]s are collected, they combine to form a giant Rupee worth 500 Rupees.<ref>{{cite|The yellow Rupees that sometimes appear after you open a chest or defeat an enemy are Rupee Shards. If you collect four of them, they combine to form a giant Rupee worth a total of 500 Rupees.|Stray Fairy|FS}}</ref> |
||
| + | *Torches can be lit up when two Links strike their swords together.<ref>{{cite|If you strike your swords together, sparks will fly! Try this in places where you want to light a fire.|Stray Fairy|FS}}</ref> |
||
| + | *Doors can sometimes open if all Links step on switches at the same time. If there are not enough people, statues can be placed on the remaining switches.<ref>{{cite|If you all step on switches at the same time, a nearby device will move. If you do not have enough people, try placing statues in switches.|Stray Fairy|FS}}</ref> |
||
| + | **Some switches will require that all Links step on them to successfully press them down.<ref>{{cite|Some switches are too strong for one person to press them down. All will need to step on these.|Stray Fairy|FS}}</ref> |
||
| + | *Locked blocks can be opened with a [[Small Key]].<ref>{{cite|If you have a Small Key, you can use it to get past locked blocks.|Stray Fairy|FS}}</ref> |
||
| + | *Once the Links enter deep water, they can only climb out of it by going into nearby shallow water.<ref>{{cite|You will find areas of shallow and deep water. Once you enter deep water, you can only climb out of it into nearby shallow water areas.|Stray Fairy|FS}}</ref> |
||
| + | **In deep water, the Links can press A to swim and B to dive.<ref>{{cite|When swimming in deep water, press A to swim and B to dive.|Stray Fairy|FS}}</ref> |
||
| + | *Link can swim against currents but not rapids.<ref>{{cite|You will also find currents and rapids in the water. If you exert some effort, you can swim against currents, but you'll never get past rapids.|Stray Fairy|FS}}</ref> |
||
| + | *Striking their [[sword]]s against cracked walls can cause them to break down.<ref>{{cite|If you strike cracked walls with your sword, the walls may break.|Stray Fairy|FS}}</ref> |
||
| + | *Link can trade items by pressing A next to the item pedestal.<ref>{{cite|You can stand in front of an item and press A to trade the item you have for the one before you. But remember...you will find some enemies cannot be defeated without using a Shield.|Stray Fairy|FS}}</ref> |
||
| + | *[[File:Gnathat(FS).gif]]The [[Gnat Hat]] shrinks Link down into the size of a [[wikipedia:gnat|gnat]]. This allows him to go through tiny holes.<ref>{{cite|Then you can go through tiny holes without any trouble at all!|Stray Fairy|FS}}</ref><ref>{{cite|You got the Gnat Hat! Wear it and watch as you become tiny!|N/A|FS}}</ref> |
||
| + | *There are some colored platforms which only the same-colored Link can go through; anyone else will fall through.<ref>{{cite|Only one whose color matches what is seen below can walk here. Anyone else will fall through. It is a very mystical path...|Stray Fairy|FS}}</ref> |
||
| + | **Some colored tiles can only be seen by the same-colored Link, although others that cannot see them can also walk across them.<ref>{{cite|Only one of the same color can see the tiles ahead. But even who can't see them can walk across them.|Stray Fairy|FS}}</ref> |
||
| + | *A special platform moves in the direction of the arrow that the Links stand on. A switch beside the platform recalls it to the beginning.<ref>{{cite|This strange platform moves in the direction of the arrow you stand on. The switch beside you recalls the platform to this spot.|Stray Fairies|FS}}</ref> |
||
| + | *Getting all the balls on the floor into a hole in the wall yields Rupee rewards.<ref>{{cite|If you can get the ball on floor into the hole in the wall, you'll receive a spectacular reward! Are you up to the challenge?|Stray Fairy|FS}}</ref> |
||
| + | *A bonus can be received depending on how fast a dungeon is cleared. The less time it takes, the bigger the Rupee bonus will be.<ref>{{cite|You may receive a bonus depending on how quickly you are able to get to the end of a dungeon. The less time you take, the bigger your bonus.|Stray Fairy|FS}}</ref> |
||
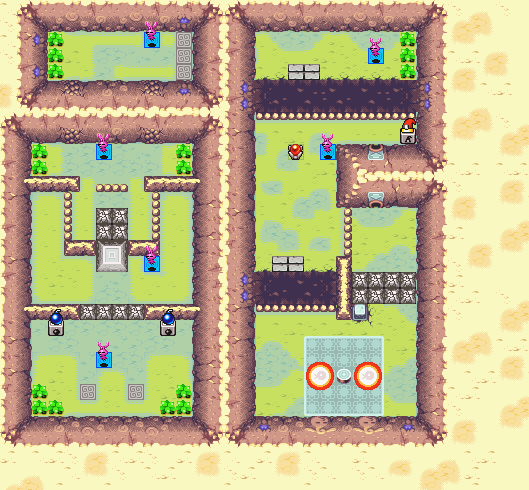
| + | ===Second Warp Zone=== |
||
| − | The more recent interpretations of the guards are vastly different compared to the more noble Knights of Hyrule spoken of in ''A Link to the Past'', who gave their lives almost to the utter last in order to protect the [[Sages|Seven Sages]] as they cast their seal on the Dark World. Whether the Knights of Hyrule have any connection to the present day guards that make up Hyrule's military is unclear, but if the Knights of Hyrule were indeed the forerunners of the present guards, it would mean a vast decline in their efficiency and courage since the times of the Imprisoning War. A similar set of knights also called the "Knights of Hyrule" acted as the guardians of the [[Royal Jewels]] in ''Four Swords Adventures'', and only four existed. Each protecting one of the four jewels that would restore the [[Tower of Winds]] and yield access to the [[Realm of the Heavens]]. Whether these four knights have any connection to the Knights of Hyrule spoken of in the tales of the Imprisoning War is unclear, but both are reputed for their bravery. |
||
| + | [[File:Chambers_of_Insight_Map-2.png|right|190px||The second warp zone|thumb]] |
||
| − | {{clear}} |
||
| + | The Second Warp Zone is much shorter than the first. It teaches how to lift rocks, press big switches, and how to defeat certain enemies, such as [[Nokken]], [[Bob-omb]], and [[Hikkun]]. |
||
| + | ====Techniques Learned==== |
||
| − | ==Economy== |
||
| + | *Rocks, grass, and pats can be lifted by pressing the R Button.<ref>{{cite|Press R when standing before a tuft of grass, a rock, or a pot to lift it.|Stray Fairy|FS}}</ref> |
||
| − | {{ImageCaption |
||
| + | **Big rocks can be lifted by having all Links combine their might.<ref>{{cite|If you all approach one side of a large rock and combine your might, you will be able to lift it over your heads!|Stray Fairy|FS}}</ref> |
||
| − | |image = File:RupeeBlueArtwork.png |
||
| + | **Companions can lift one another to throw them across gaps.<ref>{{cite|You can even lift companions and throw them across gaps.|Stray Fairy|FS}}</ref> |
||
| − | |size = 70px |
||
| + | *[[File:Hikkun.gif]] [[Hikkun]]s are defeated by stunning them first and then having two Links pull from each side of the helmet.<ref>{{cite|There are some monsters you cannot defeat unless you pull them from the left or right. Be wary of such beasts!|Stray Fairy|FS}}</ref> |
||
| − | |align = right |
||
| + | *[[File:Bob-omb(TMC).gif]] [[Bob-omb]]s can be lifted and thrown into fire to defeat them.<ref>{{cite|There are some enemies you can lift over your head and throw. You can even throw them into flames!|Stray Fairy|FS}}</ref> |
||
| − | |caption = A Blue Rupee. |
||
| + | *Levers are pulled by grabbing them with the R Button and then pressing the control pad in the opposite direction.<ref>{{cite|If you press R to grab the lever below, you can press the [control pad] in the opposite direction to pull the lever.|Stray Fairy|FS}}</ref> |
||
| − | |captionalign = center |
||
| + | **Statues can also be pulled using the same technique.<ref>{{cite|You can press R to grab small statues and use the control pad to pull them.|Stray Fairy|FS}}</ref> |
||
| − | }} |
||
| + | *[[File:Nokken.gif]] [[Nokken]]s are left defenseless without their shells when thrown across a room.<ref>{{cite|Some enemies lose their shells when you throw them. Without their shells, they are left defenseless!|Stray Fairy|FS}}</ref> |
||
| − | {{main|Rupee}} |
||
| + | *[[File:Blue Crystal FS.gif]] Blue [[Crystal#Four Swords|Crystals]] must be be picked up from their pedestal and carried them over to another pedestal. Upon doing so, certain devices will activate, such as a door opening to allow access to the next area. If Link drops a crystal and it shatters, he must start over again.<ref>{{cite|Press R to light the shining blue crystals. Then press it again to place them on another pedestal. Doing so will activate certain devices. If you drop a crystal and it shatters, you must do it all over again.|Stray Fairy|FS}}</ref> |
||
| − | Hyrule's official currency is a small jewel-like object known as the Rupee. Several color and size variations are used to denote values. Some, such as green, blue or yellow Rupees are worth less than rarer Rupees as red, purple, orange, silver or gold. Rupees are accepted in almost any establishment throughout the kingdom of Hyrule and are the single most common form of payment in the marketplace of Hyrule's capital city, Hyrule Castle Town. |
||
| − | === |
+ | ===Item Warp Zones=== |
| + | In the northern portion of the chamber are warp zones that teach the Links how to use each of the items appearing in the game. They are also taught how to take advantage of their unique abilities and use them to solve various puzzles. |
||
| − | {{Main|Technology in The Legend of Zelda Universe}} |
||
| − | Hyrule is usually portrayed as a medieval land, though some advancements take place in ''[[The Legend of Zelda: Twilight Princess|Twilight Princess]]'', ''[[The Legend of Zelda: Spirit Tracks|Spirit Tracks]]'' and ''[[The Legend of Zelda: Skyward Sword|Skyward Sword]]'' |
||
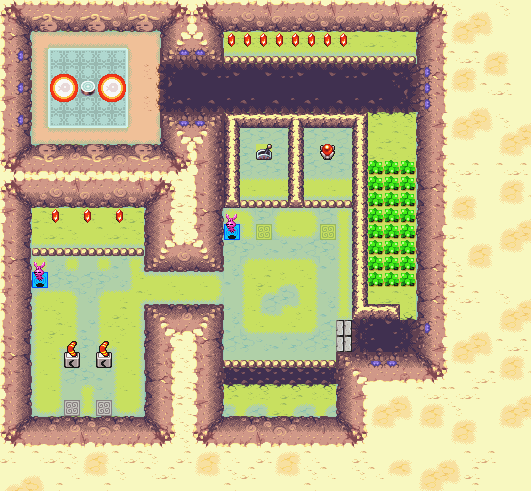
| + | ====[[Magnetic Glove]] Warp Zone==== |
||
| − | ==Geography== |
||
| + | *[[File:Magnet(FS).gif]] Link can pull or repel himself from Magnetic blocks. They are different from other blocks in that they are orange and are marked with a plus (+) sign, indicating their polarity.<ref>{{cite|That is a Magnetic block. With the Magnetic Glove, you can pull yourself to or repel yourself from [them].|Stray Fairy|FS}}</ref> |
||
| − | {{main|Hyrule/Locations and Landmarks}} |
||
| + | **The power of repulsion can be used to cross over gaps.<ref>{{cite|Use the power of repulsion to cross over to the other side.|Stray Fairy|FS}}</ref> |
||
| − | Like many of the other lands depicted in the ''Zelda'' series such as [[Termina]], [[Holodrum]] and [[Labrynna]], Hyrule's geography varies greatly from region to region. In most depictions of Hyrule, the land is shown to be a collection of regions with varying geographies and climates usually linked by a great open expanse of land known as [[Hyrule Field]]. Hyrule Castle Town and by extension Hyrule Castle are usually located near the central part of the country and not far away from Hyrule Field. The other regions of Hyrule as stated before vary greatly in their composition and appearance. For example, the region most associated with the rock-loving [[Goron]]s is the sweltering and rocky [[Death Mountain]], which has little to no vegetation and is for all intents and purposes a large volcano. On the other hand, there are parts of the country covered by deep forests that have a more hospitable climate and atmosphere, where plant-life and vegetation are much more common and provide a means to live for such forest-dwellers as the child-like [[Kokiri]] race. Hyrule is also usually shown to be home to a vast lake usually named [[Lake Hylia]] as well as a watery grotto named [[Zora's Domain]], both being more hospitable and suitable to the aquatic [[Zora]] race. Hyrule is also known to have snowy regions as well, such as the [[Snowpeak]] Mountain Range, which is the preferred home region of the [[Yeti]] race. Finally, Hyrule is also usually shown to be home to a vast desert (usually to the west), more commonly known as the [[Gerudo Desert]] amongst other names, which is home to such desert-dwelling tribes as the [[Gerudo]] or the [[Zuna]]. Taken altogether, Hyrule is shown to be a melting pot of sorts in regards to its geography as it has been shown to possess nearly every kind of climate and terrain. |
||
| + | **It can also be used to pull one of the other Links toward the glove.<ref>{{cite|You can use the Magnetic Glove to pull your companions toward you.|Stray Fairy|FS}}</ref> |
||
| + | *The polarity of the magnet can be changed by pressing the A Button.<ref>{{cite|Press A to switch between [positive] and [negative].|Stray Fairy|FS}}</ref> |
||
| + | *[[File:Hiploop FS.png]] [[Helmasaur]]s cannot be defeated unless the Magnetic Glove is used against them.<ref>{{cite|There are some creatures you cannot defeat unless you use the Magnetic Glove against them. Be wary of these beasts.|Stray Fairy|FS}}</ref> |
||
| + | *The Magnetic Glove can be used to pull companions along even if there is a wall between them. Link can walk even as he draws his companion to him.<ref>{{cite|You can use the Magnetic Glove to pull your companion along if you have a wall between you. You can even walk as you draw them to you.|Stray Fairy|FS}}</ref> |
||
| + | ====[[Roc's Cape]] Warp Zone==== |
||
| − | ==Population== |
||
| + | *[[File:RocCape(FS).gif]] Link can jump with the Roc's Cape by pressing the A Button. Holding the button will make him jump further.<ref>{{cite|Press A to jump with the Roc's Cape. Hold A to jump further!|Stray Fairy|FS}}</ref> |
||
| − | ===Races of Hyrule=== |
||
| + | *Link can jump through special gates or jump down through it.<ref>{{Cite|What you see above is a gate. You can jump through the gate or land on it to jump down through it.|Stray Fairy|FS}}</ref> |
||
| − | {{merge|Hyrulean}} |
||
| − | {{ImageCaption |
||
| − | |image = File:Princess Zelda.png |
||
| − | |size = 80px |
||
| − | |align = right |
||
| − | |caption = Princess Zelda, a notable Hylian |
||
| − | |captionalign = center |
||
| − | }} |
||
| − | Hyrule is home to numerous races which are scattered all across the land, each inhabiting a different part of the kingdom. The main distinction between Hyrule's inhabitants is that of Hylians and Hyruleans. ''Hylian'' refers to the specific race prominently appearing throughout Hyrule. ''Hyrulean'' refers to the many humanoid and non humanoid races that have inhabited Hyrule. |
||
| + | ====[[Bomb]] Warp Zone==== |
||
| − | With the exception of the Hylians, most of the races have preferred environments and primarily reside among members of their own race. Moreover, few of Hyrule's races are limited to residency in just this one kingdom. Other lands of the ''Legend of Zelda'' series have featured these, and even more exotic races. |
||
| + | *[[File:Bomb(FS).gif]] To take out a Bomb, the A Button must be pressed, then pressed again to throw it.<ref>{{cite|You can use Bombs to destroy cracked blocks. Press A to take out a Bomb, then press A again to throw it.|Stray Fairy|FS}}</ref> |
||
| + | **By pressing the A Button after the Bomb has fallen to the ground, it will blow up.<ref>{{cite|If you press A again after the Bomb falls to the ground, you can blow it up!|Stray Fairy|FS}}</ref> |
||
| + | *Bombs can be used to destroy cracked blocks or walls.<ref>{{Cite|You can use Bombs to blow open cracked walls, too.|Stray Fairy|FS}}</ref> |
||
| + | **Some walls that do not have cracks can also be blown open. Holding the B Button and then going up to tap the wall with the sword will yield a different noise than usual.<ref>{{cite|Some walls that don't have cracks can also be blown open. Hold B to hold out your sword and tap the wall. Listen for odd noises!|Stray Fairy|FS}}</ref> |
||
| + | *Bombs can be thrown over low walls to blow things that are on the other side.<ref>{{cite|You can throw Bombs over low walls to blow things up on the other side.|Stray Fairy|FS}}</ref><ref>{{cite|If your bombs won't reach the area you're trying to throw them to, try throwing them from low walls.|Stray Fairy|FS}}</ref> |
||
| + | *Switches can also be hit with bombs.<ref>{{cite|You can also use Bombs to activate the red switch over there.|Stray Fairy|FS}}</ref> |
||
| − | ==== |
+ | ====[[Boomerang]] Warp Zone==== |
| + | *[[File:Boomerang(FS).gif]] The Boomerang can be used to retrieve items that are out of reach as well as activate switches from a distance.<ref>{{cite|The Boomerang is great for retrieving items that are out of reach. You can use the Boomerang to activate switches from a distance.|Stray Fairy|FS}}</ref> |
||
| − | '''Hylians''' |
||
| − | {{main|Hylian}} |
||
| − | The '''Hylians''' are the dominant race of the realm, with close ties to the goddesses as their chosen people.<ref>{{cite|Yes, according to legend, Hyrule was made by the Hylians, who, as we all know, are the closest race to the gods.|Shad|Twilight Princess}}</ref> The Hylians are extremely abundant and are quite similar to humans on earth. Unlike most other races of Hyrule, Hylians tend to live in large cities, such as [[Hyrule Castle Town]] or [[Kakariko Village]]. They are said to be born with magic-infused blood and use magic quite often.<ref>{{cite manual|quote=With their magic infused blood, the Hylian people were endowed with psychic powers and skill in wizardry.|game=A Link to the Past|page=3}}</ref> |
||
| − | {{ImageCaption |
||
| − | |image = File:OoT Saria.png |
||
| − | |size = 80px |
||
| − | |align = right |
||
| − | |caption = Saria, one of the most famous members of the Kokiri race. |
||
| − | |captionalign = center |
||
| − | }} |
||
| + | ====[[Pegasus Shoes]] Warp Zone==== |
||
| − | '''Gerudo''' |
||
| + | *[[File:Pegasusboots(FS).gif]] Link can run quickly with the Pegasus Shoes by holding the A Button.<ref>{{cite|With the Pegasus Shoes, you can run quickly by holding A.|Stray Fairy|FS}}</ref> |
||
| − | {{main|Gerudo}} |
||
| + | **The young hero can even push his other companions if they are standing in a line.<ref>{{cite|You can even push your companions if they are standing in a line.|Stray Fairy|FS}}</ref> |
||
| − | The '''[[Gerudo]]''' are a race of largely female thieves who hail from the desert far to the west of Hyrule. They live in the [[Gerudo's Fortress]], nestled in the cliffs of [[Gerudo Valley]], where they guard the entrance to the desert. According to Gerudo lore, only one male Gerudo is born every century, and that single male is to become King of the Gerudo. It is hinted that the Gerudo take on relationships with Hylian men for reproductive purposes.<ref>{{cite|They say that Gerudos sometimes come to Hyrule Castle Town to look for boyfriends.|Gossip Stone|Ocarina of Time}}</ref> The Gerudo have a largely Arabesque appearance, even carrying scimitar-like swords for protection. |
||
| + | **Link can easily run up slippery slopes.<ref>{{cite|You can also run up slippery slopes that you couldn't climb otherwise.|Stray Fairy|FS}}</ref> |
||
| + | *Certain "rubbery" objects can be destroyed by running into them with the Pegasus Shoes.<ref>{{Cite|It feels quite rubbery, but perhaps with the Pegasus Shoes...|Stray Fairy|FS}}</ref> |
||
| + | ====[[Bow]] Warp Zone==== |
||
| − | '''Kokiri''' |
||
| + | *[[File:Bow(FS).gif]] The Bow can be powered up by holding the A Button.<ref>{{cite|When using the Bow and Arrow, hold A to put power into your shot!|Stray Fairy|FS}}</ref> |
||
| − | {{main|Kokiri}} |
||
| + | *Some [[switch]]es can only be activated when shot with an [[arrow]]. Moreover, it might be necessary to shoot all of the switches simultaneously.<ref>{{cite|There are some objects in the dungeon that will move when you shoot them. [...] Take a deep breath and release your bowstrings simultaneously!|Stray Fairy|FS}}</ref> |
||
| − | The '''[[Kokiri]]''', a humanoid, child-like race, reside deep in the [[Kokiri Forest]] under the protection of the [[Great Deku Tree]]. With long lifespans and never aging,<ref>{{cite|That's because the Kokiri never grow up! Even after seven years, they're still kids!|Deku Sprout|Ocarina of Time}}</ref> these small beings are the dominant race of the forest and are the guardians of the [[Forest Temple (Ocarina of Time)|Forest Temple]] deep in the [[Lost Woods]]. They have only ever appeared in Hyrule, making them unique to the land, unlike other races. |
||
| + | ===Enemies=== |
||
| − | '''Sheikah''' |
||
| + | {| class="wikitable" |
||
| − | {{main|Sheikah}} |
||
| + | |- |
||
| − | The mysterious '''[[Sheikah]]''' are a race of ninja-like shadow warriors, said to be the guardians of the Royal Family of Hyrule.<ref>{{cite|They are the Sheikah...the shadows of the Hylians. They say they swore allegiance to the King of Hyrule and guarded the Royal Family.|Shikashi|Ocarina of Time}}</ref> They are said to have been the builders and founders of [[Kakariko Village]].<ref>{{cite|Zelda's attendant, the great Impa, opened this village to the common people. We have only a small population now, but someday this place will be as lively as Hyrule Castle Town!|A guard|Ocarina of Time}}</ref> Little definite information is known about this race, but speculation abounds as to their history and the reasons for their subsequent disappearance. The Sheikah have red-colored eyes but are otherwise a humanoid race of beings quite similar in appearance to Hylians and humans. |
||
| + | ! Sprite !! !! Name |
||
| + | |- |
||
| + | | [[File:Ironballsoldier FS.gif]] |
||
| + | | |
||
| + | | [[Ball and Chain Soldier]] |
||
| + | |- |
||
| + | | [[File:Bob-omb FS.png]] |
||
| + | | |
||
| + | | [[Bob-omb]] |
||
| + | |- |
||
| + | | [[File:Gel FS.png|10px]] [[File:Zol FS.png]] |
||
| + | | |
||
| + | | [[Zol|Gel and Zol]] |
||
| + | |- |
||
| + | | [[File:Hiploop FS.png]] |
||
| + | | |
||
| + | | [[Helmasaur]] |
||
| + | |- |
||
| + | | [[File:Hikkun.gif]] |
||
| + | | |
||
| + | | [[Hikkun]] |
||
| + | |- |
||
| + | | [[File:Nokken.gif]] |
||
| + | | |
||
| + | | [[Nokken]] |
||
| + | |- |
||
| + | | [[File:Rope FS.gif]] |
||
| + | | |
||
| + | | [[Rope]] |
||
| + | |- |
||
| + | | [[File:Togezo FS.png]] |
||
| + | | |
||
| + | | [[Spiked Beetle]] |
||
| + | |} |
||
| + | ===Items=== |
||
| − | '''Wind Tribe''' |
||
| + | {| class="wikitable" style=text-align:center; |
||
| − | {{main|Wind Tribe}} |
||
| + | |- |
||
| − | The '''Wind Tribe''' are a race of humanoid beings who have magical powers strongly connected to the winds, as the guardians of the [[Wind Element]]. They were responsible for the construction of the [[Fortress of Winds]] in the [[Wind Ruins]] just south of [[Castor Wilds]] as well as the [[Palace of Winds]] and the [[Tower of Winds]] above Hyrule.{{fact}} They were said to have been the favorite tribe of [[Gustaf]], an ancient [[King of Hyrule]].{{fact}} After living in the marshlands of the Castor Wilds for a time, the Wind Tribe abandoned the Wind Ruins and the Fortress of Winds, leaving for the [[Cloud Tops]] and taking the Wind Element with them. In the Cloud Tops, they have made the Tower of Winds their home as well as the road to the Palace of Winds. |
||
| + | ! Sprite !! !! Name |
||
| + | |- |
||
| + | | [[File:Bomb(FS).gif]] |
||
| + | | |
||
| + | | [[Bomb]]s |
||
| + | |- |
||
| + | | [[File:Boomerang(FS).gif]] |
||
| + | | |
||
| + | | [[Boomerang]] |
||
| + | |- |
||
| + | | [[File:Gnathat(FS).gif]] |
||
| + | | |
||
| + | | [[Gnat Hat]] |
||
| + | |- |
||
| + | | [[File:Bow(FS).gif]] |
||
| + | | |
||
| + | | [[Bow]] |
||
| + | |- |
||
| + | | [[File:Magnet(FS).gif]] |
||
| + | | |
||
| + | | [[Magnetic Glove]] |
||
| + | |- |
||
| + | | [[File:RocCape(FS).gif]] |
||
| + | | |
||
| + | | [[Roc's Feather#Roc's Cape|Roc's Cape]] |
||
| + | |- |
||
| + | | [[File:Pegasusboots(FS).gif]] |
||
| + | | |
||
| + | | [[Pegasus Boots]] |
||
| + | |- |
||
| + | | [[File:Shield(FS).gif]] |
||
| + | | |
||
| + | | [[Shield]] |
||
| + | |} |
||
| + | ==Trivia== |
||
| − | ====Non-Humanoid Hyruleans==== |
||
| + | *[[Symbols]] that resemble [[Jabber Nut]]s from ''[[The Legend of Zelda: The Minish Cap|The Minish Cap]]'' appear on the warp pads in the Chambers of Insight. The symbols also slightly resemble the head of a [[Stray Fairy]]. [[File:FS Warp Pad - Chambers of Insight.png|The warp pads seen in the Chambers of Insight]] |
||
| − | '''Zoras''' |
||
| + | *The instruction manual contains a screenshot of the Stage Select which reads "Caves of Insight". |
||
| − | {{main|Zora}} |
||
| − | {{ImageCaption |
||
| − | |image = File:TP Zora.png |
||
| − | |size = 150px |
||
| − | |align = right |
||
| − | |caption = A Zora. |
||
| − | |captionalign = center |
||
| − | }} |
||
| − | The '''Zoras''' are aquatic, amphibious creatures that inhabit the waters of the kingdom, and are found in different forms which differ greatly in appearance and behavior. [[River Zora]]s occupy the rivers and appear more fish-like and aggressive, and can spit fireballs at passers-by, whereas Sea Zoras seem to be more peaceful and appear to be a hybrid between human and fish. [[Zora’s Domain]] is home to much of the Zora race, and is the source of all of Hyrule’s water in most stories set in Hyrule. The Zoras are often ruled by a monarchy themselves, the Royal Family of the Zoras usually headed by [[King Zora]], though they also swear allegiance to the central Hyrulean government.<ref>{{cite|We Zoras all serve the great King Zora.|A Zora|Ocarina of Time}}</ref><ref name=kg>{{cite|The Zoras serve Hyrule's Royal Family by protecting this water source.|Kaepora Gaebora|Ocarina of Time}}</ref> They serve the Royal Family of Hyrule largely by guarding Hyrule’s water supply.<ref name=kg/> |
||
| − | |||
| − | '''Gorons''' |
||
| − | {{main|Goron}} |
||
| − | The '''[[Goron]]s''' are a race of rock-consuming, golem-like creatures that inhabit the mountainous regions and rocky areas of Hyrule, largely [[Death Mountain]].<ref>{{cite|I am one of the Gorons, the stone-eating people who live on Death Mountain.|A Goron|Ocarina of Time}}</ref> They possess superhuman strength and the ability to curl up into a ball and roll at high speeds, and are completely heat-resistant, able to wade through lava for extended periods of time. They have formed an alliance with the Royal Family of Hyrule, answering to the central government headed by the [[King of Hyrule]].<ref name=darunia>{{cite|Has Darunia, the big boss of the Gorons, really lost so much status to be treated like this by his Sworn Brother, the King?|Darunia|Ocarina of Time}}</ref> However, in the day-to-day governing of their tribe, they live under a council of elders typically headed by a patriarch, such as [[Darunia]] or [[Darbus]].<ref name=darunia/><ref>{{cite|Because of certain...circumstances, I must lead the Goron tribe in place of Darbus, our tribal patriarch.|Gor Coron|Twilight Princess}}</ref> |
||
| − | |||
| − | '''Deku''' |
||
| − | {{main|Deku}} |
||
| − | {{ImageCaption |
||
| − | |image = File:Deku Scrub.png |
||
| − | |size = 150px |
||
| − | |align = right |
||
| − | |caption = A Deku Scrub, one of the primary members of the Deku family. |
||
| − | |captionalign = center |
||
| − | }} |
||
| − | Also inhabiting the forests of the kingdom are the plant-like race known as the '''Deku'''. The Deku of Hyrule are composed of the [[Deku Scrub]]s, which spit nuts as passersby or try to sell wares to those whom they meet. Typically these Deku Scrubs will live near a [[Deku Flower]], into which they can retreat. The Deku do not appear to have any allegiance to any form of government in Hyrule. The term "Deku" has referred to [[Great Deku Tree]], [[Deku Baba]], and many items related to the forest nature of the creatures. |
||
| − | |||
| − | '''Zuna''' |
||
| − | {{main|Zuna}} |
||
| − | The '''[[Zuna]]''' are a race of desert-dwelling nomads featured so far only in ''[[The Legend of Zelda: Four Swords Adventures|Four Swords Adventures]]'', where they inhabit the [[Desert of Doubt]] alongside the [[Gerudo]]. They are a race of green-skinned humanoid beings that are said to be descended from the ancient tribe that built the [[Pyramid (Dungeon)|Pyramid]] and sealed the [[Trident|Trident of Power]] there.<ref>{{cite|We of the Zuna tribe live in this village. We may not look it now, but we are descended from the wise pyramid builders!|Zuna|Four Swords Adventures}}</ref> Outside of that, little is known of their race's origins or how they came to live in Hyrule. They live in a small village in the central part of the Desert of Doubt, in small huts with flowers atop their roofs. |
||
| − | |||
| − | '''Minish''' |
||
| − | {{main|Minish}} |
||
| − | [[File:Forest minish.png|right|100px|An example of a Forest Minish.]] |
||
| − | The '''Minish''' are a race of tiny beings who are largely responsible for [[Rupee]]s and countless objects such as [[Magic Jar]]s and [[Bomb]]s being hidden in the weeds, grass, and beneath the pots throughout Hyrule. They are said to be concerned with bringing happiness to humans.{{fact}} The Minish seemingly did not originate from Hyrule however, as their homeland is said to be the Minish Realm that is connected to Hyrule. The passageway connecting the two worlds, the Minish Door, opens only temporarily once a century to allow the Minish to traverse to or from Hyrule. Though they primarily live in the [[Minish Village]] deep in the [[Minish Woods]] of Hyrule, they are also scattered around Hyrule, such as in [[Hyrule Castle Town|Hyrule Town]], [[Castor Wilds]], and even up on [[Mount Crenel]]. |
||
| − | |||
| − | '''Oocca''' |
||
| − | {{main|Oocca}} |
||
| − | [[File:OOCCOO.jpg|thumb|right|100px|A grown and infant Oocca.]] |
||
| − | The strange '''Oocca''' race inhabits the [[City in the Sky]], floating high above Hyrule. Only fragments of the Oocca's history have been revealed. They are said to be the creators of the [[Dominion Rod]] (known to their tribe as the "Rod of the Heavens"), a magical rod that possesses the power to infuse life into certain statues found scattered across Hyrule.<ref name=dr>{{cite|Among the legends of my clan, there is a story from the time when the Oocca still maintained contact with the royal family. Yes, it said that a mysterious rod was handed down from the people of the sky, and it was called the Dominion Rod... The rod was only to be carried by the messenger to the heavens when the royal family needed to communicate with the Oocca.|Impaz|Twilight Princess}}</ref> They are hinted to have had a close connection to both the Royal Family of Hyrule and the [[Sheikah]], as they left the [[Ancient Sky Book]] to the Sheikah tribe upon departing for the City in the Sky.<ref>{{cite|From generation to generation, my ancestors have guarded the book that, by royal decree, was to be given to the messenger to the heavens.|Impaz|Twilight Princess}}</ref> The Oocca maintained relations with the Royal Family even after they left for the skies, by means of the "Messenger to the Heavens" who would carry the "Rod of the Heavens" and journey between the surface and the city by the [[Sky Cannon]].<ref name=dr/> The Oocca have mysteriously lost touch with the surface-dwellers of Hyrule and nobody has seen one in living memory, causing many to believe their existence to be a myth. |
||
| − | {{clear}} |
||
| − | |||
| − | ===Animals=== |
||
| − | Aside from the following races, Hyrule's inhabitants include many familiar [[Animals|animals]] such as horses, cows, dogs, cats, and the like. The distinction between Animals and Beasts lies in the aggressiveness of the two. Hyrulean [[Enemies|beasts]] are very varied; the primary categorization used by the ''Legend of Zelda'' series' creators is the ones found in the Overworld and those of the Underworlds of Hyrule. |
||
| − | |||
| − | == Theories == |
||
| − | {{theory}} |
||
| − | [[File:littlekingdom.png|right|thumb|Similarities between ''[[The Legend of Zelda (Game)|The Legend of Zelda]]'' 's map and the southwestern corner of ''[[Zelda II: The Adventure of Link|The Adventure of Link]]'' 's map]] |
||
| − | *The manual of ''[[The Legend of Zelda (Game)|The Legend of Zelda]]'' places the game in a little kingdom in the land of Hyrule.<ref>{{cite manual|quote=A long, long time ago the World was in an age of Chaos. In the midst of this chaos, in a little kingdom in the land of Hyrule, a legend was being handed down from generation to generation, the legend of the "Triforce"; golden triangles possessing mystical powers.|game= The Legend of Zelda|page= 3}}</ref> In ''[[Zelda II: The Adventure of Link|The Adventure of Link]]'' it is also mentioned that there was a time when Hyrule was united under one kingdom.<ref>{{cite manual|quote=It is said that long ago, when Hyrule was one country, a great ruler maintained the peace in Hyrule using the Triforce.|game= The Adventure of Link|page= 6}}</ref> This indicates that the "little kingdom" is a small part of a greater geographical territory collectively known as Hyrule. There are also some evidence suggesting that this kingdom occupies the southwestern corner of ''The Adventure of Link'''s map. Both territories contain a Death Mountain, Spectacle Rock, graveyard, twin ponds, sideways L-shaped forested area, mazelike forested area, and a eastern side that borders water. The overworld map of the [[Valiant Comics]] helps support this idea, though the comics themselves are universally considered [[Help:Glossary#A#Ambiguously Canon|ambiguously canonical]]. |
||
| − | |||
| − | *If one rotates the Light World map from ''A Link to the Past'' clockwise forty-five degrees, several landmarks end up roughly where they are located in the map for ''Ocarina of Time'' - with Hyrule Castle in the center of the map, Death Mountain is to the north-east, Zora's River to the south-east, Lake Hylia to the south, and the desert is to the west. The only major locations that don't match up are the Lost Woods and Kakariko Village, which move to where Hyrule Castle and Castle Town are on the ''Ocarina of Time'' map. However, this can be seen as being the Hyrule of ''Ocarina of Time'', due to the fact that that the [[Master Sword]] is still in the same general area, suggesting that in the [[Decline Timeline]], [[Hyrule Castle]] was rebuilt in a new location after [[Castle Town]] and Hyrule Castle of "Ocarina of Time" had been destroyed by [[Ganon]]dorf. |
||
| − | |||
| − | {{Clear}} |
||
==Gallery== |
==Gallery== |
||
<gallery> |
<gallery> |
||
| + | File:Chambers of Insight Map-Magnetic Glove.png|The Magnetic Glove Item Warp Zone |
||
| − | File:Death Mountain LoZ.jpg|Link looks over Hyrule, official art from ''[[The Legend of Zelda (Game)|The Legend of Zelda]]''. |
||
| + | File:Chambers of Insight Map-Roc's Cape.png|The Roc's Cape Item Warp Zone |
||
| − | File:LegendOfZeldaHyruleMap.png|Hyrule map from ''The Legend of Zelda''. |
||
| + | File:Chambers of Insight Map-Bomb.png|The Bomb Item Warp Zone |
||
| − | File:Legend of zelda overworld.png|Hyrule map with indications from ''The Legend of Zelda''. |
||
| + | File:Chambers of Insight Map-Boomerang.png|The Boomerang Item Warp Zone |
||
| − | File:Hyrule TAoL.png|Hyrule map from ''[[Zelda II: The Adventure of Link|The Adventure of Link]]''. |
||
| + | File:Chambers of Insight Map-Pegasus Shoes.png|The Pegasus Shoes Item Warp Zone |
||
| − | File:Hyrule AoL 1.gif|Artwork of the Hyrule map from ''The Adventure of Link'' |
||
| + | File:Chambers of Insight Map-Bow.png|The Bow Item Warp Zone |
||
| − | File:Hyrule-Map-LoZ.jpg|Map of Hyrule from the ''Legend of Zelda'' [[Valiant Comics]]. |
||
| − | File:Land of hyrule.jpg|Hyrule, official art from ''A Link to the Past''. |
||
| − | File:Lightworldalttp.png|Light World Map from ''A Link to the Past''. |
||
| − | File:Hyrule Light World map.png|The Light World map, as seen in ''A Link to the Past'' |
||
| − | File:Darkworldalttp.png|Dark World Map from ''A Link to the Past''. |
||
| − | File:Dark World Map.png|The Dark World map, as seen in ''A Link to the Past'' |
||
| − | File:Hyrule Map OoT.jpg|The Hyrule map from ''Ocarina of Time'' |
||
| − | File:OOT3D Map of Hyrule.png|The Hyrule map from ''Ocarina of Time 3D'' |
||
| − | File:Hyrule Castle-Oracle of Seasons.png|Hyrule seen briefly in the intro of the [[Oracle Series]] |
||
| − | File:Opening 1.png|Hyrule as shown in the prologue of ''[[The Legend of Zelda: The Wind Waker|The Wind Waker]]'' |
||
| − | File:Hyrule B and W.jpeg|Hyrule frozen in time, from ''The Wind Waker''. |
||
| − | File:Hyrule-The Wind Waker.jpg|Hyrule from ''The Wind Waker'' |
||
| − | File:View of Hyrule From Atop Ganon's Tower.jpg|View of Hyrule from atop [[Ganon's Tower]] in ''The Wind Waker''. |
||
| − | File:FS Overworld.png|The map of Hyrule from ''Four Swords'' |
||
| − | File:FSAHyruleMap.png|A map of Hyrule, as it appears in ''Four Swords Adventures''. |
||
| − | File:Fsa map.png|A map of Hyrule from ''Four Swords Adventures'' |
||
| − | File:Hyrule Minish Cap.png|Map of Hyrule as featured in ''The Minish Cap''. |
||
| − | File:800px-Hyrule (The Minish Cap).png|Hyrule, as seen in ''The Minish Cap'' |
||
| − | File:Beanstalk Hyrule.png|Hyrule, as seen from a [[beanstalk]] in ''The Minish Cap'' |
||
| − | File:Fortress of Winds Hyrule.png|Hyrule, as seen from the [[Fortress of Winds]] in ''The Minish Cap'' |
||
| − | File:Hyrule TP Map.png|The Hyrule map from ''Twilight Princess'' |
||
| − | File:Hyrule Rail Map.png|Map of Hyrule as featured in ''Spirit Tracks''. |
||
| − | File:Hyrule (ST).png|The map of Hyrule in ''Spirit Tracks'' |
||
| − | File:SS Map.png|The map of Hyrule, as seen in ''[[The Legend of Zelda: Skyward Sword|Skyward Sword]]'' |
||
| − | File:The Surface SS.jpg|Concept art of the Surface in ''Skyward Sword'' |
||
</gallery> |
</gallery> |
||
| − | {{ |
+ | {{refbar}} |
| − | |||
| − | ==External Links== |
||
| − | {{Wikipedia|Hyrule}} |
||
| + | {{DungeonNav2|FS}} |
||
| − | {{Names|English=|Japanese={{Exp|Hairaru|ハイラル}}|Spanish=|Spanish(LA)=|Spanish(SP)=|French=|French(CA)=| French(FR)=|German=|Italian=}} |
||
| − | [[Category:Hyrule]] |
||
| − | [[Category:Countries]] |
||
[[Category:Places]] |
[[Category:Places]] |
||
| − | [[Category:Places in |
+ | [[Category:Places in Four Swords]] |
| − | [[Category:Places in A Link to the Past]] |
||
| − | [[Category:Places in Ocarina of Time]] |
||
| − | [[Category:Places in The Wind Waker]] |
||
| − | [[Category:Places in The Minish Cap]] |
||
| − | [[Category:Places in Twilight Princess]] |
||
| − | [[Category:Places in Spirit Tracks]] |
||
| − | [[Category:Places in Skyward Sword]] |
||
| − | [[Category:Places in The Crystal Trap]] |
||
| − | [[Category:Places in The Shadow Prince]] |
||
Revision as of 15:07, 20 August 2012
Template:Place Chambers of Insight is a practice stage in Four Swords. The stage features various areas to practice with the game's many items as well as earn the different techniques that will be needed to complete each level and to defeat certain enemies. Throughout the stage are Stray Fairies that will give the Links tips on how to complete their adventure.[1] All of the Links must stand on the warp zones to be transported to the training area they wish to go to.[2] In the middle of the chamber is a test that the Links can take to prove the skills they have learned.[3] The mini-boss that must be defeated at the end is an Ice Wizzrobe.
The Chambers of Insight can be exited at any time by standing on the warp zones in the southern portion.[4]
Overview
A map of the main chamber
First Warp Zone
The first warp zone
The First Warp Zone of the Chambers of Insight teaches the Links about the basic techniques of gameplay, such as gathering Rupees and pressing switches to open doors.
Techniques Learned
- File:Rupee 5.gif The Rupees gathered are pooled in a single wallet.[5]
- The three different types of Mystical Seeds: Armor Seed, Razor Seed, Pegasus Seed.[8]
- File:Armor Seed FS.gif Armor Seeds increase defense.
- File:Razor Seed FS.gif Razor Seeds increase offense.
- File:Pegasus Seed FS.gif Pegasus Seeds increase speed.
- A switch must be pressed by a Link to move traps or stones.[9]
- Blocks can be moved by pressing the Control Pad in the direction the Links wish to move the block.[10]
- Big blocks can only be moved when everyone cooperates.[11]
- File:Rupee Shard.gif When four Rupee Shards are collected, they combine to form a giant Rupee worth 500 Rupees.[12]
- Torches can be lit up when two Links strike their swords together.[13]
- Doors can sometimes open if all Links step on switches at the same time. If there are not enough people, statues can be placed on the remaining switches.[14]
- Some switches will require that all Links step on them to successfully press them down.[15]
- Locked blocks can be opened with a Small Key.[16]
- Once the Links enter deep water, they can only climb out of it by going into nearby shallow water.[17]
- In deep water, the Links can press A to swim and B to dive.[18]
- Link can swim against currents but not rapids.[19]
- Striking their swords against cracked walls can cause them to break down.[20]
- Link can trade items by pressing A next to the item pedestal.[21]
- File:Gnathat(FS).gifThe Gnat Hat shrinks Link down into the size of a gnat. This allows him to go through tiny holes.[22][23]
- There are some colored platforms which only the same-colored Link can go through; anyone else will fall through.[24]
- Some colored tiles can only be seen by the same-colored Link, although others that cannot see them can also walk across them.[25]
- A special platform moves in the direction of the arrow that the Links stand on. A switch beside the platform recalls it to the beginning.[26]
- Getting all the balls on the floor into a hole in the wall yields Rupee rewards.[27]
- A bonus can be received depending on how fast a dungeon is cleared. The less time it takes, the bigger the Rupee bonus will be.[28]
Second Warp Zone

The second warp zone
The Second Warp Zone is much shorter than the first. It teaches how to lift rocks, press big switches, and how to defeat certain enemies, such as Nokken, Bob-omb, and Hikkun.
Techniques Learned
- Rocks, grass, and pats can be lifted by pressing the R Button.[29]
- File:Hikkun.gif Hikkuns are defeated by stunning them first and then having two Links pull from each side of the helmet.[32]
- File:Bob-omb(TMC).gif Bob-ombs can be lifted and thrown into fire to defeat them.[33]
- Levers are pulled by grabbing them with the R Button and then pressing the control pad in the opposite direction.[34]
- Statues can also be pulled using the same technique.[35]
 Nokkens are left defenseless without their shells when thrown across a room.[36]
- Blue Crystals must be be picked up from their pedestal and carried them over to another pedestal. Upon doing so, certain devices will activate, such as a door opening to allow access to the next area. If Link drops a crystal and it shatters, he must start over again.[37]
Item Warp Zones
In the northern portion of the chamber are warp zones that teach the Links how to use each of the items appearing in the game. They are also taught how to take advantage of their unique abilities and use them to solve various puzzles.
Magnetic Glove Warp Zone
- File:Magnet(FS).gif Link can pull or repel himself from Magnetic blocks. They are different from other blocks in that they are orange and are marked with a plus (+) sign, indicating their polarity.[38]
- The polarity of the magnet can be changed by pressing the A Button.[41]
- File:Hiploop FS.png Helmasaurs cannot be defeated unless the Magnetic Glove is used against them.[42]
- The Magnetic Glove can be used to pull companions along even if there is a wall between them. Link can walk even as he draws his companion to him.[43]
Roc's Cape Warp Zone
- File:RocCape(FS).gif Link can jump with the Roc's Cape by pressing the A Button. Holding the button will make him jump further.[44]
- Link can jump through special gates or jump down through it.[45]
Bomb Warp Zone
- File:Bomb(FS).gif To take out a Bomb, the A Button must be pressed, then pressed again to throw it.[46]
- By pressing the A Button after the Bomb has fallen to the ground, it will blow up.[47]
- Bombs can be used to destroy cracked blocks or walls.[48]
- Some walls that do not have cracks can also be blown open. Holding the B Button and then going up to tap the wall with the sword will yield a different noise than usual.[49]
- Bombs can be thrown over low walls to blow things that are on the other side.[50][51]
- Switches can also be hit with bombs.[52]
Boomerang Warp Zone
- File:Boomerang(FS).gif The Boomerang can be used to retrieve items that are out of reach as well as activate switches from a distance.[53]
Pegasus Shoes Warp Zone
- File:Pegasusboots(FS).gif Link can run quickly with the Pegasus Shoes by holding the A Button.[54]
- Certain "rubbery" objects can be destroyed by running into them with the Pegasus Shoes.[57]
Bow Warp Zone
- File:Bow(FS).gif The Bow can be powered up by holding the A Button.[58]
- Some switches can only be activated when shot with an arrow. Moreover, it might be necessary to shoot all of the switches simultaneously.[59]
Enemies
Items
Trivia
- Symbols that resemble Jabber Nuts from The Minish Cap appear on the warp pads in the Chambers of Insight. The symbols also slightly resemble the head of a Stray Fairy.
- The instruction manual contains a screenshot of the Stage Select which reads "Caves of Insight".
Gallery

The Magnetic Glove Item Warp Zone

The Roc's Cape Item Warp Zone

The Bomb Item Warp Zone
The Boomerang Item Warp Zone
The Pegasus Shoes Item Warp Zone
The Bow Item Warp Zone

.gif)
.gif)
.gif)
.gif)
.gif)
.gif)
.gif)
.gif)
.gif)
Template:Refbar
Dungeons in The Legend of Zelda Series
Parapa Palace · Midoro Palace · Island Palace · Maze Island Palace
Palace on the Sea · Three-Eye Rock Palace ![]() · Great Palace
· Great Palace ![]()
Light World
Sewer Passageway · Eastern Palace · Desert Palace · Tower of Hera · Hyrule Castle Tower ![]()
Dark World
Palace of Darkness · Swamp Palace · Skull Woods · Thieves' Town · Ice Palace · Misery Mire · Turtle Rock · Ganon's Tower ![]()
Palace of the Four Sword![]()
Main Dungeons
Tail Cave · Bottle Grotto · Key Cavern · Angler's Tunnel · Catfish's Maw · Face Shrine · Eagle's Tower · Turtle Rock · Wind Fish's Egg ![]()
Mini-Dungeons
Moblin Cave · Kanalet Castle · Ancient Ruins
Optional Dungeons
Color Dungeon (LADX | LANS) · Chamber Dungeon (LANS)
Child Dungeons
Inside the Deku Tree · Dodongo's Cavern · Inside Jabu-Jabu's Belly
Adult Dungeons'
Forest Temple · Fire Temple · Water Temple · Shadow Temple · Spirit Temple · Ganon's Castle ![]()
Mini-Dungeons
Main Dungeons
Woodfall Temple · Snowhead Temple · Great Bay Temple · Stone Tower Temple
Mini-Dungeons
Swamp Spider House · Pirates' Fortress · Oceanside Spider House · Beneath the Well · Ancient Castle of Ikana
Moon Dungeons ![]()
Main Dungeons
Spirit's Grave · Wing Dungeon · Moonlit Grotto · Skull Dungeon · Crown Dungeon · Mermaid's Cave · Jabu-Jabu's Belly · Ancient Tomb · Black Tower (Turret) ![]() · Room of Rites(OoS | OoA)
· Room of Rites(OoS | OoA)
Mini-Dungeons
Maku Road · Great Moblin's Keep · Ambi's Palace · Black Tower (Rescue Zelda) ![]() · Hero's Cave
· Hero's Cave![]()
Main Dungeons
Gnarled Root Dungeon · Snake's Remains · Poison Moth's Lair · Dancing Dragon Dungeon · Unicorn's Cave · Ancient Ruins · Explorer's Crypt · Sword & Shield Maze · Onox's Castle ![]() · Room of Rites(OoS | OoA)
· Room of Rites(OoS | OoA)
Mini-Dungeons
Chambers of Insight · Sea of Trees · Talus Cave · Death Mountain · Vaati's Palace ![]()
Anniversary Edition
Main Dungeons
Forsaken Fortress · Dragon Roost Cavern · Forbidden Woods · Tower of the Gods
Earth Temple · Wind Temple · Ganon's Tower
Mini-Dungeons
Whereabouts of the Wind — Lake Hylia · Cave of No Return · Hyrule Castle
Eastern Hyrule — The Coast · Village of the Blue Maiden · Eastern Temple
Death Mountain — Death Mountain Foothills · The Mountain Path · Tower of Flames
Near the Fields — The Field · The Swamp · Infiltration of Hyrule Castle
The Dark World — Lost Woods · Kakariko Village · Temple of Darkness
Desert of Doubt — Desert of Doubt · Desert Temple · Pyramid
Frozen Hyrule — Frozen Hyrule · Temple of Ice · Tower of Winds
Realm of the Heavens — Realm of the Heavens · The Dark Cloud · Palace of Winds
Main Dungeons
Deepwood Shrine ![]() · Cave of Flames · Fortress of Winds · Temple of Droplets
· Cave of Flames · Fortress of Winds · Temple of Droplets ![]() · Palace of Winds · Dark Hyrule Castle
· Palace of Winds · Dark Hyrule Castle ![]()
Mini-Dungeons
Main Dungeons
Forest Temple · Goron Mines · Lakebed Temple · Arbiter's Grounds ![]() · Snowpeak Ruins
· Snowpeak Ruins
Temple of Time · City in the Sky · Palace of Twilight ![]() · Hyrule Castle
· Hyrule Castle
Mini-Dungeons
Lantern Caverns · Cave of Ordeals · Cave of Shadows (TPHD)
Dungeons
Temple of Fire · Temple of Wind · Temple of Courage · Ghost Ship · Goron Temple · Temple of Ice · Mutoh's Temple
Master Dungeon
Dungeons
Forest Temple · Snow Temple · Ocean Temple · Fire Temple · Sand Temple
Master Dungeon
Mini-Dungeon
Lost at Sea Station · Tunnel to the Tower · Take 'Em All On!![]()
Main Dungeons
Skyview Temple · Earth Temple · Lanayru Mining Facility · Ancient Cistern · Sandship · Fire Sanctuary · Sky Keep
Mini-Dungeons
Hyrule
Eastern Palace · Tower of Hera · House of Gales · Inside Hyrule Castle ![]()
Desert Palace ![]()
Lorule
Ice Ruins · Swamp Palace · Thieves' Hideout · Dark Palace
Skull Woods · Turtle Rock · Lorule Castle ![]()
Woodlands — Deku Forest · Buzz Blob Cave · Moblin Base · Forest Temple
Riverside — Secret Fortress · Abyss of Agony · Cove of Transition · Water Temple
Volcano — Blazing Trail · Hinox Mine · Den of Flames · Fire Temple
Ice Cavern — Frozen Plateau · Snowball Ravine · Silver Shrine · Ice Temple
Fortress — Sealed Gateway · Bomb Storage · Training Ground · The Lady's Lair
The Dunes — Infinity Dunes · Stone Corridors · Gibdo Mausoleum · Desert Temple
The Ruins — Illusory Mansion · Palace Noir · Lone Labyrinth · Grim Temple
Sky Realm — Floating Garden · Deception Castle · Dragon Citadel · Sky Temple
Forest Zone · Flooded Zone · Scorching Zone · Frozen Zone · Fortified Zone · Desert Zone · Shadow Zone · Baneful Zone
Main Dungeons
Divine Beast Vah Ruta · Divine Beast Vah Rudania · Divine Beast Vah Medoh · Divine Beast Vah Naboris · Hyrule Castle · Final Trial![]() (TCB)
(TCB)
Mini-Dungeons
Trial of the Sword (TMT ) · Yiga Clan Hideout
Ancient Shrines
Akh Va'quot ·
Bosh Kala ·
Chaas Qeta ·
Daag Chokah ·
Dagah Keek ·
Dah Kaso ·
Dah Hesho ·
Daka Tuss ·
Dako Tah ·
Daqa Koh ·
Daqo Chisay ·
Dila Maag ·
Dow Na'eh ·
Dunba Taag ·
Gee Ha'rah ·
Gorae Torr ·
Ha Dahamar ·
Hawa Koth ·
Hia Miu ·
Hila Rao ·
Ishto Soh ·
Ja Baij ·
Jee Noh ·
Jitan Sa'mi ·
Joloo Nah ·
Ka'o Makagh ·
Kaam Ya'tak ·
Kah Mael Shrine ·
Kah Okeo Shrine ·
Kah Yah Shrine ·
Kam Urog Shrine ·
Katah Chuki ·
Katosa Aug ·
Kay Noh ·
Kaya Wan ·
Kayra Mah ·
Ke'nai Shakah ·
Keeha Yoog ·
Keh Namut ·
Kema Kosassa ·
Kema Zoos ·
Keo Ruug ·
Ketoh Wawai ·
Korgu Chideh ·
Korsh O'hu ·
Kuh Takkar ·
Kuhn Sidajj ·
Lakna Rokee ·
Lanno Kooh ·
Maag Halan ·
Maag No'rah ·
Maka Rah ·
Mezza Lo ·
Mijah Rokee ·
Mirro Shaz ·
Misae Suma ·
Mo'a Keet ·
Mogg Latan ·
Monya Toma ·
Mozo Shenno ·
Muwo Jeem ·
Myahm Agana ·
Namika Ozz ·
Ne'ez Yohma ·
Noya Neha ·
Oman Au ·
Owa Daim ·
Pumaag Nitae ·
Qua Raym ·
Qaza Tokki ·
Qukah Nata ·
Raqa Zunzo ·
Ree Dahee ·
Rin Oyaa ·
Ritaag Zumo ·
Rok Uwog ·
Rona Kachta ·
Rota Ooh ·
Rucco Maag ·
Saas Ko'sah ·
Sah Dahaj ·
Sasa Kai ·
Sha Gehma ·
Sha Warvo ·
Shada Naw ·
Shae Katha ·
Shae Loya ·
Shae Mo'sah ·
Shai Utoh ·
Shai Yota ·
Shee Vaneer ·
Shee Venath ·
Sheem Dagoze ·
Sheh Rata ·
Sho Dantu ·
Shoda Sah ·
Shoqa Tatone ·
Shora Hah ·
Soh Kofi ·
Suma Sahma ·
Ta'loh Naeg ·
Tah Muhl ·
Tahno O'ah ·
Tawa Jinn ·
Tena Ko'sah ·
Tho Kayu ·
To Quomo ·
Toh Yahsa ·
Toto Sah ·
Tu Ka'loh ·
Tutsuwa Nima ·
Voo Lota ·
Wahgo Katta ·
Ya Naga ·
Yah Rin ·
Zalta Wa ·
Ze Kahso ·
Zuna Kai
Ancient Shrines (TCB)
Etsu Korima · Kamia Omuna · Kee Dafunia · Keive Tala · Kiah Toza · Kihiro Moh · Mah Eliya · Noe Rajee · Rinu Honika · Rohta Chigah · Ruvo Korbah · Sato Koda · Sharo Lun · Shira Gomar · Takama Shiri · Yowaka Ita
Main Dungeons
Wind Temple · Fire Temple · Water Temple · Lightning Temple · Hyrule Castle · Spirit Temple · Gloom's Lair
Level 1 — Ordon Target Practice · Gerudo Stalfos: Defender · Arbiter's Grounds: Ranger
Level 2 — Goron Target Practice · Zora River: Defender · Skull Shooting
Level 3 — Kakariko Target Practice · Fruit Balloons · The Great Bridge: Defender
Level 4 — Zora River Target Practice · Hyrule Castle: Defender · Skulltula Forest: Ranger
Level 5 — Oocca Target Practice · Gerudo Moldorm: Defender · The Shootout
Level 6 — Ordon Target Practice 2 · Bridge of Eldin: Defender · Snowpeak Ruins: Ranger
Level 7 — Underground Target Practice · City in the Sky: Defender · Temple of Time: Ranger
Level 8 — Horseback Target Practice · Snowpeak Ruins: Defender · Darknut Battle
Finale — Ranch Target Practice · Sacred Grove: Defender · Fossil Stallord Battle
- ↑ "Welcome to our cave, young heroes! You will find many traps and puzzles in the areas ahead. We will give you advice that will aid you on your quest. Do not fail to heed it." — Stray Fairy (Four Swords)
- ↑ "When each of you stands on a red warp zone, all will be transported to another floor, where you will learn about many items. Begin by standing on the warp zones ahead." — Stray Fairy (Four Swords)
- ↑ "Have you learned much? If so, you should be ready for the test below." — Stray Fairy (Four Swords)
- ↑ " The one below will take you back to the map." — Stray Fairy (Four Swords)
- ↑ "The lovely jewel you have found is a Rupee. Your Rupees are counted in the bottom-right corner of your screen. The Rupees each of you gather are pooled in a single wallet for all." — Stray Fairy (Four Swords)
- ↑ "If one of you fails in your quest, he can be revived for 50 Rupees. But the cost for revival will increase each time on of you fails..." — Stray Fairy (Four Swords)
- ↑ "And while there is one wallet, your individual efforts are being watched by us fairies. And your efforts shall certainly be rewarded. He who gathers the most Rupees will be acknowledged as the greatest hero." — Stray Fairy (Four Swords)
- ↑ "The mystical seeds you see will increase your power by two levels. Razor Seeds increase sword power. Armor Seeds increase defense. Pegasus Seeds increase speed." — Stray Fairy (Four Swords)
- ↑ "The [switches] that you see on the ground are switches. Step on the switches to move traps and stones. A switch only operates while one of you standing on it." — Stray Fairy (Four Swords)
- ↑ "There are some blocks you can push. If you see a conspicuous block, press [the control pad] in the direction you want to push the block." — Stray Fairy (Four Swords)
- ↑ "Everyone will have to cooperate to push big blocks." — Stray Fairy (Four Swords)
- ↑ "The yellow Rupees that sometimes appear after you open a chest or defeat an enemy are Rupee Shards. If you collect four of them, they combine to form a giant Rupee worth a total of 500 Rupees." — Stray Fairy (Four Swords)
- ↑ "If you strike your swords together, sparks will fly! Try this in places where you want to light a fire." — Stray Fairy (Four Swords)
- ↑ "If you all step on switches at the same time, a nearby device will move. If you do not have enough people, try placing statues in switches." — Stray Fairy (Four Swords)
- ↑ "Some switches are too strong for one person to press them down. All will need to step on these." — Stray Fairy (Four Swords)
- ↑ "If you have a Small Key, you can use it to get past locked blocks." — Stray Fairy (Four Swords)
- ↑ "You will find areas of shallow and deep water. Once you enter deep water, you can only climb out of it into nearby shallow water areas." — Stray Fairy (Four Swords)
- ↑ "When swimming in deep water, press A to swim and B to dive." — Stray Fairy (Four Swords)
- ↑ "You will also find currents and rapids in the water. If you exert some effort, you can swim against currents, but you'll never get past rapids." — Stray Fairy (Four Swords)
- ↑ "If you strike cracked walls with your sword, the walls may break." — Stray Fairy (Four Swords)
- ↑ "You can stand in front of an item and press A to trade the item you have for the one before you. But remember...you will find some enemies cannot be defeated without using a Shield." — Stray Fairy (Four Swords)
- ↑ "Then you can go through tiny holes without any trouble at all!" — Stray Fairy (Four Swords)
- ↑ "You got the Gnat Hat! Wear it and watch as you become tiny!" — N/A (Four Swords)
- ↑ "Only one whose color matches what is seen below can walk here. Anyone else will fall through. It is a very mystical path..." — Stray Fairy (Four Swords)
- ↑ "Only one of the same color can see the tiles ahead. But even who can't see them can walk across them." — Stray Fairy (Four Swords)
- ↑ "This strange platform moves in the direction of the arrow you stand on. The switch beside you recalls the platform to this spot." — Stray Fairies (Four Swords)
- ↑ "If you can get the ball on floor into the hole in the wall, you'll receive a spectacular reward! Are you up to the challenge?" — Stray Fairy (Four Swords)
- ↑ "You may receive a bonus depending on how quickly you are able to get to the end of a dungeon. The less time you take, the bigger your bonus." — Stray Fairy (Four Swords)
- ↑ "Press R when standing before a tuft of grass, a rock, or a pot to lift it." — Stray Fairy (Four Swords)
- ↑ "If you all approach one side of a large rock and combine your might, you will be able to lift it over your heads!" — Stray Fairy (Four Swords)
- ↑ "You can even lift companions and throw them across gaps." — Stray Fairy (Four Swords)
- ↑ "There are some monsters you cannot defeat unless you pull them from the left or right. Be wary of such beasts!" — Stray Fairy (Four Swords)
- ↑ "There are some enemies you can lift over your head and throw. You can even throw them into flames!" — Stray Fairy (Four Swords)
- ↑ "If you press R to grab the lever below, you can press the [control pad] in the opposite direction to pull the lever." — Stray Fairy (Four Swords)
- ↑ "You can press R to grab small statues and use the control pad to pull them." — Stray Fairy (Four Swords)
- ↑ "Some enemies lose their shells when you throw them. Without their shells, they are left defenseless!" — Stray Fairy (Four Swords)
- ↑ "Press R to light the shining blue crystals. Then press it again to place them on another pedestal. Doing so will activate certain devices. If you drop a crystal and it shatters, you must do it all over again." — Stray Fairy (Four Swords)
- ↑ "That is a Magnetic block. With the Magnetic Glove, you can pull yourself to or repel yourself from [them]." — Stray Fairy (Four Swords)
- ↑ "Use the power of repulsion to cross over to the other side." — Stray Fairy (Four Swords)
- ↑ "You can use the Magnetic Glove to pull your companions toward you." — Stray Fairy (Four Swords)
- ↑ "Press A to switch between [positive] and [negative]." — Stray Fairy (Four Swords)
- ↑ "There are some creatures you cannot defeat unless you use the Magnetic Glove against them. Be wary of these beasts." — Stray Fairy (Four Swords)
- ↑ "You can use the Magnetic Glove to pull your companion along if you have a wall between you. You can even walk as you draw them to you." — Stray Fairy (Four Swords)
- ↑ "Press A to jump with the Roc's Cape. Hold A to jump further!" — Stray Fairy (Four Swords)
- ↑ "What you see above is a gate. You can jump through the gate or land on it to jump down through it." — Stray Fairy (Four Swords)
- ↑ "You can use Bombs to destroy cracked blocks. Press A to take out a Bomb, then press A again to throw it." — Stray Fairy (Four Swords)
- ↑ "If you press A again after the Bomb falls to the ground, you can blow it up!" — Stray Fairy (Four Swords)
- ↑ "You can use Bombs to blow open cracked walls, too." — Stray Fairy (Four Swords)
- ↑ "Some walls that don't have cracks can also be blown open. Hold B to hold out your sword and tap the wall. Listen for odd noises!" — Stray Fairy (Four Swords)
- ↑ "You can throw Bombs over low walls to blow things up on the other side." — Stray Fairy (Four Swords)
- ↑ "If your bombs won't reach the area you're trying to throw them to, try throwing them from low walls." — Stray Fairy (Four Swords)
- ↑ "You can also use Bombs to activate the red switch over there." — Stray Fairy (Four Swords)
- ↑ "The Boomerang is great for retrieving items that are out of reach. You can use the Boomerang to activate switches from a distance." — Stray Fairy (Four Swords)
- ↑ "With the Pegasus Shoes, you can run quickly by holding A." — Stray Fairy (Four Swords)
- ↑ "You can even push your companions if they are standing in a line." — Stray Fairy (Four Swords)
- ↑ "You can also run up slippery slopes that you couldn't climb otherwise." — Stray Fairy (Four Swords)
- ↑ "It feels quite rubbery, but perhaps with the Pegasus Shoes..." — Stray Fairy (Four Swords)
- ↑ "When using the Bow and Arrow, hold A to put power into your shot!" — Stray Fairy (Four Swords)
- ↑ "There are some objects in the dungeon that will move when you shoot them. [...] Take a deep breath and release your bowstrings simultaneously!" — Stray Fairy (Four Swords)