Template:Book The Legend of Zelda: Oracle of Ages is a manga by Akira Himekawa loosely based on the story of the game of the same name. It was originally released in Japan in December 2001 and an English translation was released by VIZ Media on June 2, 2009.[1][2]
A Legendary Edition also containing the Oracle of Seasons manga by Akira Himekawa was released in Japan on May 27, 2016 and in North America on January 10, 2017. This premium edition features new cover art and color pages.
Storyline
Oracle of Ages: Nayru

Japanese cover
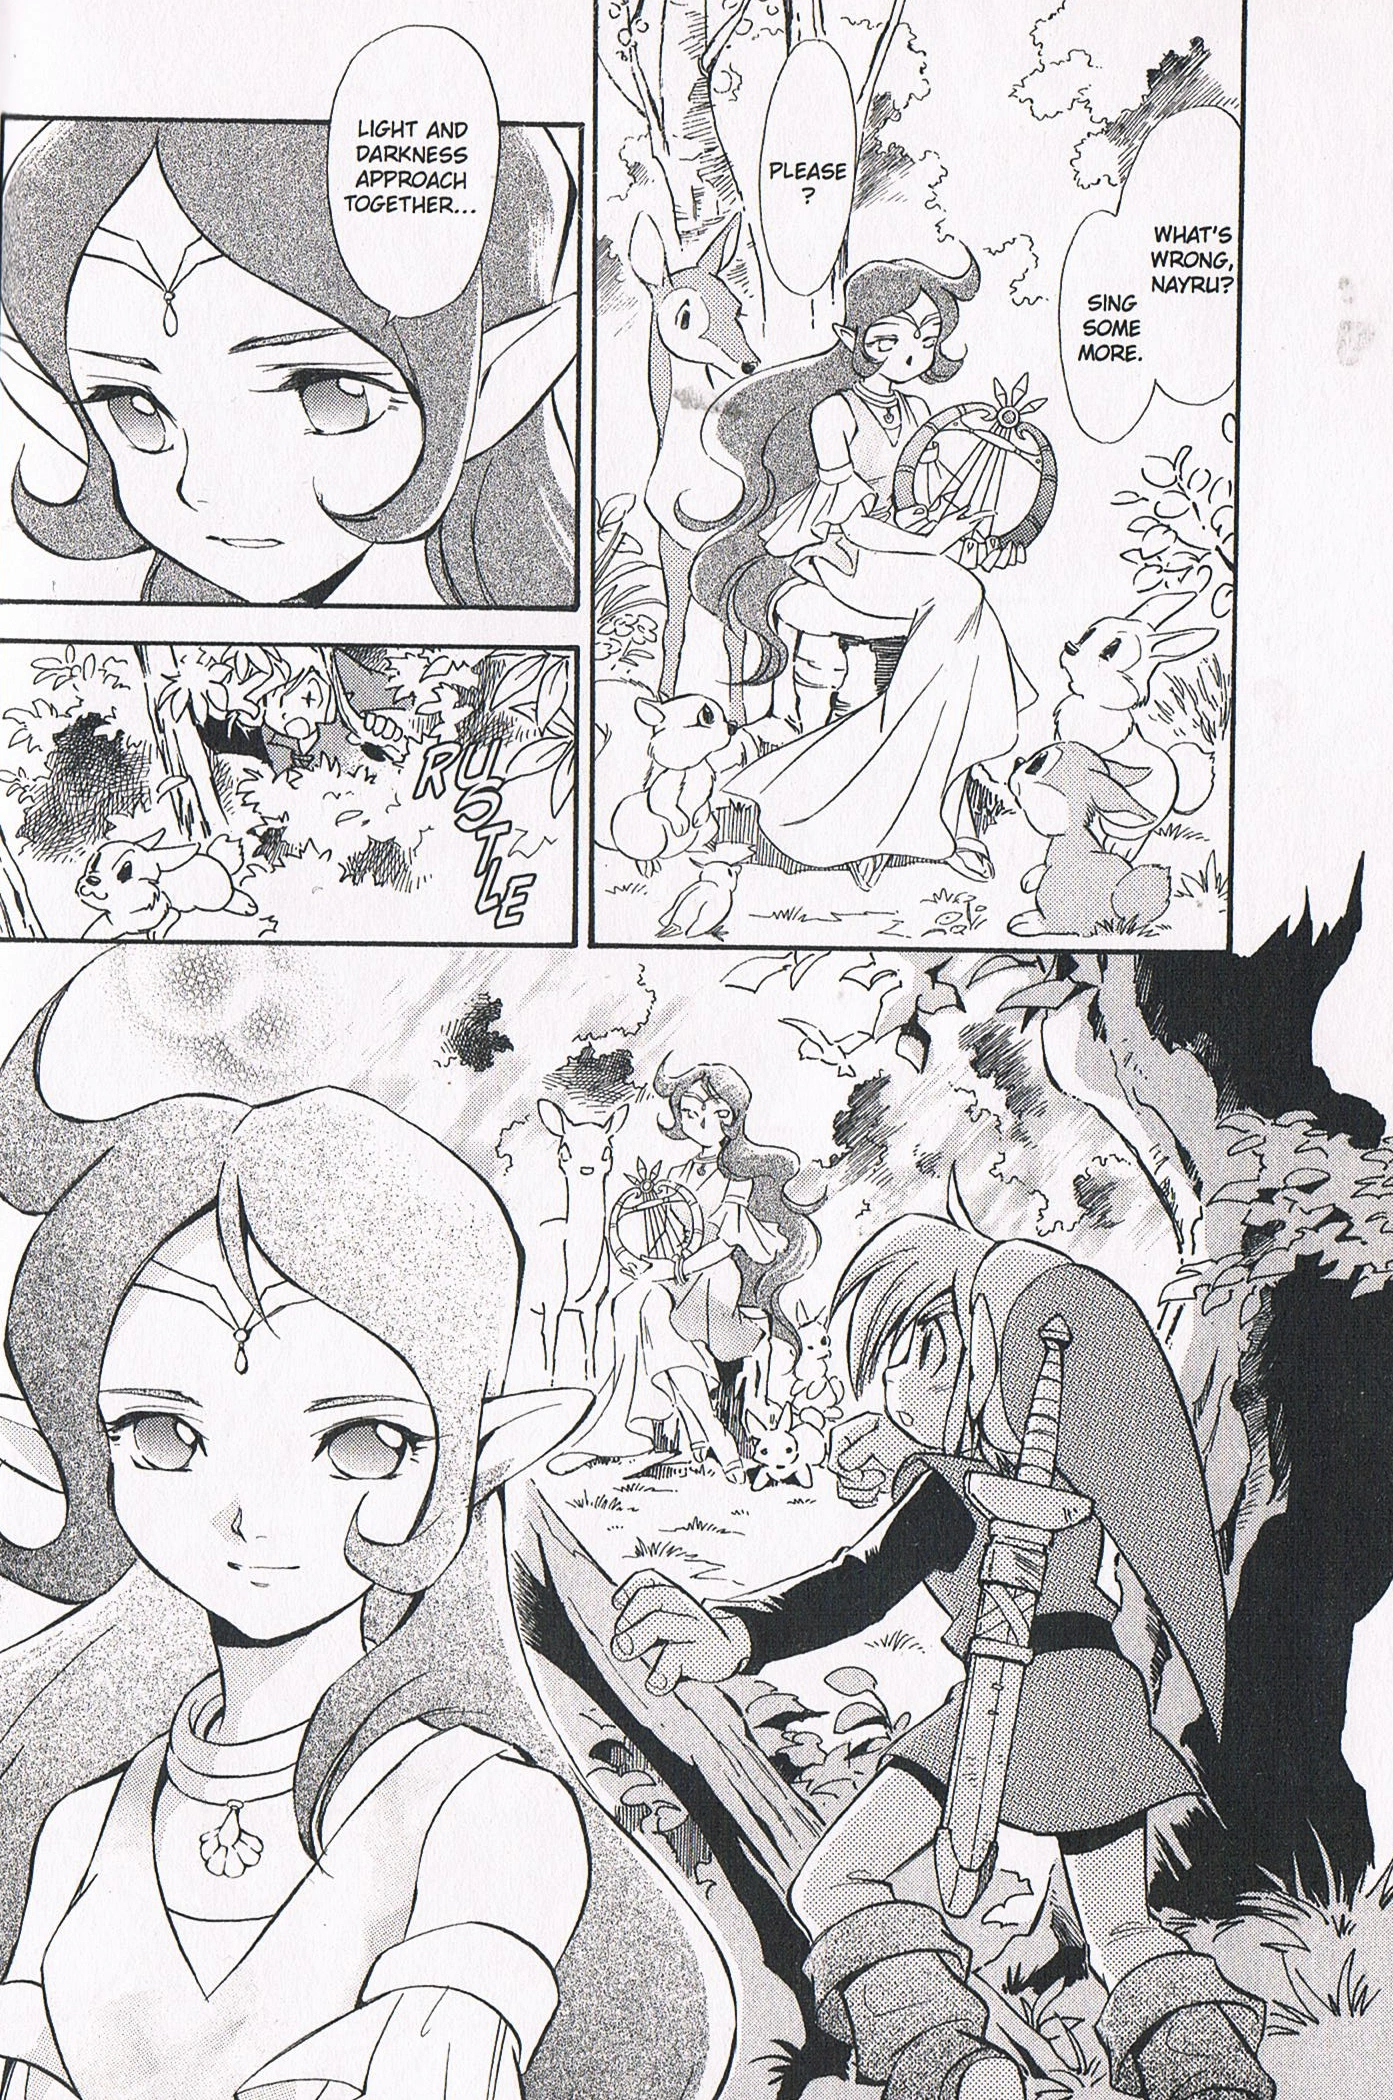
Since the Oracle of Seasons manga by Akira Himekawa, Link has ventured from Holodrum to Labrynna and participates in a fighting contest against Buri. Impa approaches Link after he wins the fight.[3] Meanwhile, the Twinrova recruit Veran to destroy Link in their attempt to resurrect Ganon.[4][5] In Hyrule, Princess Zelda awakens from her sleep, as a dream revealed to her that darkness lurks in the shadows and something is about to happen to history and time.[6]
In Labrynna, Impa informs Link that she is on a mission from Princess Zelda to find a girl named Nayru, who is a friend of Din's and the Oracle of Ages.[7] A young girl possessed by Veran appears and asks Link if he would like to buy some flowers.[8] The girl calls Link a stupid hero and says an ominous shadow is approaching from Labrynna.[9] The child abruptly thanks Link[10] and leaves the startled hero, Veran jumping into Impa and possessing the Sheikah.
Sorceress of Shadows: Veran
The possessed Impa leads Link into a forest[11] and asks him to move a stone marked with the symbol of the Triforce, because she is unable to do so.[12][13] At first Link laughs and does not since Impa had lifted a Cow in Lynna.[14] When she yells at him Link quickly moves the stone and they enter the forest.[15][16] The two are attacked by the forest animals and are told to go back.[17][18] However, they are allowed to pass once the animals realize Link can speak to them and that he is a Hylian of the old blood.[19] Sensing that light and darkness approach together, Nayru stops her music.[20] She welcomes Link and sees his future, stating his story will be told for generations.[21] Link says that his ancestors were heroes but according to his grandfather he is a disappointment.[22] Nayru insists that she is referring to Link.[23] The possessed Impa questions if Nayru knows her own fate.[24] The oracle responds that although she does, she cannot outwit the Goddess of Time.[25] Veran calls her compliant and a good oracle from within her host before revealing her posession of the woman.[26] The animals attack to defend Nayru but are unable to keep Veran from possessing the Oracle of Ages.[27] Using Nayru's abilities, Veran travels to the past in order to erase Link's existence.[28]
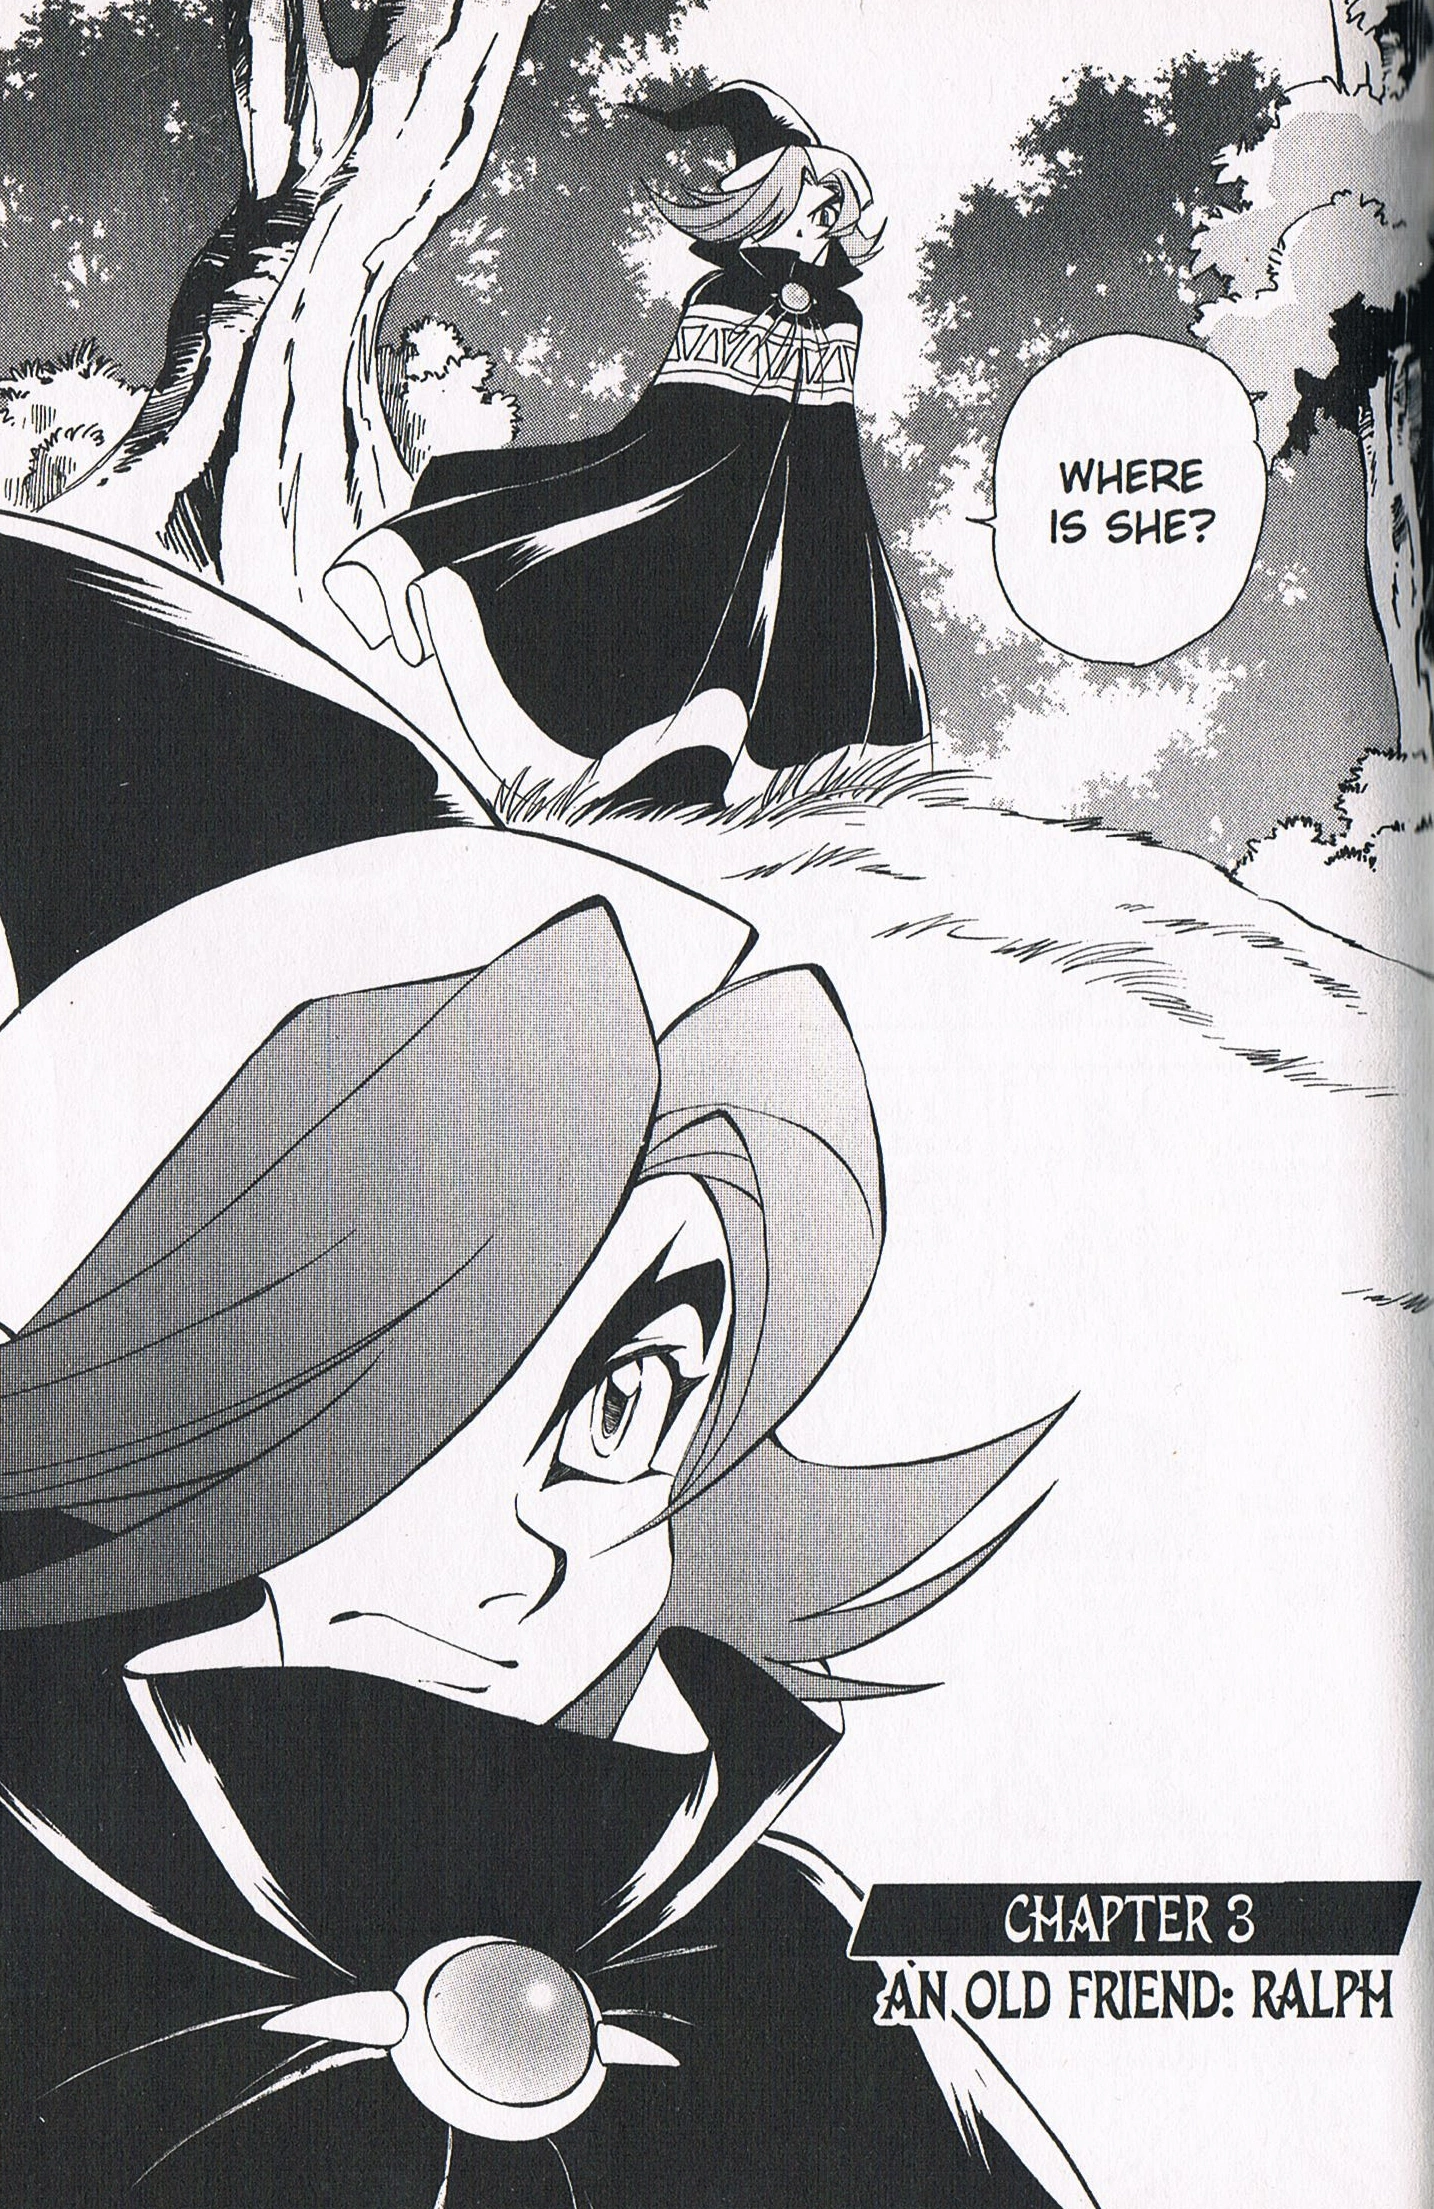
An Old Friend: Ralph
Link is confronted by Ralph, the descendant of an ancient and noble family and a friend of Nayru's.[29] During Ralph's introduction, Lynna is thrown into chaos since Veran is manipulating the city's past.[30] Link explains Nayru's disappearance,[31] sending Ralph into an emotional rage.[32] Ralph voices Link's incompetance and accuses him of trying to seduce his friend[33] until Impa awakens and confirms that it is not the hero's fault.[34] Impa explains Veran's ability to possess people and says Princess Zelda had a premonition about this and that Link must save Nayru.[35] When Ralph learns that Nayru's Harp of Ages was left behind, he wrestles Link for the instrument so he can save Nayru himself.[36][37] Ralph accidentally strums the Harp and creates a portal to the past.[38] Link kicks Ralph aside and travels to the past alone.[39] When he appears in Labrynna’s past, Link is forced into labor with the men of the past to build Queen Ambi’s Black Tower.[40] Link suspects that Veran is involved and attempts to convince the guards that their Queen is under an evil influence.[41] As he escapes, Link is confronted by a Hylian named Sir Raven.[42][43]
Queen Ambi of Labrynna
Link battles Sir Raven and quickly realizes that he cannot win bare handed and flees.[44] Sir Raven blocks Link’s path and knocks him unconscious. He is then carried to a dungeon cell.[45] Link manages to escape using a Fish Hook[46] and spies on Sir Raven’s conversation with Queen Ambi and the possessed Nayru. At the possessed Oracle’s prodding, Queen Ambi orders Link to be executed despite Sir Raven’s suggestions,[47][48][49] dismissing the knight.[50] Through Nayru, Veran tells Queen Ambi that by building the Black Tower will she will be remembered in history and show the world Labrynna’s power to encourage the monarch’s efforts.[51][52] When Veran sees Link’s cell empty, she orders the castle guards to find him.[53] Link spots Sir Raven and decides to follow the knight.[54] Sir Raven and his Horse Puini are aware of Link’s presence.[55] The knight is disturbed by Nayru’s innocent front and that Queen Ambi has become her puppet.[56] Before reporting this to his collegues, Raven and his steed disappear around the corner of a house with Link close behind.[57] The hero finds Sir Raven fishing.[58] Sir Raven has Link help him catch a Fish. When Link asks what he had meant by the Queen was being influenced,[59] The knight spins around and holds his sword to Link’s throat, telling him to not move and that next time he will cut the boy to cut him.[60] Link asks if he would harm an unarmed opponent.[61] Sir Raven puts away his sword and apologizes and asks Link to come with him.[62] Link rides with Sir Raven through a graveyard of the supposedly dead[63][64] and sees for the first time the Hidden Village.[65]
Sir Raven
Upon entering the Village, Link meets a girl named Roperi. Sir Raven leaves Link with the girl to go check the fields.[66] Link realizes Sir Raven is his ancestor after speaking to Roperi about him.[67] Link is brought before the village’s elder and is asked to tell what he knows about Queen Ambi.[68] Link informs that Nayru is being controlled by Veran.[69] He in turn learns that the people of the Hidden Village love and support the queen but not construction of the tower, which is causing suffering.[70] Something must be done or civil war might break out in the kingdom.[71] Link comes to the conclusion that Veran must want to change Labrynna’s history so the peaceful country will become one ravaged by darkness and war.[72] Sir Raven shows Link the villagers and their life style and the two agree to defeat Veran together.
Overthrowing Veran
Upon arriving in Labrynna’s past, Link lost the Harp of Ages during his fight with Queen Ambi’s soldiers. A soldier took the Harp and used it to pay his bar tab and from there it passed from hand to hand across the centuries, eventually arriving in a Tokay’s shop.[73] Ralph finds the Harp while searching for a time travel device and uses it to go after Link.[74]
In the past, Link and Sir Raven talk while observing the Black Tower. A villager tells Raven that fights are breaking out at the Tower.[75] The knight and Link mount Puini and race to Queen Ambi’s castle. Link stays to confront Veran and Raven turns to the Tower. Link orders Veran to release Nayru.[76] The sorceress scoffs at his drawn sword and says the only one he will hurt is Nayru.[77] She then brings the stone dragons in the castle to life to attack him.[78] Link defeats the fiends and has to battle the flaming leopards Veran creates in their stead.[79] Ralph appears and lands on top of Link,[80] causing the leopards to disappear. Ralph moves toward Nayru, unaware that she is still possessed.[81][82] Link reaches for Ralph and strums the Harp of Ages instead. This causes the two to be transported to an island in the middle of an ocean.[83]
The Pirate Captain
As Link and row paddle a makeshift raft, a storm almost drowns them.[84] Link spots a ship and calls for help.[85] When brought aboard, they discover that everyone onboard is a skeleton.[86] Link asks the Captain if he can tell him anything about Veran since he knows so much.[87] The Captain agrees to tell Link Veran’s weakness if he first answers all his questions.[88] He compliments Link’s sword and says how he once was a knight who swore his loyalty to a lady.[89] The Captain notices Ralph holding the Harp of Ages and orders him to play a song.[90] The Harp does not cause a time trip and the Captain remembers his lover and how he sailed away from her to forget when their romance ended.[91] He could never forget her, so the Captain commands his crew to set sail for Labrynna.[92] Link reads the Ship’s log and learns that the skeleton crew has been stuck in the storm forever.[93] The two boys attempt to escape the Ship but are stopped by the Captain and his crew.[94] A duel ensues between Link and the Captain. Link states that although the Captain is stuck there, Ralph and he can go and fix everything for his crew and he along with his lady.[95] The Captain realizes Link is correct and gives the boys a boat.[96] The Captain gives Link a locket with the picture of a woman inside, and asks him to tell this lady if he ever sees her on his journeys that the knight who set sail will love her for all eternity.[97] The woman in the picture is none other than Queen Ambi.[98] The Captain stays true to his promise and reveals Veran’s weakness.[99] As they drift away, Link promises to send the Captain’s love to Queen Ambi.[100]
At the Black Tower, Sir Raven works with Queen Ambi’s soldiers to suppress the rebelling work hands. Sir Raven finds Roperi’s father Jacob and asks if he is crazy since he told him to wait until the signal was given.[101] Jacob responds by apologizing and saying they cannot stop it now.[102] One of the dragons Veran brought to life flies past Raven and reports to its mistress that Raven was talking privately with one of the rioters.[103] Veran knew there was something she did not like about him and decides to look more deeply into his background.[104]
Ramrock
Veran leaves Nayru’s body while she sleeps to spy on Sir Raven.[105] She watches as Link and Ralph reunite with the knight and leave to the Hidden Village. Veran possesses Ralph and follows. She learns from Link that all the people who had been sentenced to death by her were brought to the Village and that Sir Raven is Link’s ancestor.[106] Inside one of the buildings Link announces that demons that possess people cannot stand Mystery Seeds,[107] making them Veran’s weakness. Sir Raven shows some seeds he got on his journey, which happen to be Mystery Seeds.[108][109] The group prepares to attack the next day at dawn and goes to sleep.[110] Using Ralph, Veran burns the Seeds in the fireplace and abandons her host as the men wake.[111][112] Then she summons Ramrock to crush the Village.[113] Link defends the Village and defeats Ramock with a double Spin Attack.[114] Sir Raven spots a hidden archer and pushes Link aside, taking the arrow meant for the boy in his shoulder. Queen Ambi’s soldiers quickly take over the area. Sir Raven yells at Link to run and is surrounded by the invaders.[115] Although she may be unable to defeat Link, Veran knows that killing his ancestor will make the hero cease to exist.[116] Raven tells Link and Ralph to get the villagers to safety and battles the troops with the Village’s remaining men.[117] He finally surrenders when archers surround the Villagers and threaten to shoot.[118] Link begins to fade as Sir Raven is taken away, since his death means the disappearance of his family line.[119] Link finds Puini[120] and charges Queen Ambi’s castle with Raven’s men.
Link and his allies arrive right before Sir Raven is to be executed. Link cuts the executioner’s axe in half and stands before Raven with Ralph. The crowd, now armed, also joins the fight for Sir Raven’s life.[121] Veran uses Nayru to grab a spear from the hesitant guards to kill Raven herself.[122] Link grabs the weapon mid thrust and yanks it out of her hands.[123] Link hands Queen Ambi the Captain’s locket and relays his message.[124] Queen Ambi begins to cry because the reason she had built the Tower was so the Captain might see it no matter where he was in the world and never forget her.[125] Now that she knows how he feels, Queen Ambi cancels construction on the Tower and Sir Raven’s execution.[126] The assembly rejoices, leaving Veran astonished that all the sorrow she spread is turned into great joy.[127] Nayru is released from Veran’s hold and Queen Ambi becomes her new host,[128] ordering the guards to seize them and get back to work on the Tower.[129]
Mystery Seeds
Nayru awakens in time to teleport Link, Ralph, and Sir Raven to modern day Labrynna before Queen Ambi’s guards take ahold of them.[130][131] After Ralph and Nayru are reunited, the Oracle whisks the group back to the past where she knows they can find more Mystery Seeds.[132] The four find Roperi and the other villagers who have not been taken to the Black Tower in a cave.[133] Nayru takes Roperi’s plant, which she had grown from a Seed Sir Raven gave her, and reveals that it is a young Mystery Tree.[134] The Tree is still a seedling so Nayru will speed its growth with her power over time.[135][136] Despite this, Ralph leaves to face Veran on his own to slow the nearly finished Tower’s completion.[137] Nayru explains in a panic that they cannot left Ralph fight Queen Ambi since she is his direct ancestor.[138] Ralph finds the possessed Queen Ambi inside the Black Tower and chases Veran’s powerless host with sword drawn.[139]
Nayru’s powers yield a Mystery Seed from Roperi’s seedling and Sir Raven and Link ride Puini to the Black Tower.[140][141] Before Ralph can run Queen Ambi through with his blade, Link uses a Seed Shooter he took from a villager to launch the Mystery Seed at Veran’s host. Queen Ambi falls to the ground unconscious as the Seed forces Veran from her body.[142] The sorceress transforms into her true form, a large, arthropod like creature, and captures Link in her web strands.[143]
Veran's True Form
Sir Raven brings Queen Ambi to safety as Link struggles with Veran.[144] Link cuts himself free and fights Veran, eventually coming across a box of explosives from the construction. He throws an explosive at Veran’s three eyes and stuns her. Veran climbs along the Tower’s interior and launches webs to cover her escape.[145] Veran grabs Link by the throat once he reaches the top of the Tower and begins to slowly crush him to death.[146] Link cuts off the arthropod limb holding him and charges Veran’s eye. Veran is paralyzed by the power of the Triforce and is unable to protect herself.[147] Dying, Veran picks up a fallen Bomb and holds Link to her body, determined to kill Link with her.[148] Sir Raven arrives and slashes Link out of Veran’s grasp. The two finish her off together.[149] With her dying breath, Veran sends Twinrova one final lamentation of her own.[150] Twinrova appear and using the Flame of Destruction and Flame of Sorrow resurrect Ganon, sacrificing their lives in the process.[151]
The Return of the King of Evil
Princess Zelda speaks to Link as Ganon begins his rampage on the Black Tower, informing the hero that Twinrova’s ritual was incomplete and only Ganon’s strength has been raised, making him a beast without any intelligence.[152][153] The Princess pleads Link to protect the future.[154] Link’s Triforce saves the trio as they fall from the crumbling Tower.[155][156] Link, Sir Raven, Ralph, all the villagers,[157] and Queen Ambi’s army attack Ganon.[158] With a final blow Link destroys Ganon, the gathered people rejoicing. Queen Ambi asks Sir Raven if he will stay as a knight of the realm and apologizes for her mistakes.[159] Sir Raven responds by bowing respectfully. Labrynna’s citizens bid Nayru, Ralph, and Link farewell before they depart to the future. Raven tells Link he is proud to have a descendant like him,[160] surprising the hero.[161] Sir Raven gives Link his horse Puini and the three return to their own time.[162]
At Hyrule Castle, Nayru and Ralph have tea with Princess Zelda and Impa. They discuss how lucky they were that Ganon’s resurrection was incomplete and the Princess congratulates Nayru and Ralph.[163] Meanwhile, Link returns to the farm where he grew up and is reunited with his grandparents. He spends a while there with his family but soon sets out on another journey.[164]
Characters Exclusive to the Manga
Sir Raven
Sir Raven is a Knight of Hyrule in employment as the captain of Queen Ambi's knights. He is an ancestor to Link. While on leave and not in the Queen's service, Sir Raven lives in a hidden village that has come to oppose Queen Ambi.
Resuta
Resuta is briefly mentioned by the elder of the hidden village. When Raven takes Link to the village, they make a stop at a house full of people, where Link explains what has happened to the queen. Before Link speaks, Raven gives the elder a fish, and the elder then gives it to Resuta and tells him or her to cook it.
Roperi
Roperi is a girl who lives in the hidden village away from the misery created by the Black Tower. She admires Sir Raven for his kindness. Roperi was given a special seed to her by Sir Raven. As the construction of the tower continues, the seed eventually sprouts into a Mystery Seed, Veran's only weakness. She worries about her father, who is a slave building Queen Ambi's Tower.
Roperi's Mother
Roperi's Mother is constantly seen with her daughter, Roperi. She is depicted as gentle and caring toward her daughter.
Jacob
Jacob is Roperi's father and her mother's husband. He is a friend of Sir Raven's and is a slave building Queen Ambi's tower.
Buri
Buri is an arena fighter Link duels against at the Manga's beginning.
Gallery

French cover

Spanish cover

Italian cover

English Legendary Edition
Japanese Legendary Edition
Italian Perfect Edition
Ralph
Link meeting Nayru
References
- ↑ Template:Cite web
- ↑ Template:Cite web
- ↑ Template:Cite book
- ↑ Template:Cite book
- ↑ Template:Cite book
- ↑ Template:Cite book
- ↑ Template:Cite book
- ↑ Template:Cite book
- ↑ Template:Cite book
- ↑ Template:Cite book
- ↑ Template:Cite book
- ↑ Template:Cite book
- ↑ Template:Cite book
- ↑ Template:Cite book
- ↑ Template:Cite book
- ↑ Template:Cite book
- ↑ Template:Cite book
- ↑ Template:Cite book
- ↑ Template:Cite book
- ↑ Template:Cite book
- ↑ Template:Cite book
- ↑ Template:Cite book
- ↑ Template:Cite book
- ↑ Template:Cite book
- ↑ Template:Cite book
- ↑ Template:Cite book
- ↑ Template:Cite book
- ↑ Template:Cite book
- ↑ Template:Cite book
- ↑ Template:Cite book
- ↑ Template:Cite book
- ↑ Template:Cite book
- ↑ Template:Cite book
- ↑ Template:Cite book
- ↑ Template:Cite book
- ↑ Template:Cite book
- ↑ Template:Cite book
- ↑ Template:Cite book
- ↑ Template:Cite book
- ↑ Template:Cite book
- ↑ Template:Cite book
- ↑ Template:Cite book
- ↑ Template:Cite book
- ↑ Template:Cite book
- ↑ Template:Cite book
- ↑ Template:Cite book
- ↑ Template:Cite book
- ↑ Template:Cite book
- ↑ Template:Cite book
- ↑ Template:Cite book
- ↑ Template:Cite book
- ↑ Template:Cite book
- ↑ Template:Cite book
- ↑ Template:Cite book
- ↑ Template:Cite book
- ↑ Template:Cite book
- ↑ Template:Cite book
- ↑ Template:Cite book
- ↑ Template:Cite book
- ↑ Template:Cite book
- ↑ Template:Cite book
- ↑ {{Cite book|quote= My apologies. There’s something I want to ask you. Come with me.|book= Oracle of Ages (Himekawa)|publisher= VIZ Media|page= 68}]
- ↑ Template:Cite book
- ↑ Template:Cite book
- ↑ Template:Cite book
- ↑ Template:Cite book
- ↑ Template:Cite book
- ↑ Template:Cite book
- ↑ Template:Cite book
- ↑ Template:Cite book
- ↑ Template:Cite book
- ↑ Template:Cite book
- ↑ Template:Cite book
- ↑ Template:Cite book
- ↑ Template:Cite book
- ↑ Template:Cite book
- ↑ Template:Cite book
- ↑ Template:Cite book
- ↑ Template:Cite book
- ↑ Template:Cite book
- ↑ Template:Cite book
- ↑ Template:Cite book
- ↑ Template:Cite book
- ↑ Template:Cite book
- ↑ Template:Cite book
- ↑ Template:Cite book
- ↑ Template:Cite book
- ↑ Template:Cite book
- ↑ Template:Cite book
- ↑ Template:Cite book
- ↑ Template:Cite book
- ↑ Template:Cite book
- ↑ Template:Cite book
- ↑ Template:Cite book
- ↑ Template:Cite book
- ↑ Template:Cite book
- ↑ Template:Cite book
- ↑ Template:Cite book
- ↑ Template:Cite book
- ↑ Template:Cite book
- ↑ Template:Cite book
- ↑ Template:Cite book
- ↑ Template:Cite book
- ↑ Template:Cite book
- ↑ Template:Cite book
- ↑ Template:Cite book
- ↑ Template:Cite book
- ↑ Template:Cite book
- ↑ Template:Cite book
- ↑ Template:Cite book
- ↑ Template:Cite book
- ↑ Template:Cite book
- ↑ Template:Cite book
- ↑ Template:Cite book
- ↑ Template:Cite book
- ↑ Template:Cite book
- ↑ Template:Cite book
- ↑ Template:Cite book
- ↑ Template:Cite book
- ↑ Template:Cite book
- ↑ Template:Cite book
- ↑ Template:Cite book
- ↑ Template:Cite book
- ↑ Template:Cite book
- ↑ Template:Cite book
- ↑ Template:Cite book
- ↑ Template:Cite book
- ↑ Template:Cite book
- ↑ Template:Cite book
- ↑ Template:Cite book
- ↑ Template:Cite book
- ↑ Template:Cite book
- ↑ Template:Cite book
- ↑ Template:Cite book
- ↑ Template:Cite book
- ↑ Template:Cite book
- ↑ Template:Cite book
- ↑ Template:Cite book
- ↑ Template:Cite book
- ↑ Template:Cite book
- ↑ Template:Cite book
- ↑ Template:Cite book
- ↑ Template:Cite book
- ↑ Template:Cite book
- ↑ Template:Cite book
- ↑ Template:Cite book
- ↑ Template:Cite book
- ↑ Template:Cite book
- ↑ Template:Cite book
- ↑ Template:Cite book
- ↑ Template:Cite book
- ↑ Template:Cite book
- ↑ Template:Cite book
- ↑ Template:Cite book
- ↑ Template:Cite book
- ↑ Template:Cite book
- ↑ Template:Cite book
- ↑ Template:Cite book
- ↑ Template:Cite book
- ↑ Template:Cite book
- ↑ Template:Cite book
- ↑ Template:Cite book
- ↑ Template:Cite book
- ↑ Template:Cite book