No edit summary |
m (Text replace - "''Spirit Tracks''" to "''Spirit Tracks''") |
||
| Line 1: | Line 1: | ||
| ⚫ | |||
| − | [[File:Nintendo_Gallery.jpg|thumb|right|250px|The Gallery's main desk]] |
||
| + | {{Place |
||
| − | The '''Nintendo Gallery''' is a location in {{TWW}} where all the [[Figurines in The Wind Waker|Figurines]] collected can be seen. |
||
| + | |name = Sand Sanctuary |
||
| + | |image = [[File:Rael.png|200px]] |
||
| + | |caption = Link and Rael engage in their duet in the Sand Sanctuary as Princess Zelda's spirit looks on. |
||
| + | |game = {{ST}} |
||
| + | |inhab = [[Rael]] |
||
| + | |items = [[Force Gem]] |
||
| + | |related = [[Sand Realm]]<br>[[Sand Temple]] |
||
| + | |theme music = |
||
| ⚫ | |||
| + | The '''Sand Sanctuary''' is a location within the [[Sand Realm]] of the re-established kingdom of [[Hyrule]] in {{ST}}. It is located in the sandy dunes just north of the waters of the [[Ocean Realm]] and is the home dwelling of the realm's [[Lokomo]] guardian, [[Rael]]. |
||
| − | == |
+ | ==Features== |
| + | ===Story=== |
||
| − | [[File:Carlov.png|thumb|right|180px|Carlov inside the Gallery]] |
||
| + | After defeating [[Byrne]] atop the [[Tower of Spirits]] and witnessing the revival of the Demon King [[Malladus]], [[Link]] and [[Princess Zelda]] are sent by [[Anjean]] to recover the legendary [[Bow of Light]] from the final temple in the kingdom of Hyrule far across the dunes of the Sand Realm, the [[Sand Temple]].<ref>{{cite|In the battle between the Demon King and the spirits, there was a weapon called the Bow of Light... Perhaps it can drive his spirit from your body.|Anjean|ST}}</ref> To reach the temple across the desert sands, Link sees that like all the other realms he has visited, he must first restore the realm's lost Spirit Tracks that lead to the temple in order to fully explore it. After succeeding in restoring enough of the tracks through the use of a [[Force Gem]] given to them by [[Anjean]] to reach the Sand Sanctuary, the pair travel to the Sand Realm to restore the final temple and recover the only weapon capable of banishing Malladus from a human host. |
||
| − | The Nintendo Gallery is located on a tall cylindrical island near the [[Forest Haven]] and can be opened by hitting a switch in the main island with a [[Seagull]]. The gallery is run by [[Carlov]], who will carve a figurine of every enemy and character in the game. To request a figurine, [[Link]] must show Carlov a color [[Pictograph]] of the subject. Carlov will only accept pictographs which display a significant amount of the subject's body and which show the subject facing the camera. After Carlov approves the pictograph, he will complete the requested figurine in a day. Link can use the [[Song of Passing]] to advance time and speed up this process. Certain characters in the game cannot be pictographed, such as [[Ganon]]dorf and the [[Fairy Queen]], but Link can purchase pictographs of them from [[Lenzo]] on [[Windfall Island]]. These are known as [[Pictograph#Legendary Pictograph|Legendary Pictograph]]s. |
||
| + | Link at first finds the area of the sanctuary to be an empty clearing of sand, but soon realizes the area is a miniature model of the entire desert.<ref>{{cite|Do not dwell on what's inside. Instead, turn your gaze outward. There are no statues here.|Gossip Stone|ST}}</ref><ref>{{cite|The lake forms the sea. The paths forms the rails.|Gossip Stone|ST}}</ref> After reading an ancient inscription nearby, the young hero must journey around the Sand Realm to find the four giant [[Head Statue|head statues]] scattered around the realm and trace their gazes to find their intersection. Once done so, the place where the gazes intersect on the map is the same place where Link must place a bomb in the sanctuary, where it will reveal the hidden doorway to the sanctuary's inner sanctums as well as Rael, the Lokomo sage.<ref>{{cite|Find me by blasting the area where the gazes of the big statues meet.|A sign|ST}}</ref> Together, he and Link perform the necessary [[Lokomo Song]] with Link wielding the [[Spirit Flute]], restoring the Spirit Tracks and reopening the path to the Sand Temple far across the desert. |
||
| − | Some characters and bosses appear one time only, making possible to leave the Nintendo Gallery uncompleted. If a pictograph of certain subjects are not taken before they are defeated or they dissapear, completing the galley becomes impossible during the first playthrough, altough it can be completed during the [[Second Quest#The Wind Waker|Second Quest]], where the [[Picto Box#Deluxe Picto Box|Deluxe Picto Box]] is available from the beginning and all the figurines from the previous playthrough are still in the gallery. |
||
| + | ===Force Gem=== |
||
| − | It is possible to complete the Nintendo Gallery on the first playthrough, as Carlov will accept the pictograph of the [[Gohma#The Wind Waker|Gohma]] rematch in [[Ganon's Tower#The Wind Waker|Ganon's Tower]]. This is the only pictograph missed before the Deluxe Picto Box can be obtained. |
||
| + | After Link completes the Sand Temple, Link can bring Rael five [[Cucco]]s from [[Hyrule Castle Town]] to help him with his Cucco research, which consists of harnessing the unbelievable power the Cuccos possess when they call others as they are being threatened by others and use this power for the good of mankind.<ref>{{cite|Do you know about the birds called Cuccos? They are flightless. But when cornered, they can call their friends to unleash an amazing power. I want to study this phenomenon more closely... My goal is to harness this unbelievable Cucco power for the good of mankind. And this is where you come in, young man. Would you bring me some Cuccos? The more Cuccos, the better. At the very least, I'd like five. Once you bring them to me, I'll give you something nice. Thanks!|Rael|ST}}</ref> As a sign of gratitude, Rael will give the young hero a [[Force Gem#Spirit Tracks|Force Gem]] that reveals more tracks in the [[Fire Realm]], opening way to the [[Ends of the Earth Station]]. |
||
| + | ==Gallery== |
||
| − | {{Myth|Nintendo Gallery complete only in the Second Quest}} |
||
| + | <gallery> |
||
| − | |||
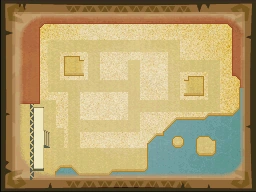
| + | File:Sand Sanctuary Map.png|The map of the sanctuary |
||
| − | After the entance to the gallery is opened, [[Manny]], who is seen outside of the gallery before it is opened, will appear next to the main desk, and sometimes inside the rooms looking at the figurines. Figurines that cannot be obtained can be seen behind Carlov's desk, including [[Tetra's Ship]], a [[Submarine]], the [[Salvage Corp|Salvage Corp's]] boat, a scale model of the windmill and lighthouse on [[Windfall Island]], and both forms of the [[Nayru (Goddess)|Nayru]] statue on [[Southern Triangle Island]]. Around the desk, some ''Zelda''-related easter eggs can also be found, such as the [[Bunny Hood]], [[All-Night Mask]], [[Goron Mask]] and [[Keaton Mask]], one of [[Tijo]]'s drums from {{MM}}, several bottles of [[Lon Lon Milk]], and a [[Cucco]]. The figurines are made out of Rainbow Stone, a type of rock found only around Forest Haven.<ref>{{Cite|How do you like my figurine? Isn't it marvelous? We do use only the highest quality material, after all, so I suppose it couldn't be anything less than lovely. You can make figurines out of many different materials, but I carve mine from rainbow stone—It's a special type of rock whose colors defy description. Rainbow stone is a very precious material, and it can only be found around here!|Carlov|TWW}}</ref> |
||
| + | </gallery> |
||
| − | |||
| − | ===''The Wind Waker HD''=== |
||
| − | Completing the Nintendo Gallery in {{TWWHD}} is facilitated. In the remake, the Picto Box can hold 12 pictographs instead of 3, plus a golden Carlov icon will appear on a pictograph that can be used to make a figurine. Also, Carlov can now make up to 12 figurines per day, as opposed to only one. As the Deluxe Picto Box is obtained much earlier, it is also possible to take pictographs of characters and enemies sooner than previously; such as [[Gohma#The Wind Waker|Gohma]]'s, thus eliminating the need to take its pictograph at [[Ganon's Tower]]. Additionally, pictographs found in a [[Tingle Bottle]] can be saved in the Picto Box, making it possible to obtain figurines of subjects that were previously missed. |
||
| − | |||
| − | ==Figurine Collection== |
||
| − | {{Main|Figurines in The Wind Waker}} |
||
| − | |||
| − | '''Legend:'''<br> |
||
| − | L — Obtained via a Legendary Pictograph.<br> |
||
| − | ''*'' — Automatically received with another figurine.<br> |
||
| − | ! — May be missable after some point of the game. |
||
| − | |||
| − | ===Hall A: [[Forest Haven]] Figurines=== |
||
| − | [[File:Gallery1.jpg|right|250px]] |
||
| − | {| |
||
| − | |width=225px| |
||
| − | *[[Makar]] |
||
| − | *[[Fado (The Wind Waker)|Fado]] (L) |
||
| − | *[[Great Deku Tree|Deku Tree]] |
||
| − | *[[Korok#Elma|Elma]] |
||
| − | *[[Korok#Hollo|Hollo]] |
||
| − | *[[Korok#Olivio|Olivio]] |
||
| − | *[[Korok#Drona|Drona]] |
||
| − | *[[Korok#Rown|Rown]] |
||
| − | *[[Korok#Irch|Irch]] |
||
| − | *[[Korok#Linder|Linder]] |
||
| − | |valign=top| |
||
| − | *[[Korok#Aldo|Aldo]] |
||
| − | *[[Korok#Oakin|Oakin]] |
||
| − | *[[Carlov|Carlov the Sculptor]] |
||
| − | *[[Manny]] |
||
| ⚫ | |||
| ⚫ | |||
| − | |||
| − | ===Hall B: [[Dragon Roost Island]] Figurines=== |
||
| − | [[File:Gallery2.jpg|right|250px]] |
||
| − | {| |
||
| − | |width=225px| |
||
| − | *[[Medli]] |
||
| − | *[[Laruto]] (L) |
||
| − | *[[Prince Komali|Komali]] |
||
| − | *[[Rito Chieftain|The Rito Chieftain]] |
||
| − | *[[Kogoli]] (!) |
||
| − | *[[Pashli]] |
||
| − | *[[Skett and Akoot]] |
||
| − | *[[Koboli]] |
||
| − | *[[Baito]] |
||
| − | *[[Hoskit]] |
||
| − | |valign=top| |
||
| − | *[[Quill|Quill the Postman]] {{Exp|Received with The Rito Chieftain figurine.}} |
||
| − | *[[Valoo]] |
||
| − | *[[Zephos]] and [[Cyclos]] (!) |
||
| − | *[[Ilari]] |
||
| − | *[[Namali]] |
||
| − | *[[Bisht and Basht|Basht and Bisht]] |
||
| − | *[[Obli]] |
||
| − | *[[Willi]] |
||
| ⚫ | |||
| − | |||
| − | ===Hall C: Enemy Figurines=== |
||
| − | [[File:Gallery3.jpg|right|250px]] |
||
| − | {| |
||
| − | |width=225px| |
||
| − | *[[Floormaster]] |
||
| − | *[[Magtail]] |
||
| − | *[[Keese]] and [[Keese#Fire Keese|Fire Keese]] |
||
| − | *[[Bokoblin]] |
||
| − | *[[Bubble]] |
||
| − | *[[Rat]] |
||
| − | *[[Boko Baba]] |
||
| − | *[[Miniblin]] |
||
| − | *[[Chuchu|ChuChu]] |
||
| − | *[[Peahat]] |
||
| − | |valign=top| |
||
| − | *[[Gyorg (Enemy)|Gyorg]] |
||
| − | *[[Octorok]] |
||
| − | *[[Seahat]] |
||
| − | *[[Kargarok|Kargaroc]] |
||
| − | *[[Armos]] |
||
| − | *[[Armos Knight]] |
||
| − | *[[Morth]] |
||
| − | *[[Poe]] |
||
| − | *[[ReDead]] |
||
| − | |} |
||
| − | |||
| − | ===Hall D: Boss and Mini-boss Figurines=== |
||
| − | [[File:Gallery4.jpg|right|250px]] |
||
| − | {| |
||
| − | |width=225px| |
||
| − | *[[Darknut]] |
||
| − | *[[Gohdan|Gohdan, the Great Arbiter]] |
||
| − | *[[Darknut]] |
||
| − | *[[Wizzrobe]] |
||
| − | *[[Wizzrobe]] ([[Wind Temple]]) (!) |
||
| − | *[[Mighty Darknut]] |
||
| − | *[[Moblin]] |
||
| − | *[[Phantom Ganon]] (!) |
||
| − | *[[Stalfos]] |
||
| − | *[[Jalhalla|Jalhalla, Protector of the Seal]] |
||
| − | *[[Ganon|Ganondorf]] (L) |
||
| − | |valign=top| |
||
| − | *[[Helmaroc King|The Monstrous Helmaroc King]] (!) |
||
| − | *[[Mothula]] |
||
| − | *[[Puppet Ganon]] (!) {{Exp|To obtain this figurine, the player must save and quit in order to exit the boss room after taking the pictograph.}} |
||
| − | *[[Molgera|Molgera, Protector of the Seal]] |
||
| − | *[[Kalle Demos]] |
||
| − | *[[Gohma]] |
||
| − | *[[Big Octo#The Wind Waker|Big Octo]] (!) |
||
| − | |} |
||
| − | |||
| − | ===Hall E: [[Outset Island]] Figurines=== |
||
| − | [[File:Gallery5.jpg|right|250px]] |
||
| − | {| |
||
| − | |width=225px| |
||
| − | *[[Crab]] |
||
| − | *[[Mesa]] |
||
| − | *[[Jabun]] (L) |
||
| − | *[[Orca]] |
||
| − | *[[Sturgeon]] |
||
| − | *[[Sue-Belle]] |
||
| − | *[[Seagull]] |
||
| − | *[[Aryll]] {{Exp|Received with Link's Grandma figurine.}} |
||
| − | *[[Grandmother|Link's Grandma]] |
||
| − | *[[Pig|Wild Pig]] |
||
| − | |valign=top| |
||
| − | *[[Rose]] |
||
| − | *[[Abe]] |
||
| − | *[[Joel]] |
||
| − | *[[Zill]] |
||
| − | |} |
||
| − | |||
| − | ===Hall F: [[Windfall Island]] Figurines=== |
||
| − | [[File:Gallery6.jpg|right|250px]] |
||
| − | {| |
||
| − | |width=225px| |
||
| − | *[[Minenco]] |
||
| − | *[[Anton]] |
||
| − | *[[Missy]] |
||
| − | *[[Kreeb]] |
||
| − | *[[Garrickson]] |
||
| − | *[[Pompie and Vera]] |
||
| − | *[[Zunari|The Shop Guru, Zunari]] |
||
| − | *[[Tott]] |
||
| − | *[[Lenzo|The Pictographer, Lenzo]] |
||
| − | *[[Killer Bees|Windfall's Gang of Boys, the Killer Bees]] |
||
| − | |valign=top width=225px| |
||
| − | *[[Mrs. Marie|The Joyful Teacher, Mrs. Marie]] |
||
| − | *[[Potova and Joanna]] |
||
| − | *[[Maggie's Father]] |
||
| − | *[[Maggie]] |
||
| − | *[[Mila]] |
||
| − | *[[Mila's Father]] |
||
| − | *[[Gummy|Gummy the Sailor]] |
||
| − | *[[Kane|Kane the Sailor]] |
||
| − | *[[Dampa|Dampa the Sailor]] |
||
| − | *[[Candy|Candy the Sailor]] |
||
| − | |valign=top| |
||
| − | *[[Linda]] |
||
| − | *[[Sam]] |
||
| − | *[[Gillian]] |
||
| − | *[[Gossack]] |
||
| − | *[[Bomb-Master Cannon]] |
||
| − | *[[Doc Bandam|The Potion Master, Doc Bandam]] |
||
| − | *[[Kamo]] |
||
| − | |} |
||
| − | {{Clear}} |
||
| − | |||
| − | ===Hall G: [[Great Sea]] Figurines=== |
||
| − | [[File:Gallery7.jpg|right|250px]] |
||
| − | {| |
||
| − | |width=225px| |
||
| − | *[[Fairy]] |
||
| − | *[[Great Fairy]] (L) |
||
| − | *[[Fairy Queen|Queen of Fairies]] (L) |
||
| − | *[[Goron#The Wind Waker|Traveling Merchants]] |
||
| − | *[[Old Man Ho Ho]] |
||
| − | *[[Mako]] * (!) |
||
| − | *[[Niko]] * (!) |
||
| − | *[[Zuko]] * (!) |
||
| − | *[[Nudge]] * (!) |
||
| − | *[[Senza]] * (!) |
||
| − | |valign=top width=225px| |
||
| − | *[[Gonzo]] * (!) |
||
| − | *[[Tetra]] (!) {{Exp|All her Pirate Crew is obtained with her figurine.}} |
||
| − | *[[Fishman]] |
||
| − | *[[Daphnes Nohansen Hyrule|King of Hyrule]] (L) |
||
| − | *[[Link]] & the [[King of Red Lions]] (!) {{Exp|Received after the rest of the figurines are obtained.}} |
||
| − | *[[Princess Zelda]] {{Exp|Received with the King of Hyrule figurine.}} |
||
| − | *[[Salvage Corp]] |
||
| − | *[[Salvatore]] |
||
| − | *[[Loot|Loot the Sailor]] |
||
| − | *[[Beedle]] |
||
| − | |valign=top| |
||
| − | *[[Tingle]] |
||
| − | *[[Tingle Brothers#Ankle|Ankle]] |
||
| − | *[[Tingle Brothers#David Jr.|David Jr.]] |
||
| − | *[[Tingle Brothers#Knuckle|Knuckle]] (!) {{Exp|In the GameCube version, it is only available through the use of the Tingle Tuner, and must be obtained before completing the rest of the collection.}} |
||
| − | |} |
||
| − | |||
| − | ==Trivia== |
||
| − | *In {{TWWHD}}, the [[Knuckle]] figurine is needed to complete the Nintendo Gallery, unlike the original game. A reference to this fact was added to his figurine description.<ref>{{Cite|Supposedly, it used to bother him that this collection was considered complete, even without his figurine.|Nintendo Gallery figurine description|TWWHD}}</ref> |
||
| − | *It is impossible to get a figurine of a [[Beamos]]. If Link brings in a successful pictograph of one, the resulting figurine will be an [[Armos]]. |
||
| − | *To the right of Carlov, a figurine in the process of being carved resembles [[Saria]]. |
||
| − | *If Link talks to Carlov with an empty [[Deluxe Picto Box]] after having seen at least one figurine, Carlov will digress about how his figurine was so lovely because he carved it out of a precious and colorful rock called '''Rainbow Stone'''.<ref name="Stone">{{cite|...We do use only the highest quality material, after all, so I suppose it couldn't be anything less than lovely. You can make figurines out of many different materials, but I carve mine from rainbow stone—It's a special type of rock whose colors defy description. Rainbow stone is a very precious material, and it can only be found around here!|Carlov|TWW}}</ref> Despite ''Rainbow Stone'' being highlighted in red with its general location given, <ref name="Stone" /> implying it holds importance to the story, there is no such item/object in the game that Link can find. |
||
| − | |||
| − | ==See Also== |
||
| − | * [[Figurine Shop]] |
||
{{Ref}} |
{{Ref}} |
||
| + | <br> |
||
{{Names |
{{Names |
||
| − | |en= |
+ | |en= Dune Sanctuary |
|enM= |
|enM= |
||
| + | |ja= {{Japanese|砂の叢祠|Suna no Hokora||1}} |
||
| − | |ja= |
||
| − | |jaM= |
+ | |jaM= Sand Shrine |
|es= |
|es= |
||
|esM= |
|esM= |
||
| − | |esS= |
+ | |esS= |
|esSM= |
|esSM= |
||
| − | |esL= |
+ | |esL= Altar de las Arenas |
| − | |esLM= |
+ | |esLM= Altar of the Sands |
|fr= |
|fr= |
||
|frM= |
|frM= |
||
| − | |frF= |
+ | |frF= Sanctuaire des Sables |
|frFM= |
|frFM= |
||
| − | |frC= |
+ | |frC= Sanctuaire des sables |
|frCM= |
|frCM= |
||
| − | |de= |
+ | |de= {{de|Sandschrein}} |
|deM= |
|deM= |
||
|it= |
|it= |
||
| Line 255: | Line 61: | ||
|ko= |
|ko= |
||
|koM= |
|koM= |
||
| − | |ch= |
+ | |ch= |
| − | |chM= |
+ | |chM= |
| − | |chT= |
+ | |chT= |
| − | |chTM= |
+ | |chTM= |
| − | |chS= |
+ | |chS= |
| − | |chSM= |
+ | |chSM= |
| ⚫ | |||
| ⚫ | |||
| + | <br> |
||
| − | [[Category:Sidequests]] |
||
| + | {{STNavMap}} |
||
| + | <br> |
||
| + | {{Spirit Tracks Sanctuaries}} |
||
| ⚫ | |||
Revision as of 10:45, 22 May 2015
Template:Stamp Template:Place The Sand Sanctuary is a location within the Sand Realm of the re-established kingdom of Hyrule in Spirit Tracks. It is located in the sandy dunes just north of the waters of the Ocean Realm and is the home dwelling of the realm's Lokomo guardian, Rael.
Features
Story
After defeating Byrne atop the Tower of Spirits and witnessing the revival of the Demon King Malladus, Link and Princess Zelda are sent by Anjean to recover the legendary Bow of Light from the final temple in the kingdom of Hyrule far across the dunes of the Sand Realm, the Sand Temple.[1] To reach the temple across the desert sands, Link sees that like all the other realms he has visited, he must first restore the realm's lost Spirit Tracks that lead to the temple in order to fully explore it. After succeeding in restoring enough of the tracks through the use of a Force Gem given to them by Anjean to reach the Sand Sanctuary, the pair travel to the Sand Realm to restore the final temple and recover the only weapon capable of banishing Malladus from a human host.
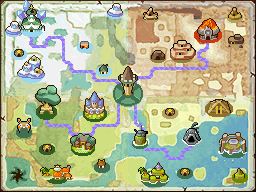
Link at first finds the area of the sanctuary to be an empty clearing of sand, but soon realizes the area is a miniature model of the entire desert.[2][3] After reading an ancient inscription nearby, the young hero must journey around the Sand Realm to find the four giant head statues scattered around the realm and trace their gazes to find their intersection. Once done so, the place where the gazes intersect on the map is the same place where Link must place a bomb in the sanctuary, where it will reveal the hidden doorway to the sanctuary's inner sanctums as well as Rael, the Lokomo sage.[4] Together, he and Link perform the necessary Lokomo Song with Link wielding the Spirit Flute, restoring the Spirit Tracks and reopening the path to the Sand Temple far across the desert.
Force Gem
After Link completes the Sand Temple, Link can bring Rael five Cuccos from Hyrule Castle Town to help him with his Cucco research, which consists of harnessing the unbelievable power the Cuccos possess when they call others as they are being threatened by others and use this power for the good of mankind.[5] As a sign of gratitude, Rael will give the young hero a Force Gem that reveals more tracks in the Fire Realm, opening way to the Ends of the Earth Station.
Gallery

The map of the sanctuary
References
- ↑ "In the battle between the Demon King and the spirits, there was a weapon called the Bow of Light... Perhaps it can drive his spirit from your body." — Anjean (Spirit Tracks)
- ↑ "Do not dwell on what's inside. Instead, turn your gaze outward. There are no statues here." — Gossip Stone (Spirit Tracks)
- ↑ "The lake forms the sea. The paths forms the rails." — Gossip Stone (Spirit Tracks)
- ↑ "Find me by blasting the area where the gazes of the big statues meet." — A sign (Spirit Tracks)
- ↑ "Do you know about the birds called Cuccos? They are flightless. But when cornered, they can call their friends to unleash an amazing power. I want to study this phenomenon more closely... My goal is to harness this unbelievable Cucco power for the good of mankind. And this is where you come in, young man. Would you bring me some Cuccos? The more Cuccos, the better. At the very least, I'd like five. Once you bring them to me, I'll give you something nice. Thanks!" — Rael (Spirit Tracks)
| Language | Name | Meaning | |
|---|---|---|---|
| EnglishUK | Dune Sanctuary | ||
| Japanese | Template:Japanese | Sand Shrine | |
| FrenchCA | Sanctuaire des sables | ||
| FrenchEU | Sanctuaire des Sables | ||
| German | Sandschrein | ||
| SpanishLA | Altar de las Arenas | Altar of the Sands | |
| Stations in Spirit Tracks | |
|---|---|
 Click on a station | |
Template:Spirit Tracks Sanctuaries