TeridaxXD001-gpuser (talk | contribs) |
mNo edit summary |
||
| Line 1: | Line 1: | ||
| + | {{Boss |
||
| − | {{exitstub-nintendo|SmashWiki|Super Smash Bros.|''Super Smash Bros''|more in-depth articles}} |
||
| + | |name = Grinexx |
||
| − | {{noncanon}} |
||
| + | |image = [[File:TrinexxModelALBW.png|150px]] |
||
| − | {{Game |
||
| + | |title = |
||
| − | | title= Super Smash Bros. |
||
| + | |game = {{ALBW}} |
||
| − | | image= [[File:SSB Logo.png|250px]]<br>[[File:SSB.jpg]] |
||
| − | | |
+ | |other = |
| + | |era = [[Zelda Timeline#The Era of Light and Dark|Era of Light and Dark]] |
||
| − | | developer= {{Wp|HAL Laboratory}} |
||
| + | |dungeon = [[Turtle Rock (A Link Between Worlds)|Turtle Rock]] |
||
| − | | publisher= [[Nintendo]] |
||
| + | |weakness = [[Sword]], [[Ice Rod]] |
||
| − | | designer= {{Wp|Masahiro Sakurai}} |
||
| + | |reward = [[Sage]] [[Impa]], [[Heart Container]] |
||
| − | | released= '''N64 release'''<br>{{release|na=April 26, 1999|jp=January 21, 1999|eu=November 19, 1999}}<br>'''Wii Virtual Console release'''<br>{{release|jp=January 20, 2009|eu=June 12, 2009|aus=June 12, 2009|na=December 21, 2009}} |
||
| − | | esrb= E |
||
| − | | pegi= 7 |
||
| − | | elspa= |
||
| − | | cero= |
||
| − | | grb= |
||
| − | | usk= 6 |
||
| − | | cb= G8+{{exp|N64 release}} |
||
| − | | dejus= |
||
| − | | gsrmr= |
||
| − | | platforms= [[Nintendo 64]] |
||
| − | | predecessor= |
||
| − | | successor= {{SSBM}} |
||
| − | | futuregame= |
||
}} |
}} |
||
| + | '''Grinexx''' is a boss that appears in {{ALBW}}. It is the [[Lorule]]an counterpart of [[Trinexx]], and like Trinexx in {{ALttP}}, it is the boss of [[Turtle Rock (A Link Between Worlds)|Turtle Rock]]. It shares quite a few similarities with Trinexx, such as a long neck, a stone shell, and rock like skin. It guards [[Sage]] [[Impa]]'s painting. |
||
| − | '''''Super Smash Bros.''''' is a fighting game released for the [[Nintendo 64]]. It is the first game in the Super Smash Bros. series, followed by its sequel {{SSBM}} for the [[Nintendo GameCube]]. It features various [[The Legend of Zelda (Series)|''The Legend of Zelda'']] characters, stages and items, alongside those of other popular [[Nintendo]] series. |
||
| + | ==Appearance and Weaknesses== |
||
| − | ==''The Legend of Zelda'' in ''Super Smash Bros.''== |
||
| + | Grinexx begins the fight swimming in the lava underneath the arena, and attacks [[Link]] by erupting lava from its volcano-like back, which can go through the floor since it is a grate. During this phase, Link must use the Ice Rod to hit Grinexx as it passes under the holes of the arena, while also taking care not to get hit by the naturally erupting bursts of lava. Grinexx will occasionally retaliate by erupting lava and chasing Link around, but a hit from the Ice Rod will calm it down. |
||
| − | [[File:Link ssb.png|left|130px]] |
||
| − | ''Super Smash Bros.'' features [[Link]] as a playable character based on his appearance in {{OOT}}. |
||
| + | After sustaining enough damage, Grinexx will jump onto the main arena and attack Link more directly. Link's swords and other weapons can now damage its head in this phase, though it will often shoot out its head with its long neck and try to bite Link. Grinexx will occasionally curl up into a boulder, and release a devastating explosion. This attack is extremely damaging, so it is advised to run away from Grinexx as soon as it curls into its shell. It can also spin around while tucked in to its shell, sliding and ricocheting on the sides of the arena. The safest way for Link to avoid this attack is to stay in the corners as it bounces around the arena since Grinexx cannot fit in those areas. It should also be noted that all of the attacks that it uses in it's second phase except for the explosion attack can be deflected with a shield. After hitting Grinexx, eventually, the boss will fall, revealing a Heart Container and Impa's painting. |
||
| − | Link's moveset includes many attacks and items from the ''Zelda'' series, including the [[Master Sword]] for most of his smash attacks, the [[Spin Attack]] as his recovery, the [[Up Thrust]] and [[Down Thrust]], the [[Hookshot]] as his grab, and the [[Boomerang]] and [[Bomb]]s as projectiles. Link also holds the [[Hylian Shield]], although it cannot be used to protect him, feature that was not added until ''Melee''. |
||
| + | {{Bosses|ALBW}} |
||
| − | Link's costumes include the [[Tunic#Kokiri Tunic|Kokiri Tunic]] as his main costume, and the [[Tunic#Goron Tunic|Goron Tunic]] and [[Tunic#Zora Tunic|Zora Tunic]] as his alternative costumes. |
||
| + | {{SaurianEnemy}} |
||
| − | |||
| ⚫ | |||
| − | The [[Hyrule Castle#Super Smash Bros.|Hyrule Castle]] appears as a stage taking place on the roof. Frequently, small tornadoes appear through the stage, throwing upward any player that gets trapped in them. |
||
| − | |||
| − | [[Heart Container]]s appear as recovery {{ssb|item}}s, restoring all damage from a player. |
||
| − | {{clear}} |
||
| − | |||
| − | ==Gallery== |
||
| − | <gallery> |
||
| − | File:Link2.png|Link as he appears in the game |
||
| − | File:LinkSSB.gif|Artwork of Link |
||
| − | File:HCSSB.jpg|The Hyrule Castle stage |
||
| − | File:SSBCast.jpg|Artwork of the full ''Super Smash Bros.'' roster, featuring Link |
||
| − | File:Ssb64 select screen.jpg|The full ''Super Smash Bros.'' roster, featuring Link |
||
| − | </gallery> |
||
| − | |||
| − | {{Names |
||
| − | |ja= {{Japanese|ニンテンドウオールスター! 大乱闘スマッシュブラザーズ|Nintendō Ōrusutā! Dairantō Sumasshu Burazāzu}} |
||
| − | |jaM= Nintendo All-star! Great Fray Smash Brothers |
||
| − | |es= |
||
| − | |esM= |
||
| − | |esS= |
||
| − | |esSM= |
||
| − | |esL= |
||
| − | |esLM= |
||
| − | |fr= |
||
| − | |frM= |
||
| − | |frF= |
||
| − | |frFM= |
||
| − | |frC= |
||
| − | |frCM= |
||
| − | |de= |
||
| − | |deM= |
||
| − | |it= |
||
| − | |itM= |
||
| − | |ko= |
||
| − | |koM= |
||
| − | |ch= |
||
| − | |chM= }} |
||
| − | |||
| − | {{Games|other}} |
||
| − | |||
| − | [[Category:Super Smash Bros.]] |
||
| − | [[Category:Other Games]] |
||
| ⚫ | |||
Revision as of 05:14, 26 October 2014
Template:Boss
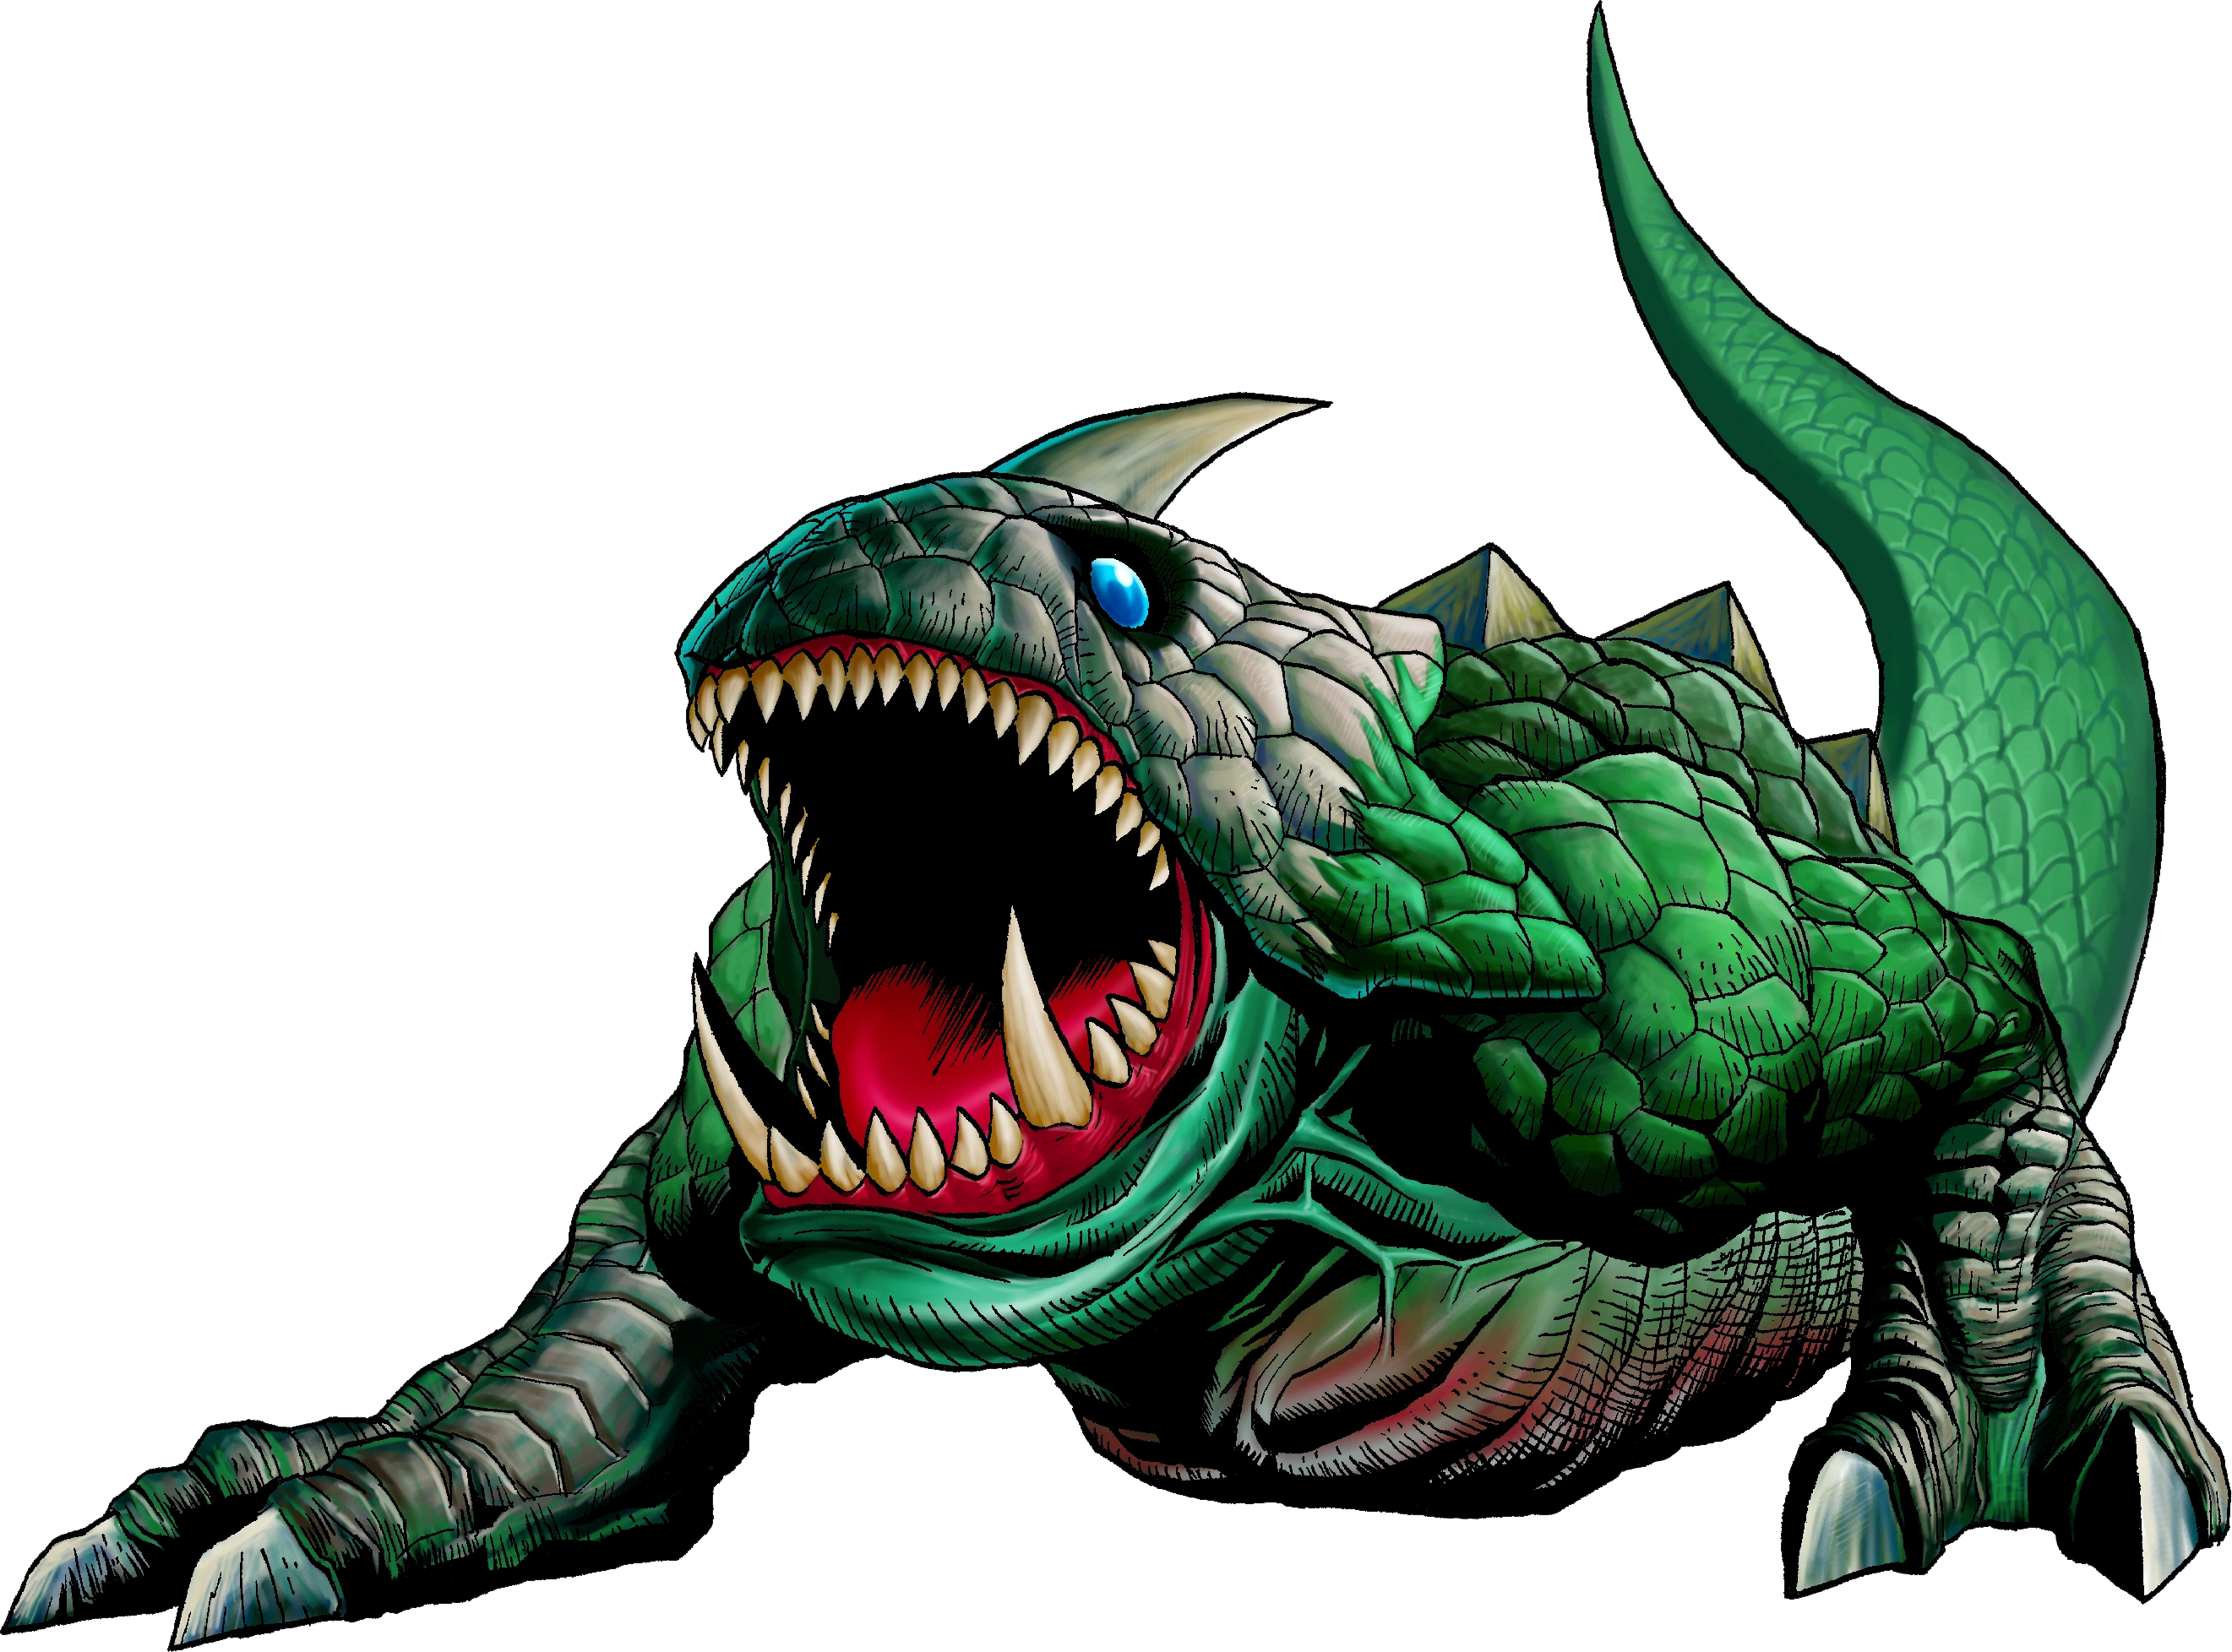
Grinexx is a boss that appears in A Link Between Worlds. It is the Lorulean counterpart of Trinexx, and like Trinexx in A Link to the Past, it is the boss of Turtle Rock. It shares quite a few similarities with Trinexx, such as a long neck, a stone shell, and rock like skin. It guards Sage Impa's painting.
Appearance and Weaknesses
Grinexx begins the fight swimming in the lava underneath the arena, and attacks Link by erupting lava from its volcano-like back, which can go through the floor since it is a grate. During this phase, Link must use the Ice Rod to hit Grinexx as it passes under the holes of the arena, while also taking care not to get hit by the naturally erupting bursts of lava. Grinexx will occasionally retaliate by erupting lava and chasing Link around, but a hit from the Ice Rod will calm it down.
After sustaining enough damage, Grinexx will jump onto the main arena and attack Link more directly. Link's swords and other weapons can now damage its head in this phase, though it will often shoot out its head with its long neck and try to bite Link. Grinexx will occasionally curl up into a boulder, and release a devastating explosion. This attack is extremely damaging, so it is advised to run away from Grinexx as soon as it curls into its shell. It can also spin around while tucked in to its shell, sliding and ricocheting on the sides of the arena. The safest way for Link to avoid this attack is to stay in the corners as it bounces around the arena since Grinexx cannot fit in those areas. It should also be noted that all of the attacks that it uses in it's second phase except for the explosion attack can be deflected with a shield. After hitting Grinexx, eventually, the boss will fall, revealing a Heart Container and Impa's painting.
Mazura · Jermafenser · Rebonack · Carock · Gooma · Barba · Thunderbird ![]() · Link's Shadow
· Link's Shadow
Light World
Ball and Chain Trooper ![]() · Six Armos Knights · Lanmola Trio · Moldorm · Agahnim
· Six Armos Knights · Lanmola Trio · Moldorm · Agahnim ![]()
Dark World
Helmasaur King · Arrghus · Mothula · Blind the Thief · Kholdstare · Vitreous · Trinexx · Ganon
Super Helmasaur · Super Arrghus · Super Mothula · Super Blind · Dark Links![]()
Bosses
Moldorm · Genie · Slime Eye · Angler Fish (2D) · Slime Eel · Facade · Evil Eagle (2D) · Hot Head · Shadow Nightmares
Guardians
Rolling Bones ![]() · King Moblin
· King Moblin ![]() · Hinox
· Hinox ![]() · Dodongo Snakes x2
· Dodongo Snakes x2 ![]() · Lanmola
· Lanmola ![]() · Cue Ball
· Cue Ball ![]() · Master Stalfos x4 · Gohma Twins · Armos Knight
· Master Stalfos x4 · Gohma Twins · Armos Knight ![]() · Smasher
· Smasher ![]() · Grim Creeper · Turtle Rock · Blaino
· Grim Creeper · Turtle Rock · Blaino
Bosses
Gohma · King Dodongo · Barinade · Phantom Ganon · Volvagia · Morpha · Bongo Bongo · Twinrova · Ganondorf · Ganon
Middle Bosses
Lizalfos · Big Octo · Stalfos · Meg · Flare Dancer · White Wolfos · Dark Link · Dead Hand · Gerudo Thief · Iron Knuckle · Dynalfos
Bosses
Odolwa · Goht · Gyorg · Twinmold · Majora ![]()
Middle Bosses
Dinolfos · Gekko · Wizzrobe · Gerudo Pirate · Wart · Gekko and Mad Jelly
Captain Keeta · Iron Knuckle · Sharp · Igos du Ikana · Garo Master · Gomess · Eyegore
Bosses
Aquamentus · Dodongo · Mothula · Gohma · Digdogger · Manhandla · Gleeok · Medusa Head · General Onox ![]()
Sub-Bosses
Brother Goriyas · Facade ![]() · Omuai · Agunima · Great Moblin
· Omuai · Agunima · Great Moblin ![]() · Syger · Vire
· Syger · Vire ![]() · Poe Sisters · Frypolar
· Poe Sisters · Frypolar
Bosses
Pumpkin Head · Head Thwomp (2D) · Shadow Hag · Eyesoar · Smog · Octogon · Possessed Nayru · Plasmarine · Ramrock · Veran ![]()
Sub-Bosses
Giant Ghini · Swoop · Subterror · Armos Warrior · Great Moblin ![]() · Smasher · Vire
· Smasher · Vire ![]() · Angler Fish (2D) · Blue Stalfos
· Angler Fish (2D) · Blue Stalfos
Bosses
Gohma · Kalle Demos · Gohdan · Helmaroc King · Jalhalla · Molgera · Puppet Ganon ![]() · Ganondorf
· Ganondorf
Minibosses
Green Bokoblin · Moblin · Mothula · Darknut · Cyclos · Phantom Ganon · Stalfos · Wizzrobe · Mighty Darknut · Big Octo![]()
Bosses
Phantom Ganon ![]() · Stone Arrghus · Helmaroc King · Big Poe · Big Moldorm x2 · Frostare · Vaati · Ganon
· Stone Arrghus · Helmaroc King · Big Poe · Big Moldorm x2 · Frostare · Vaati · Ganon
Sub-Bosses
Chief Soldier · Shadow Link ![]() · Manhandla · Dodongos · Big Dark Stalfos · Gohma · Big Dodongo
· Manhandla · Dodongos · Big Dark Stalfos · Gohma · Big Dodongo
Bosses
Big Green Chuchu ![]() · Gleerok · Mazaal · Big Octorok
· Gleerok · Mazaal · Big Octorok ![]() · Gyorg Pair · Vaati
· Gyorg Pair · Vaati ![]()
Sub-Bosses
Madderpillar ![]() · Dark Nut · Big Blue Chuchu
· Dark Nut · Big Blue Chuchu ![]() · Red Dark Nut · Black Knight
· Red Dark Nut · Black Knight
Bosses
Diababa · Fyrus · Morpheel · Stallord · Blizzeta · Armogohma · Argorok · Zant · Puppet Zelda · Ganon · Ganondorf ![]()
Sub-Bosses
Ook · King Bulblin · Dangoro · Twilit Carrier Kargarok · Twilit Bloat · Deku Toad · Death Sword · Darkhammer · Darknut · Aeralfos · Phantom Zant
Bosses
Stagnox · Fraaz · Phytops · Cragma · Byrne · Skeldritch · Demon Train · Chancellor Cole · Malladus
Stagnox II · Fraaz II · Phytops II · Cragma II · Skeldritch II · Dark Link![]()
Sub-Bosses
Mothula · Geozard · Rocktite · Ice Keese · Freezard · White Wolfos · Geozard Chief · Big Blin ![]() · Snapper · Helmet Chuchu · Metal Chuchu · Stalfos · Heatoise · Stalfos Warrior · Gerune · Ergtorok ·
· Snapper · Helmet Chuchu · Metal Chuchu · Stalfos · Heatoise · Stalfos Warrior · Gerune · Ergtorok ·
Bosses
Ghirahim ![]() · Scaldera · Moldarach · The Imprisoned
· Scaldera · Moldarach · The Imprisoned ![]() · Koloktos · Tentalus · Levias
· Koloktos · Tentalus · Levias ![]() · Bilocyte
· Bilocyte ![]() · Demise
· Demise
Sub-Bosses
Stalfos · Lizalfos · Stalmaster · Moldarach · LD-002G Scervo · Dark Lizalfos · Magmanos · Moldorm · Dreadfuse
Bosses
Yuga ![]() · Moldorm · Margomill · Gemesaur King · Arrghus · Knucklemaster · Stalblind · Zaganaga · Dharkstare · Grinexx · Yuga Ganon
· Moldorm · Margomill · Gemesaur King · Arrghus · Knucklemaster · Stalblind · Zaganaga · Dharkstare · Grinexx · Yuga Ganon
Sub-Bosses
Armos · Red Stalfos · Heedles · Green & Red Goriyas · Gigabari · Gibdos & Purple Mini-Moldorms · Red Eyegores · Flying Tiles & Devalants · Big Pengator & Pengators · Fire Gimos · Moldorm · Lorule Ball and Chain Soldier · Arrghus
StreetPass Bosses
Bosses
Margoma · Arrghus · Moldorm · Blizzagia · The Lady's Pets ![]() · Stalchampion · Prismantus · The Lady
· Stalchampion · Prismantus · The Lady
Shadow Link x3![]()
Mini-Bosses
Electric Blob King · Electric Blob Queen · Hinox Brothers · Freezlord · Vulture Vizier · Grim Repoe · Gigaleon
Bosses
Windblight Ganon · Fireblight Ganon · Master Kohga · Thunderblight Ganon · Waterblight Ganon · Calamity Ganon · Dark Beast Ganon ![]()
Sub-Bosses
Stone Talus · Igneo Talus · Frost Talus · Molduga · Hinox · Blue Hinox · Black Hinox · Stalnox · Igneo Talus Titan · Molduking
Bosses
Colgera · Mucktorok · Marbled Gohma · Queen Gibdo · Phantom Ganon · Seized Construct · The Demon King's Army · Demon King Ganondorf · Demon Dragon ![]()
Sub-Bosses
Flame Gleeok · Frost Gleeok · Sludge Like · Thunder Gleeok · King Gleeok · Yunobo · Frox · Flux Construct · Moragia · Molduga · Hinox · Stalnox · Frost Talus · Igneo Talus · Stone Talus · Battle Talus · Stone Talus (Luminous) · Ganondorf · Master Kohga · Phantom Ganon
| |||||||||||||||||||||||