Link1432@legacy41960631 (talk | contribs) No edit summary |
m (→Characters: whoops, forgot one) |
||
| Line 1: | Line 1: | ||
| − | {{ |
+ | {{noncanon}} |
| + | {{book |
||
| − | The search term '''Necklace''' may refer to any of the following necklace items in ''[[The Legend of Zelda (Series)]]''. |
||
| + | | image= [[File:A Link to the Past (comic).png|250px]] |
||
| + | | caption= The first page of the comics |
||
| + | | writer= Shotaro Ishinomori |
||
| + | | artist= Shotaro Ishinomori |
||
| + | | publisher= {{release |
||
| + | | na= Nintendo Power |
||
| + | }} |
||
| + | | released= January 1992{{exp|in the Nintendo Power magazine}}<br>1993{{Exp|as a graphic novel}} |
||
| + | | isbn= ISBN 4091740111{{exp|Japanese edition}}<br>ASIN B0006QBMJ6{{Exp|English edition}} |
||
| + | }} |
||
| + | '''''The Legend of Zelda: A Link to the Past''''' is a comic book miniseries by Shotaro Ishinomori based on [[The Legend of Zelda: A Link to the Past|the game of the same name]]. It appeared in [[Nintendo Power]] beginning in January 1992 and ran for 12 issues, ending in December 1992. It was later published as a graphic novel in 1993. Many portions of the game were omitted, and several new story segments were added to "preserve the elements of surprise and add to the dramatic flow.<ref>{{cite web|quote=This comic was written and illustrated by Shotaro Isinomori, one of Japan's most famous comic book creators. It was originally serialized in Nintendo Power Magazine. The first of 12 parts appeared in January 1992 (Volume 32) and the series ran through December 1992. It was published in book form in 1993. The plot loosely follows ALttP, but some elements were added to "preserve the elements of surprise and add to the dramatic flow."|url=http://www.zeldalegends.net/index.php?n=manga#alttpcomic|title = Zelda Legends - Other Material - Comics/Manga; retrieved May 19 2011|site=Zelda Legends}}</ref> Several new characters are introduced, most prominently [[Roam]], [[Epheremelda]], the librarian of Kakariko, and an unnamed boy who is friends with Sahasrahla. |
||
| − | *'''[[Link's_Awakening_Trading_Sequence#Necklace|Mermaid's Necklace]]''', a trading sequence item in ''[[The Legend of Zelda: Link's Awakening|Link's Awakening]]''. |
||
| + | |||
| − | *'''[[Skull Necklace]]''', a spoil from Moblins in ''[[The Legend of Zelda: The Wind Waker|The Wind Waker]]''. |
||
| + | In this alternate version of the events in ''A Link to the Past'', [[Link]] is beckoned telepathically by [[Princess Zelda]] to rescue her from [[Agahnim|Agahnim's]] clutches, and eventually from [[Turtle Rock]] in the [[Dark World]]. Although Link starts out as a simple, bumbling kid, he gradually grows more confident about his abilities and succeeds in rescuing the princess with the help of the friends he makes along his adventure. In the comic, Link and Zelda have a close bond with one another, even going as far as sharing a dream together. |
||
| − | *'''[[Regal Necklace]]''', an item in ''[[The Legend of Zelda: Phantom Hourglass|Phantom Hourglass]]'' |
||
| + | |||
| − | *'''[[Treasure|Pearl Necklace]]''', a treasure in ''Phantom Hourglass'' and ''[[The Legend of Zelda: Spirit Tracks|Spirit Tracks]]''. |
||
| + | == Chapter Summaries == |
||
| − | *'''[[Treasure|Dark Pearl Loop]]''', a treasure in ''Phantom Hourglass'' and ''Spirit Tracks''. |
||
| + | |||
| − | *'''[[Pirate Necklace]]''', a treasure in ''Spirit Tracks''. |
||
| + | === Chapter 1: Hero's Awakening === |
||
| + | [[File:Agahnim kills Link's uncle.png|thumb|right|Agahnim kills Link's uncle]] |
||
| + | [[Link]] is awoken as he is contacted telepathically by [[Princess Zelda]], who asks him to save her from [[Hyrule Castle|Hyrule Castle's]] prison.<ref>{{cite book|quote=Link... Help me... I'm being held prisoner in the castle... Help me... My name is Zelda...|book=A Link to the Past|publisher=Nintendo Power|page=4}}</ref> The young hero panics and looks for [[Link's Uncle|his uncle]] only to find that he is missing.<ref>{{cite book|quote=Uncle!? Where ARE you? Where did he '''go'''?|book=A Link to the Past|Nintendo Power|page=5}}</ref> Following Zelda's voice to Hyrule Castle, Link sneaks into the castle and sees his uncle dueling [[Agahnim]]. Agahnim deals a deadly strike to Link's uncle, saying that anyone who challenges him will meet their doom, and promptly vanishes afterward.<ref>{{cite book|quote=You have struck your '''final''' blow, puny fool! ...Hmnph! Thus shall all who challenge me, Agahnim, meet their '''doom'''!|book=A Link to the Past|publisher=Nintendo Power|page=8}}</ref> Link rushes to his uncle's side and receives his [[sword]] and [[Fighter's Shield|shield]] from him. Before passing out, Link's Uncle explains that after the young hero rescues Zelda and the people in the [[Dark World]], he might be able to meet his parents.<ref>{{cite book|quote=Take my sword and shield. The princess...you must save her! After you rescue Zelda...and the people in the Dark World...you may meet your parents...|book=A Link to the Past|publisher=Nintendo Power|page=8}}</ref> |
||
| + | |||
| + | Meanwhile, Agahnim orders the soldiers to bring Zelda to him before anyone else she has contacted telepathically is able to find and rescue her.<ref>{{cite book|quote=...It appears Zelda was able to summon help with her telepathic powers... If we do not act soon, more fools may attempt to rescue their precious princess! Bring Zelda to me at once! The final enchantment must be cast immediately!|book=A Link to the Past|publisher=Nintendo Power|page=9}}</ref> Link continues to search for Zelda while she relates to him Agahnim's plan: to use the life force of the [[Maiden|descendants of the seven Wise Men]] to open the door to the [[Sacred Realm|Golden Land]] and unleash the evil power contained there.<ref>{{cite book|quote=Agahnim is planning to use the life force of Seven Maidens to open the seal of the Seven Wise Men... Long ago, many people entered the Golden Land in search of the mighty Golden Power said to be hidden there. But no one ever returned... One day, an evil power began flowing from the entrance! And the King ordered Seven Wise Men to seal the gate to the Golden Land forever! But now, Agahnim is going to open the Golden Seal using our life energy!|book=A Link to the Past|publisher=Nintendo Power|page=10}}</ref> The young hero eventually finds the princess and, after distracting two Castle Soldiers that were taking her away, Link rescues Zelda and the two escape through a hidden passage to [[Sanctuary]] with the use of a nearby [[lantern]].<ref>{{cite book|quote=We must escape and make our way to the Sanctuary!! The Old Man there will help us|book=A Link to the Past|publisher=Nintendo Power|page=13}}</ref> |
||
| + | |||
| + | Upon reaching the Sanctuary, the Old Man explains the consequences of Agahnim's plan.<ref>{{cite book|quote= Yes...and were he successful, the master of evil would marshal his forces against this world again!|book=A Link to the Past|publisher=Nintendo Power|page=14}}</ref> Zelda goes on to say that she feels Link is the legendary hero who appears every one hundred years to protect and save the land of Hyrule against Agahnim's forces,<ref>{{cite book|quote=Link, I feel that YOU are...you MUST be...the Legendary Hero who appears in Hyrule once every hundred years... YOU are the lone protector of this land! I feel SURE that you can foil Agahnim's plot!|book=A Link to the Past|publisher=Nintendo Power|page=14,15}}</ref> but just then, Agahnim appears and commands that Zelda return to the castle.<ref>{{cite book|quote=Princess Zelda... Come back to the castle quietly! Even if you run to the ends of Hyrule, you will not escape me!|book=A Link to the Past|publisher=Nintendo Power|page=15}}</ref> Although Link steps in to protect the princess, the wizard easily defeats him when the young hero tries to attack him. As he takes Zelda away, Zelda reveals to Link that only the [[Master Sword]] can harm Agahnim.<ref>{{cite book|quote=It's no use fighting Agahnim with an ordinary sword! You need the Master Sword of legends past!|book=A Link to the Past|publisher=Nintendo Power|page=17}}</ref> The young hero then rushes out of the Sanctuary to find the legendary sword.<ref>{{cite book|quote=There's just one thing! The Master Sword--where is it?!|book=A Link to the Past|publisher=Nintendo Power|page=18}}</ref> |
||
| + | |||
| + | === Chapter 2: Wise Man's Warning === |
||
| + | |||
| + | While Link continues to search for the Master Sword, Agahnim has wanted signs posted around the kingdom calling for Link's arrest for kidnapping Zelda.<ref>{{cite book|quote=Now, Link searches for the only weapon powerful enough to defeat his foe. Agahnim, posing as the king, has placed a price on Link's head...|book=A Link to the Past|publisher=Nintendo Power|page=1}}</ref> Before leaving the Sanctuary, the Old Man sends Link to find [[Sahasrahla]], a descendant of the Wise Men who knows more about the location of the Master Sword.<ref>{{Cite book|quote=This marks the location of Sahasrahla the Elder's house... He is a descendant of one of the Seven Wise Men who sealed the Golden Land so long ago. I am certain he can tell you more of the Master Sword.|book=A Link to the Past|publisher=Nintendo Power|page=4}}</ref> |
||
| + | |||
| + | [[File:Sahasrahla grants pendant.png|thumb|left|Sahasrahla gives Link the Pendant of Courage]] |
||
| + | Link finds Sahasrahla's house in [[Kakariko Village]] in the care of [[Sahasrahla's Wife|his wife]], but she tells him that Sahasrahla left when he found out that Agahnim was responsible for the missing maidens and does not know where he has gone to.<ref>{{cite book|quote=Well, young man, when the maidens began to disappear, the rumors began to fly. When Sahasrahla heard that the wizard might be responsible, he said, 'so it has begun...' and disappeared himself! [...] I'm sorry, but you know wise men like him... They often wander off without notice, in search of enlightenment. If you ask in the village, someone may know where he is... If I may ask, why are you looking for him?|book=A Link to the Past|publisher=Nintendo Power|page=5}}</ref> When Link tells her that he is looking for the Master Sword, the old woman tells of ancient scrolls that speak of the prosperous people who once inhabited the land of Hyrule. According to the scrolls they made many powerful weapons, including the ultimate treasure, the Master Sword, crafted specifically to resist evil power and which now rests in the [[Lost Woods]].<ref>{{cite book|quote=Master Sword?! I've heard of that legend... The ancient scrolls tell of a prosperous people who once inhabited this land... They created many powerful weapons and hid them throughout Hyrule. The Master Sword was their ultimate treasure... Its blade was specially tempered to resist evil power, or so I've heard... Now, it is sleeping deep in the forest known as the Lost Woods!|book=A Link to the Past|publisher=Nintendo Power|page=6}}</ref> Upon leaving Sahasrahla's house, [[Informant Women|a villager]], who is actually one of Agahnim's minions, alerts the [[Castle Guard#A Link to the Past|soldiers]] to Link's presence,<ref>{{cite book|quote=Hey! It's HIM! [...] You are under arrest by order of the king! Get moving!|book=A Link to the Past|publisher=Nintendo Power|page=7}}</ref> but the young hero manages to escape their grasp and stumbles upon a boy who was asked by Sahasrahla to watch over his wife.<ref>{{cite book|quote=The old man asked me to take care of his wife while he went away.|book=A Link to the Past|publisher=Nintendo Power|page=9}}</ref> After being convinced of Link's good nature,<ref>{{cite book|quote=Look at me! Do I LOOK like a bad guy?|book=A Link to the Past|publisher=Nintendo Power|page=9}}</ref> the boy tells him where Saharsahla can be found, and so Link travels to the [[Eastern Palace]]. There, he finds the descendant of the wise men, and although he is puzzled as to how someone so young like Link could be searching for the Master Sword,<ref>{{cite book|quote=Yes... I am INDEED Sahasrahla! But you... You are just a BOY... I cannot believe a youngster like you is looking for the Master Sword! Not just anyone can use that mighty blade!|book=A Link to the Past|publisher=Nintendo Power|page=12,13}}</ref> he tells Link he must recover the [[Pendants of Virtue]] to claim the legendary weapon. Sahasrahla reveals that he can help Link by giving him the Pendant of Courage, but since the task to finding the remaining two pendants will not be an easy one, he asks whether he will be able to accomplish said task,<ref>{{cite book|quote=The symbols are the legendary Pendants of Virtue. I can help you with the Pendant of Courage...but finding the remaining two pendants is not a quest to be taken lightly... Do you really believe you can accomplish this task, young man?|book=A Link to the Past|publisher=Nintendo Power|page=13}}</ref> to which the young hero confidently says yes both for Zelda and his deceased uncle.<ref>{{cite book|quote=Of course! Besides, I promised Zelda! And...I have to bring Agahnim to justice for what he did to my uncle!|book=A Link to the Past|publisher=Nintendo Power|page=13,14}}</ref> Just as Sahasrahla hands the Pendant of Courage to Link, the soldiers pursuing Link find him. Empowered by the pendant, he easily dispatches their leader and sends the rest fleeing. The young hero, amazed at the power of the pendant, promises to find the remaining two pendants and use their power to defeat Agahnim.<ref>{{cite book|quote=So, THIS is the power of the pendant... Excellent! I will rise to the challenge of the pendants, and with their power, I will destroy you, Agahnim!!|book=A Link to the Past|publisher=Nintendo Power|page=16}}</ref> |
||
| + | |||
| + | === Chapter 3: Book of Mudora === |
||
| + | |||
| + | The soldiers report that Link has the Pendant of Courage to Agahnim, who orders that all those in the Knight's Line must be eliminated at once.<ref>{{cite book|quote=Do you mean to tell me that the boy has the Pendant of Courage?! And you weaklings came back here without stopping him? ...I have tried to be merciful to the people of this kingdom, but those in the Knight's Line...they must be TERMINATED!|book=A Link to the Past|publisher=Nintendo Power|page=2}}</ref> He erroneously thought that Link's Uncle, who he defeated at the castle, was the last of the knight's line, but he begins to suspect that Link is also of their bloodline and commands his soldiers to not return until he has been killed.<ref>{{cite book|quote=I thought the old fool I destroyed in the castle was the '''last''' one! Could it be the whelp is '''also''' of their bloodline? '''Find him'''! And leave no stone unturned in your search! Do '''not''' return to this castle until you witness his last breath! Is that understood?|book=A Link to the Past|publisher=Nintendo Power|page=3}}</ref> After they leave, Agahnim reassures himself that the prophecy of the legendary Hero is just a folktale, and that the world will be at his hands when the moon is full and he casts the final spell over Princess Zelda.<ref>{{cite book|quote=It makes no difference... The world will be ours when the moon is '''full''' and I cast the '''final incantation''' on Princess Zelda... The prophecy of the legendary Hero is but a folktale...|book=A Link to the Past|publisher=Nintendo Power|page=3}}</ref> |
||
| + | |||
| + | When Link returns to Kakariko to find clues about the remaining two pendants,<ref>{{cite book|quote=Leaving Sahasrahla, Link returns to Kakariko Village to look for clues to the location of the remaining two pendants...|book=A Link to the Past|publisher=Nintendo Power|page=4}}</ref> he finds the [[Library]] has been set on fire by soldiers.<ref>{{cite book|quote=The House of Books is ablaze! The soldiers must have laid torch to it!|book=A Link to the Past|publisher=Nintendo Power|page=4}}</ref> Link learns that the librarian, who Link must speak to according to Sahasrahla,<ref>{{cite book|quote=He's inside that inferno?! Sahasrahla said I must speak with him!|book=A Link to the Past|publisher=Nintendo Power|page=5}}</ref> is trapped inside the flames.<ref>{{cite book|quote=Mister, you gotta help! The librarian is trapped inside!|book=A Link to the Past|publisher=Nintendo Power|page=5}}</ref> The young hero pours a bucket of water on him and barges in to successfully save the librarian. Inside the House of Books, the librarian theorizes that the soldiers might have been after the [[Book of Mudora]],<ref>{{cite book|quote=Perhaps their target was the book of Mudora...|book=A Link to the Past|publisher=Nintendo Power|page=6}}</ref> and explains that it is the key to the ancient Hylian language which mentions that the hero will stand in the desert holding the book.<ref>{{cite book|quote=We managed to save it from the flames... This book is the key to the ancient Hylian language. According to the legends, the hero will stand in the desert with this book...|book=A Link to the Past|publisher=Nintendo Power|page=7}}</ref> Link takes the Book of Mudora and mentions how Sahasrahla had told him the Pendant of Power was in desert ruins,<ref>{{cite book|quote=Let me see that! After Sahasrahla gave me the Pendant of Courage, he told me the Pendant of Power was in a desert ruin!|book=A Link to the Past|publisher=Nintendo Power|page=7}}</ref> leading the librarian to claim Link as the legendary Hero of Hyrule and calmly leaving the book in the young hero's hands.<ref>{{cite book|quote=Then you...'''you''' must be the legendary Hero of Hyrule! This is a very fortunate turn of events! I will leave the book in your capable hands.|book=A Link to the Past|publisher=Nintendo Power|page=7}}</ref> Before Link can head out to the desert, Sahasrahla's wife warns Link that traveling through the desert will not be easy since the "fierce winds and shifting sand" have bested even the most capable adventurers.<ref>{{cite book|quote=I should warn you that travelling in the desert is no simple matter! The fierce winds and shifting sands have buried more able adventurers than you!|book=A Link to the Past|publisher=Nintendo Power|page=7}}</ref> Just then, the young boy who Sahasrahla left in charge of his wife remembers that Sahasrahla showed him a [[Flute Boy's Bird|bird that Link can ride on]], which is actually a sort of glider with the shape of wings woven by the Hylian Sages.<ref>{{cite book|quote=Hey, buddy! I just remembered! I have something that may help! Sahasrahla showed it to me! It's a bird that you can ride on!|book=A Link to the Past|publisher=Nintendo Power|page=8}}</ref> According to the librarian, the wings belonged to the bird who the knights used to take on their campaigns to protect the kingdom and which carried them to battle.<ref>{{cite book|quote=It was no ordinary bird! Its strength was legendary! The knights used to take it on their campaigns to protect the kingdom! They say these miracle wings belonged to a powerful bird that carried the Knights of Hyrule into battle! The Hylian Sages wove its feathers into this miracle wing!|book=A Link to the Past|publisher=Nintendo Power|page=8}}</ref> |
||
| + | |||
| + | Using the "miracle wings", Link flies over the [[Desert of Mystery]] and locates the ruins of the [[Desert Palace]].<ref>{{cite book|quote=The desert ruins! And this must be ancient Hylian script! The book, the script, the desert...it's just like in the legend!|book=A Link to the Past|publisher=Nintendo Power|page=11}}</ref> Using the Book of Mudora to translate the runes he finds,<ref>{{cite book|quote=Maybe I '''am''' the legendary hero after all! I suppose if I look it up in the book, the writing should make sense...|book=A Link to the Past|publisher=Nintendo Power|page=11}}</ref> the ruins begin to sink to reveal a scorpion statue that has the Pendant of Power hanging on it.<ref>{{Cite book|quote=Hanging on that strange statue! It's the pendant!|book=A Link to the Past|publisher=Nintendo Power|page=12}}</ref> Before Link can approach it, he sinks into the quicksand and resurfaces on top of a [[Lanmola]]. Link tries to attack it with his sword but to no avail;<ref>{{cite book|quote=This is hopeless! Its skin is like armor!|book=A Link to the Past|publisher=Nintendo Power|page=15}}</ref> however, he manages to retrieve the Pendant of Power from the statue and prepares himself to defeat the Lanmola.<ref>{{cite book|quote=Nice move, ugly! But now you're playing with the Pendant of Power!|book=A Link to the Past|publisher=Nintendo Power|page=16}}</ref> |
||
| + | |||
| + | === Chapter 4: The Master Sword === |
||
| + | [[File:Link and Zelda meet in a dream.png|thumb|left|Link and Zelda meet in their dreams]] |
||
| + | Using the Pendant of Power's energy, Link successfully defeats the Lanmola; however, he is left stranded in the desert due to the glider having been ruined by a sandstorm. Left to traverse the desert on foot, Link is guided by Sahasrahla's telepathy to [[Death Mountain]].<ref>{{Cite book|quote=Link! Your priority should be finding the next pendant... Go to the Tower of Hera atop Death Mountain....|book=A Link to the Past|publisher=Nintendo Power|page=4}}</ref> Link arrives to the mountain and stumbles upon a portal, which activates itself and shows a vision of two people standing with his uncle.<ref>{{cite book|quote=Link... Link... We are here with our brother...in the world of darkness....|book=A Link to the Past|publisher=Nintendo Power|page=6}}</ref> Believing them to be his parents,<ref>{{cite book|quote=Uncle?! Are you my '''father''' and '''mother'''?! It '''can't''' be!!|book=A Link to the Past|publisher=Nintendo Power|page=7}}</ref> Link reaches for her mother's hand when she extends hers out to the young hero, but Link's hand turns into a claw when it passes the portal's boundary. Sahasrahla warns the power of the Dark World turns the inhabitants into a reflection of their heart, and Link's hatred of Agahnim, although justifiable, would turn him into a beast if he were to enter.<ref>{{cite book|quote=You penetrated the gate to the Dark World... That wicked realm has the power to change your body to reflect your heart. The emotions now in your heart are negative and evil! You nearly became a '''beast'''! [...] Yes, Link, but you can never win with hatred alone... Even if you were victorious, darkness would consume you! |book=A Link to the Past|publisher=Nintendo Power|page=7}}</ref> Shortly afterward, Zelda appears to Link and explains that they are in a dream, for if two people dream the same thing, they will meet.<ref>{{cite book|quote=We are in our dream... If two people dream the same thing, they will meet...|book=A Link to the Past|publisher=Nintendo Power|page=8}}</ref> The princess tells Link to rest and encourages him to not give up while he begins to fall asleep on her lap, complaining about his arm hurting.<ref>{{cite book|quote='''Zelda:''' You must be very tired... You have give us '''so''' much hope... You '''can't''' give up now... [...] Please rest...don't '''worry'''...|book=A Link to the Past|publisher=Nintendo Power|page=9}}</ref><ref>{{Cite book|quote=My arm...it '''hurts'''...|book=A Link to the Past|publisher=Nintendo Power|page=9}}</ref> When Link wakes up, he finds that someone has bandaged his arm and is actually standing in front of the [[Tower of Hera]].<ref>{{cite book|quote='''That''' was a strange dream! But my '''arm'''! Who '''did''' this?! [...] The Tower of Hera!|book=Nintendo Power|publisher=A Link to the Past|page=10}}</ref> |
||
| + | |||
| + | Link enters the [[Tower of Hera]] and climbs to the top to battle a [[Gohma|giant spider]], seizing the Pendant of Wisdom from one of its eyes.<ref>{{cite book|quote=Link... The pendant is the '''third eye'''...|book=A Link to the Past|publisher=Nintendo Power|page=12}}</ref> Upon grabbing the pendant, his arm is instantly healed,<ref>{{cite book|quote=My arm! It's back to normal!|book=A Link to the Past|publisher=Nintendo Power|page=13}}</ref> and the young hero uses the spider to ride down the tower. With all three pendants in hand, Link enters the [[Lost Woods]] and, while speaking telepathically with Sahasrahla, begins to have his doubts about whether the Master Sword will select him as his bearer.<ref>{{cite book|quote='''Sahasrahla''': If you really are the legendary Hero of Hyrule...the sword of Evil's Bane will select you as its bearer!<br>'''Link:''' The sword will select me? What if it doesn't?|book=A Link to the Past|publisher=Nintendo Power|page=14}}</ref> Sahasrahla goes on to explain that his parents were [[Knights of Hyrule]] but stumbled into the Dark World and, after they disappeared, Link's uncle adopted him to shield him from the intrigues of the Royal Family.<ref>{{cite book|quote=Your parents were Knights of Hyrule... But they stumbled into the Dark World... You will never be able to enter the Dark World and find your parents! [...] They dwell now in the Dark World... After they disappeared, your uncle adopted you and shielded you from the intrigues of the Royal Family...|book=A Link to the Past|publisher=Nintendo Power|page=14}}</ref> Just then, the young hero finds the Master Sword and seizes it from [[Pedestal of Time|its pedestal]], readying himself to have his final battle with Agahnim and rescue the princess. |
||
| + | |||
| + | ===Chapter 5: An Old Enemy=== |
||
| + | |||
| + | After defeating three [[Ball and Chain Trooper]]s with a single [[Spin Attack]], Link decides to lie down and rest for a bit, only to be awoken by Zelda via telepathy.<ref>{{cite book|quote=...Wake up, Link... |book=A Link to the Past|publisher=Nintendo Power|page=3}}</ref> Although the young hero tells Zelda that he must rest,<ref>{{cite book|quote=Zelda?! I must rest! I can't...|book=A Link to the Past|publisher=Nintendo Power|page=3}}</ref> Zelda reminds him that only a single night remains until Agahnim, casts his final incantation on her and causes the entrance to the Dark World to open and overwhelm Hyrule with its evil. She goes on to say that Link cannot forget the sacrifice that his uncle made to stop Agahnim's plot, as well as the fact that his parents were sent to the Dark World for that same reason.<ref>{{cite book|quote=Link! Only a single night remains! Agahnim will cast his incantation on me under a full moon! Link! You must hurry! If he succeeds, the seal of the wise men will be broken! The entrance to the Dark World will be thrown open and evil will overwhelm us! Do not forget the sacrifice your uncle made trying to foil Agahnim's plot! And your parents... Do you think it was an accident that they fell into the Dark World?! Please, you '''must''' destroy Agahnim before his evil magic leads to Hyrule's destruction!book=A Link to the Past|publisher=Nintendo Power|page=4}}</ref> Link, now confident with the power of the Master Sword,<ref>{{cite book|quote=I have sworn to defeat Agahnim! And now I have the Master Sword to fulfill my vow!!|book=A Link to the Past|publisher=Nintendo Power|page=4}}</ref> heads to [[Kakariko Village]] with his friends, but finds out that all approaches to the castle are blocked by Agahnim's soldiers.<ref>{{cite book|quote='''Link''': So all the approaches to the castle are '''blocked''' by Agahnim's sentries?<br>'''Boy:''' Yep! Even '''approaching''' the castle means certain death!|book=A Link to the Past|publisher=Nintendo Power|page=5 }}</ref> The librarian then comes up with the idea of making a hot air balloon to carry him into the castle.<ref>{{cite book|quote=That gives me an '''idea'''! I believe that a large bubble...filled with hot hair...will float! But to make such a thing...in '''one day'''...will be...hard work!book=A Link to the Past|publisher=Nintendo Power|page= 5,6}}</ref> |
||
| + | |||
| + | [[File:Link in the air balloon.png|thumb|right|Link uses an air balloon to reach the castle]] |
||
| + | Meanwhile, at the castle, Agahnim's preparations to cast the final incantation are complete, but he is soon interrupted by [[Ganon]].<ref>{{cite book|quote=...Agahnim... Now is the hour of the incantation... You must '''not''' fail me!|book=A Link to the Past|publisher=Nintendo Power|page= 68}}</ref> He warns the wizard that a "being with intense emotional energy" is approaching the castle,<ref>{{cite book|quote=Hmmmm... I sense a being approaching the barrier surrounding the castle... A being with intense emotional energy...|book=A Link to the Past|publisher=Nintendo Power|page= 68}}</ref> much to Agahnim's surprise.<ref>{{cite book|quote='''What?!''' Can it be '''him?!'''book=A Link to the Past|publisher=Nintendo Power|page=8}}</ref> Knowing this, Agahnim decides to wait on casting the incantation until Link arrives so that he can send Zelda into the Dark World right in front of Link.<ref>{{cite book|quote=Very well...I will send Princess Zelda into the Dark World before his '''very eyes!''' But, if he can make it '''here'''...|book=A Link to the Past|publisher=Nintendo Power|page=68}}</ref> Just then, Link lands on the castle's highest tower and, after easily defeating a few soldiers with the Master Sword's might, he rushes to find Agahnim in the middle of his spell. Sahasrahla contacts Link and tells him not to trust all his power in the Master Sword, for even the legendary blade cannot harm Agahnim's body.<ref>{{cite book|quote=Link, do not put all your trust in the Master Sword! Even its mighty magic cannot harm Agahnim's body!|book=A Link to the Past|publisher=Nintendo Power|page=10}}</ref> Link attacks him anyway, but the Master Sword passes right through the evil wizard,<ref>{{cite book|quote=What are you '''saying'''?! It's my only chance! '''Huh'''?! Then it's '''true'''?!|book=A Link to the Past|publisher=Nintendo Power|page=10}}</ref> which causes him to turn around and paralyze Link by only looking at him.<ref>{{cite book|quote='''Link''':I...I can't move!!|book=A Link to the Past|publisher=Nintendo Power|page=14}}</ref> Agahnim then casts Zelda into the Dark World<ref>{{cite book|quote=I have been awaiting your arrival, foolish hero! Watch now as your precious princess '''vanishes'''--before your very '''eyes'''! '''Behold!''' The last moment of Princess Zelda! '''NOW!'''|book=A Link to the Past|publisher=Nintendo Power|page= 13,14}}</ref> triumphantly mocking Link that not even the legendary hero could stop them from obtaining the [[Triforce]].<ref>{{cite book|quote=Ho ho ho... Now, it is only a matter of time before the forces of evil conquer this world! Even the so-called Legendary Hero is helpless against us, the tribe of evil, now that we have the power of Gold--the Triforce!!|book=A Link to the Past|publisher=Nintendo Power|page=15}}</ref> As Agahnim continues to ridicule Link for challenging him only to meet his doom,<ref>{{cite book|quote=Soon I will send you to '''join''' her, Link!! See how '''helpless''' my magic has made you! '''Frozen''' like a statue! You '''challenged''' me only to meet your '''doom'''!|book=A Link to the Past|publisher=Nintendo Power|page=16}}</ref> the Master Sword begins to shine while Link is still frozen. |
||
| + | |||
| + | ===Chapter 6: A Fool in the Shape of a Tree=== |
||
| + | |||
| + | Link's rage towards Agahnim begins to channel through the Master Sword since the young hero and the legendary blade are as one, which causes for the castle to begin to crumble down.<ref>{{cite book|quote=Hummph... The puny fool's rage is somehow being channeled by the Master Sword! '''He''' and the '''sword''' are as '''one!'''|book=A Link to the Past|publisher=Nintendo Power|page=2}}</ref> Agahnim and Link begin to battle, and after Sahasrahla reveals to the young hero that the Master Sword was also forged to repel evil magic,<ref>{{cite book|quote=Link, listen! Agahnim's magic is like a double-edged sword... The Master Sword was also forged to repel evil magic!|book=A Link to the Past|publisher=Nintendo Power|page=4}}</ref> Link uses the sword to turn back Agahnim's magic against him and successfully defeat him.<ref>{{Cite book|quote=It can defend as well as attack? I have you now, Agahnim! Your own evil energy will be the end of you!|book=A Link to the Past|publisher=Nintendo Power|page=4}}</ref> Bested by Link, Agahnim reveals that him being killed will not restore the Wise Men's seal, and with his final breath transports Link to the [[Dark World]] as Hyrule Castle crumbles to reveal the [[Pyramid of Power]].<ref>{{cite book|quote=It appears you are not such a fool after all... But it makes no difference... My defeat will not restore the wise men's seal, on the contrary... [...] And with my final breath...you will join Zelda in...the Dark World!|book=A Link to the Past|publisher=Nintendo Power|page=5,6}}</ref> |
||
| + | |||
| + | Frustrated for having disappointed Zelda again,<ref>{{cite book|quote='''Zelda!''' I've let you '''down''' again! '''Now''' who will save you?|book=A Link to the Past|publisher=Nintendo Power|page=7}}</ref> Link is momentarily transformed into a wolf by his negative emotions, but he manages to control them to remain in human form.<ref>{{cite book|quote=Oh no! My negative emotions are turning me into a beast! I must not surrender to these emotions! I'll live a beast's life--forever! I won't!|book=A Link to the Past|publisher=Nintendo Power|page=8}}</ref> He then resumes his search for the princess, determined to find her,<ref>{{Cite book|quote=I will '''never''' give up! I will '''find''' Zelda even in the Dark World!|book=A Link to the Past|publisher=Nintendo Power|page=8}}</ref> but first stumbles into a shrine where he can rest before going on.<ref>{{cite book|quote=Before I start searching I better get some rest... I think I'll stop for a while in that shrine...|book=A Link to the Past|publisher=Nintendo Power|page=9}}</ref> As Link begins to fall asleep, a small tree that was inside the shrine begins to tell him the story of the [[Triforce]] and the [[Golden Land]].<ref>{{Cite book|quote='''Tree:''' '''You there'''... Did you journey to this world in search of the Power of Gold--the Triforce?<br>'''Link:''' Not really, but...|book=A Link to the Past|publisher=Nintendo Power|page=9}}</ref> The tree goes on to explain that only the first to touch the Triforce will be endowed with its strength, and that the land where they are now used to be the Golden Land where the Triforce was hidden. He speaks of Ganondorf the Thief, who accidentally stumbled upon the entrance to the Golden Land and had his evil wishes granted by the Triforce.<ref>{{cite book|quote=Only the first to touch this Golden Power will be endowed with its strength... This land was once the Golden Land where the Triforce was hidden by those who created the world. Ganondorf the Thief, skilled in the magical arts, accidentally stumbled upon the entrance to this magical place.|book=A Link to the Past|publisher=Nintendo Power|page=10}}</ref> After touching the touched the Triforce, Ganondorf achieved ultimate power and transformed the Golden Land into the Dark World, which caused for many men from Hyrule to be drawn to the land of evil only to be converted into monsters because of their impure thoughts and emotions, including the tree himself.<ref>{{cite book|quote=When he touched the Triforce, his evil wishes were granted. He achieved ultimate power over this world and transformed it into a land of evil, a Dark World. Many evil men from your world were drawn here. They were transformed into monsters because of their evil thoughts and emotions. '''I''' was one of them...|book=A Link to the Past|publisher=Nintendo Power|page=10}}</ref> The tree makes a final comment that Link must defeat Ganondorf and reclaim the Triforce to restore the Dark World into the Golden Land, at which point Link wakes up, confused, thinking it was a dream.<ref>{{cite book|quote=In order to restore this world to the shining Golden Land it once was, you must '''defeat''' the thief and reclaim the Triforce! Until then...I remain a fool in the shape of a tree...doomed never to leave the Dark World...|book=A Link to the Past|publisher=Nintendo Power|page=10,11}}</ref><ref>{{cite book|quote=A talking tree? Ganondorf? Was it a dream?|book=A Link to the Past|publisher=Nintendo Power|page=11}}</ref> |
||
| + | |||
| + | Upon leaving the shrine, Link is confronted by three knights and a [[Hinox]], who ask him about a [[fairy]] they are pursuing for her magic powers.<ref>{{cite book|quote=All right, kid! Did you see a '''faerie''' fly through here? Which way did she go? [...] Yer lyin'!! Don't hide her! We want her magic powers and we want them now!|book=A Link to the Past|publisher=Nintendo Power|page=12}}</ref> When Link tells them he does not have the fairy, the monsters attack him, but the young hero easily defeats them with the use of the Master Sword and by throwing the Hinox's own bombs back at it. After the Hinox explodes, the fairy appears next to Link. |
||
| + | |||
| + | ===Chapter 7: Zora's Mask=== |
||
| + | Before Link has a chance to ask the fairy anything, she flies away and leads him to the [[Zora's Lake]], where he encounters a [[Zola]]. Thinking it to be a monster, the young hero tries to fight it, but the Zola thanks Link for having saved [[Epheremelda]], the fairy.<ref>{{cite book|quote=Uggh! You're an '''ugly''' little mannn...but you have my thanksss for helping my Epheremelda... I sssaw your sssword and thought you were the knight...|book=A Link to the Past|publisher=Nintendo Power|page=4}}</ref> The Zola explains that he thought he was [[Romu]], the knight who, with the Master Sword, scarred his forehead.<ref>{{cite book|quote=A dangerousss man who sswung the sssingular Massster Ssssword... Rommmu wasss his name... He's the one who ssscarred my forehead...|book=A Link to the Past|publisher=Nintendo Power|page=4}}</ref> After Link is healed by Epheremelda,<ref>{{cite book|quote=Suddenly I feel healed and refreshed!|book=A Link to the Past|publisher=Nintendo Power|page=4}}</ref> which is the sole reason the thieves of the Dark World desire her power,<ref>{{cite book|quote=It'sss the healing power of my Epheremelda's wingsss... That is what makesss her desssirable to the thieves of thisss world...|book=A Link to the Past|publisher=Nintendo Power|page=4}}</ref> the creature introduces itself as [[Zora]]. He and Epheremelda tell Link about the ruler of the Dark World and the usurper of the Triforce, Ganon,<ref>{{cite book|quote=My name isss Zzzora... Mmmy people had lived in peace sssince water firssst fell upon the earth...until Ganon usssurped the Power of Gold and created the Dark World!|book=A Link to the Past|publisher=Nintendo Power|page=5}}</ref> and how he sent Agahnim to Hyrule to do all the work for him since Ganon cannot leave the Dark World.<ref>{{cite book|Quote=Even though Ganon has the Triforce, he can't go to Hyrule! So, he sent Agahnim there to do his dirty work!|book=A Link to the Past|publisher=Nintendo Power|page=5}}</ref> With Agahnim's magic, he sent the Maidens to the Dark World so Ganon could steal their power, which makes Link realize that Zelda is still alive.<ref>{{cite book|quote=Agahnim sent the Maidens here so Ganon could steal their power!|book=A Link to the Past|publisher=Nintendo Power|page=5}}</ref> Knowing this, Zora tells Link that one of the maidens is imprisoned in the [[Palace of Darkness]] nearby; however, he warns the young hero of the explosive materials, known as [[firecorn]], that are kept in there.<ref>{{cite book|quote=Yesss, and one is imprisoned in Crystal in the palace nearby...but you shouldn't go there! In legendsss that place is known as the Palace of Darkness... Ganon's servantss have ssstockpiled the dangerousss, explosssive firecorn there...|book=A Link to the Past|publisher=Nintendo Power|page=5,6}}</ref> Link decides to go anyway, for he insists that he must rescue the maiden trapped in the [[crystal]].<ref>{{cite book|quote=I've already seen what the firecorn can do, but no matter what... I '''must''' rescue the girl who is held there!|book=A Link to the Past|publisher=Nintendo Power|page=6}}</ref> Before leaving, Zora allows Link to take Epheremelda as a guide and grants him the [[Zora's Mask]] to disguise himself and not look so conspicuous as he is sneaking around the palace.<ref>{{cite book|quote=If you mussst go, take my Epheremelda for your ggguide... Also, your gggrotesssque face isss too conssspicuousss... You musst wear Zzzora's Masssk!!|book=A Link to the Past|publisher=Nintendo Power|page=6}}</ref> |
||
| + | |||
| + | [[File:Palace of Darkness (comic).png|thumb|left|The Palace of Darkness]] |
||
| + | The duo arrive to the Palace of Darkness and eventually reach the storeroom with the explosives,<ref>{{cite book|quote=The storeroom of the palace! If this went off, they wouldn't call it the Palace of Darkness!|book=A Link to the Past|publisher=Nintendo Power|page=8}}</ref> and although Link had been able to sneak around with the Zora's Mask without being noticed,<ref>{{cite book|quote=Now I know why Zora put this thing on my face!|book=A Link to the Past|publisher=Nintendo Power|page=9}}</ref> he is discovered by a [[Rocklops]].<ref>{{cite book|quote=I can see another face behind the mask! The face of an intruder! Death to the interloper!|book=A Link to the Past|publisher=Nintendo Power|page=9}}</ref> The Rocklops warns Link of what could happen if he set off the firecorns in the palace,<ref>{{cite book|quote=You fool! you know what will happen if you use the firecorn here?!|book=A Link to the Past|publisher=Nintendo Power|page=10}}</ref> but the young hero disregards his warning and takes a Hinox's bomb belt that was wrapped around it.<ref>{{cite book|quote=We'll all go up in smoke! But if you guys are going to get me...we'll all go together!|book=A Link to the Past|publisher=Nintendo Power|page=10}}</ref> Link then stumbles into the imprisoned crystal, but is attacked by a [[Gleeock]] that was called upon by the Rocklops. Although he defeats it easily with the Master Sword, soon more Hinoxs riding Gleeocks begin to head towards him.<ref>{{cite book|quote=Link!! There's more on the way!|book=A Link to the Past|publisher=Nintendo Power|page=12}}</ref> Link gives Epheremelda ones of the bombs from the Hinox's belt, which eventually denotes the firecorn stockpile and destroys the entire palace. This allows the maiden to be freed from the crystal, who thanks Link and grants him a relic called the [[Comm-Fork]].<ref>{{cite book|quote=Thank you, Link! Because of you I can escape this Crystal prison! Now, here is something that will help you--the Comm-Fork!|book=A Link to the Past|publisher=Nintendo Power|page=16}}</ref> Before Link can ask her where Zelda is, the maiden disappears,<ref>{{cite book|quote=Wait! Do you know where Zelda is... Comm-Fork?!|book=A Link to the Past|publisher=Nintendo Power|page=16}}</ref> and instead a knight appears in the rubble and demands that the young hero hand over the Master Sword.<ref>{{cite book|quote=Now you will hand ME the Master Sword!|book=A Link to the Past|publisher=Nintendo Power|page=16}}</ref> |
||
| + | |||
| + | ===Chapter 8: Roam, the Mystery Knight=== |
||
| + | The knight introduces himself as Roam, who challenges Link for the right to wield the Master Sword.<ref>{{cite book|quote=My name is Roam! I challenge you...for the right to wield the Master Sword!!|book=A Link to the Past|publisher=Nintendo Power|page=1}}</ref> He transforms into a monstrous eagle and proceeds to attack Link, who counters Roam's attack and defeats him.<ref>{{cite book|quote=You fight well...or is it just luck? I may have misjudged you, hero...|book=A Link to the Past|publisher=Nintendo Power|page=3}}</ref> Roam apologizes for having misjudged Link and reveals to him that the ancient Book of Mudora tells that the one who corrupts the Golden Land will be defeated with the [[Silver Arrow]], the sacred item that Roam has been seeking.<ref>{{cite book|quote=It is written in the Book of Mudora: 'He who corrupts the land of gold shall fall to the shaft of the enchanted arrow of silver...' My family has always excelled in archery, and it is my destiny to destroy Ganon! I have not yet obtained the enchanted arrow, but...|book=A Link to the Past|publisher=Nintendo Power|page=4}}</ref> He continues to explain that he is a descendant of one of the Knights of Hyrule who was a master archer, and when he discovered that Agahnim was sending the seven maidens to the Dark World, he sought after them through the portal near [[Death Mountain]].<ref>{{cite book|quote=Roam is the descendant of one of the Knights of Hyrule who was a master archer. When he discovered that Agahnim was sending members of the Seven Wise Men's line to the Dark World, he went after them through the portal near Death Mountain.|book=A Link to the Past|publisher=Nintendo Power|page=4}}</ref> Because he is in the Dark World, he is transformed into an eagle every time he engages in battle.<ref>{{cite book|quote=Do not be deceived by my form... When I do battle, I am transformed into a monstrous eagle by the dark forces of this world!|book=A Link to the Past|publisher=Nintendo Power|page=4}}</ref> Link, overjoyed that Roam is also a descendant of the Knights of Hyrule, begins to think that the two of them can join forces to find Zelda.<ref>{{cite book|quote=So '''your''' ancestors were Knights of Hyrule? Mine too! Perhaps we can join forces to find Zelda!|book=A Link to the Past|publisher=Nintendo Power|page=4}}</ref> Roam is shocked to hear Zelda has been transported to the Dark World, saying Link is too much of a "weakling" to wield the Master Sword and save the princess.<ref>{{cite book|quote='''What?!''' Princess Zelda is here, in the Dark World?! Where were the knights? Why didn't they protect her?! They must be '''mad''', giving a weakling like you the Master Sword and sending you to rescue her!|book=A Link to the Past|publisher=Nintendo Power|page=5}}</ref> The young hero tries to defend himself by saying he has the three Pendants of Virtue to prove his worth,<ref>{{cite book|quote=Weakling? I'll show you who's weak! I've been through a '''lot''' to get this far! I have the Pendants of Power, Wisdom and Courage to '''prove''' it!|book=A Link to the Past|publisher=Nintendo Power|page=5}}</ref> but Roam is unimpressed and begins to walk away to continue searching for the Silver Arrow.<ref>{{cite book|quote=I find that '''difficult''' to believe, with your lack of discipline, and obvious immaturity... Well, I'm off to find the enchanted Silver Arrow... Without it, no one can defeat Ganon.|book=A Link to the Past|publisher=Nintendo Power|page=5}}</ref> Before disappearing, Roam tells Link that he senses they will have to join forces against Ganon, and advices the young hero to stay alive until then.<ref>{{cite book|quote=I have a feeling that the time will come when we must join forces against him... Until then, '''do''' try to stay '''alive.'''|book=A Link to the Past|publisher=Nintendo Power|page=5}}</ref> |
||
| + | |||
| + | [[File:Link using the Comfork.png|thumb|right|120px|Link using the Comfork to see Sahasrahla in the Light World]] |
||
| + | After Roam leaves, the Comfork begins to ring and Link sees an image of Sahasrahla and the rest of his friends back in Kakariko,<ref>{{Cite book|quote=What's that noise? [...] Sahasrahla!|book=A Link to the Past|publisher=Nintendo Power|page=6}}</ref> where they are discussing an earthquake that shook the Eastern Palace.<ref>{{cite book|quote=...and the Eastern Palace was shaken by a quake that almost levelled it...|book=A Link to the Past|publisher=Nintendo Power|page=6}}</ref> Although at first Sahasrahla disregards Link's voice as having been his imagination, Sahasrahla and the others eventually communicate with Link and discover that the Comfork allows them to speak with each other even though they are on different planes of existence.<ref>{{cite book|quote=I can '''see''' them...when the Comfork rings! The girl in the crystal wasn't kidding when she said it might be helpful!|book=A Link to the Past|publisher=Nintendo Power|page=6}}</ref><ref>{{cite book|quote=Ahhh, it must be the magical comfork of legend! The vibrations of this crystal tuning fork can distort time and space... While the comfork vibrates, you can communicate with beings on different planes of existence...|book=A Link to the Past|publisher=Nintendo Power|page=7}}</ref> Link begins to tell his friends about his journey through the Dark World, and Sahasrahla begins to note similarities between the Dark World and Hyrule on his map of the land,<ref>{{cite book|quote=Through the comfork's magic, Link told his friends about the journey through the Dark World and about his battles at the pyramid and the Palace of Darkness. As he spoke, Sahasrahla noted similarities between the Dark World and Hyrule on his map of the land.|book=A Link to the Past|publisher=Nintendo Power|page=7}}</ref> leading him to discover that the Dark World is a warped reflection of the Light World and that the two are somehow connected.<ref>{{cite book|quote=Link, listen! According to my calculations, the location of the pyramid in the Dark World corresponds to that of Hyrule Castle in the light world! The Palace of Darkness, which you destroyed, must somehow be connected to Hyrule's Eastern Palace! That explains the sudden earthquake... This event leads me to believe that the Dark World is like a warped reflection of our Light World, and that the two worlds are somehow connected!|book=A Link to the Past|publisher=Nintendo Power|page=8}}</ref> He goes on to reveal that the Dark World reflects the inner contents of one's mind, and because the heart of the maiden Link rescued was so pure, she was trapped in a crystal, much like Zelda.<ref>{{cite book|quote=Also, it appears that the inner contents of your mind will also influence the external shape of your body in the Dark World! Because the mind of the maiden was so pure, she was imprisoned in the crystal cocoon...as must be Zelda!|book=A Link to the Past|publisher=Nintendo Power|page=9}}</ref> Knowing this, Epheremelda begins to ask her fairy friends if they've seen the princess,<ref>{{cite book|quote=Let me ask some of my faerie friends if they've seen her...|book=A Link to the Past|publisher=Nintendo Power|page=9}}</ref> and one of them comments on how she overheard a monster talking about a girl imprisoned in a crystal near the [[Swamp Palace]].<ref>{{cite book|quote=Ya know, I overheard some monsters talking about something like that near the Swamp Palace...|book=A Link to the Past|publisher=Nintendo Power|page=9}}</ref> |
||
| + | |||
| + | The duo head out to the palace but discover that the area is completely dried up.<ref>{{cite book|quote=There's no water here! This place is as dry as a tomb!|book=A Link to the Past|publisher=Nintendo Power|page=10}}</ref> Link calls to Sahasrahla for help<ref>{{cite book|quote=Maybe Sahasrahla has an idea! I'll call him with the Comfork!|book=A Link to the Past|publisher=Nintendo Power|page=11}}</ref> and asks him to go to the Light World location of the Swamp Palace, where Sahasrahla and the boy accompanying him find a fountain surrounded by statues.<ref>{{cite book|quote=We found a large pool of water surrounded by statues, but nothing else of interest...|book=A Link to the Past|publisher=Nintendo Power|page=12}}</ref> The boy, able to see Link in the water of the fountain, warns Link of the monsters behind him,<ref>{{cite book|quote=Look in the pool! I see Link! Link!! Behind you!!|book=A Link to the Past|publisher=Nintendo Power|page=12}}</ref> where a Hinox and a [[Taurus]] shut the door to trap the young hero inside the palace.<ref>{{Cite book|quote=Heh heh heh... I shut the door! Now you're trapped in here!|book=A Link to the Past|publisher=Nintendo Power|page=12}}</ref> As the boy watches the battle between Link and the foes, he accidentally activates the statues that cause water to pour into the fountain. This leads to the Swamp Palace in the Dark World to get flooded, washing away the monsters and Link. |
||
| + | |||
| + | ===Chapter 9: Wizzrobe's Trap=== |
||
| + | The Hinox and Taurus end up sinking as they struggle with each other,<ref>{{cite book|quote=GLUB! Let me g-g-go! Your armor...too heavy...|book=A Link to the Past|publisher=Nintendo Power|page=2}}</ref> while Link's Master Sword is dragging him below the surface.<ref>{{cite book|quote=The Master Sword...dragging me dowwn...|book=A Link to the Past|publisher=Nintendo Power|page=2}}</ref> Epheremelda tells Link to stay afloat, for the water is almost up to an opening that the fairy had found earlier on.<ref>{{cite book|quote=You're close, Link! Stay afloat a little longer! The water's almost up to the opening!|book=A Link to the Past|publisher=Nintendo Power|page=3}}</ref> The young hero is then rushed into a new chamber, where he finds the second maiden imprisoned in her crystal. As Link makes his way to the maiden, a large, tentacled monster attacks him. He thrusts himself with the Master Sword into the monster and defeats the creature, which spits out Link from inside and gives him a chance to destroy the floating crystal where the maiden is. The maiden, now freed, thanks Link and tells him that Zelda is imprisoned in a [[Turtle Rock|rock shaped like a turtle]] found at the end of the world, then vanishes.<ref>{{cite book|quote=Thank you for saving me, Link! I know you are searching for Zelda. She is being held in a rock that looks like a turtle. But this rock is located at the end of this world...|book=A Link to the Past|publisher=Nintendo Power|page=8}}</ref> Epheremelda tells Link of a map of the Dark World that is located in the [[Ice Palace|Ice Tower]],<ref>{{Cite book|quote=You know, I've heard of a map deep inside the Ice Tower. The tower overlooks the entire world, but...|book=A Link to the Past|publisher=Nintendo Power|page=8}}</ref> when suddenly Link hears Zelda contact him telepathically from beyond the [[Misery Mire|wasteland]].<ref>{{cite book|quote='''Zelda:''' Link!<br>'''Link:''' Zelda?! Is that you?! <br>'''Zelda:''' I...am...nearby... Hurry!|book=A Link to the Past|publisher=Nintendo Power|page=9}}</ref><ref>{{Cite book|quote=Can't you hear her? Zelda is calling from beyond the wasteland!|book=A Link to the Past|publisher=Nintendo Power|page=9}}</ref> Epheremelda, who cannot hear Zelda's calling, advises Link against going to the wasteland since it is too dangerous, and once they get in there, there will be no way to escape.<ref>{{cite book|quote=Now you're hearing things! Anyway, the wasteland is '''way''' too '''harsh'''! Once you get in there, you can't escape!|book=A Link to the Past|publisher=Nintendo Power|page=9}}</ref> She recommends that they go find the map first,<ref>{{cite book|quote='''I''' think we should try to find the map first!|book=A Link to the Past|publisher=Nintendo Power|page=10}}</ref> but Link disregards her suggestion, for he claims that if the wasteland is as dangerous as she says, then he has to rescue Zelda as soon as possible.<ref>{{Cite book|quote=If this wasteland is as dangerous as you say it is, I've got to get Zelda out of there right away!|book=A Link to the Past|publisher=Nintendo Power|page=10}}</ref> This angers Epheremelda, who claims that Link never worries about her and that all he ever talks about is Zelda, leading the fairy to indignantly leave Link's side.<ref>{{Cite book|quote=I've '''had''' it!! All you ever talk about is '''Zelda''' this and '''Zelda''' that! You '''never''' worry about '''me'''! From now on, you're on your own!|book=A Link to the Past|publisher=Nintendo Power|page=10}}</ref> |
||
| + | |||
| + | [[File:Wizzrobe's Trap.png|thumb|right|Link caught in the Wizzrobe's trap]] |
||
| + | Now on his own, Link heads into the wasteland and stumbles into an oasis from where Zelda is calling his name. The young hero ventures in and finds her,<ref>{{cite book|quote=It's some kind of oasis! This must be where Zelda is being held! Zelda! I'm on my way! [...] Can it be? Zelda! I finally found you!|book=A Link to the Past|publisher=Nintendo Power|page=11}}</ref> but as he remembers the maiden's words of Zelda being inside a turtle rock,<ref>{{cite book|quote=But wait... The girl in the crystal said Zelda was in a rock shaped like a turtle...|book=A Link to the Past|publisher=Nintendo Power|page=12}}</ref> the princess turns out to be an illusion made by a [[Wizzrobe]], who promptly captures Link and conjures [[Vitreous]] from the swamp to devour him.<ref>{{cite book|quote=You walked right into my trap, tasty morsel! This is Misery Mire, world famous for its fine aroma of Swamp Gas. You're just in time for dinner with Sir Vitreous, the master of this place... Dinner, with you as the main course!|book=A Link to the Past|publisher=Nintendo Power|page=12}}</ref> Just then, a whirlpool is created that engulfs both Vitreous and the Wizzrobe, and from beneath Zora appears to rescue Link. When the young hero asks Zora how he arrived and who told him where he was,<ref>{{cite book|quote=Zora...how'd you get here? How'd you know?|book=A Link to the Past|publisher=Nintendo Power|page=16}}</ref> Zora explains that Epheremelda had requested that he go rescue Link and that he is able to warp between worlds due to the presence of water.<ref>{{cite book|quote=Ahhh... It isss sssimple for me to appear anywhere there isss water... Plusss, I cannot deny Epheremelda's requesst...|book=A Link to the Past|publisher=Nintendo Power|page=16}}</ref> |
||
| + | |||
| + | ===Chapter 10: To Turtle Rock...and Zelda!=== |
||
| + | Reunited with Epheremelda, Link travels to the Ice Tower, where they are confronted by [[Kholdstare|Kholdstone]]. Link reveals that all he wants is to see the map of the Dark World,<ref>{{cite book|quote=I don't want any '''trouble'''! I just want to see the map of the Dark World!|book=A Link to the Past|publisher=Nintendo Power|page=5}}</ref> but Kholdstone mentions that the map is his greatest treasure and will not let anyone see it.<ref>{{cite book|quote=This map you speak of is Kholdstone's greatest treasure! I will '''never''' let you gaze upon it! Arise, Stalfos! Destroy him!|book=A Link to the Past|publisher=Nintendo Power|page=6}}</ref> The monster unleashes two Stalfos to attack Link, but when the young hero sees that they keep respawning even after defeating them, he begins to focus his power on the Master Sword,<ref>{{cite book|quote=It's impossible to keep them down! Aaaargh!! I've had enough!|book=A Link to the Past|publisher=Nintendo Power|page=7}}</ref> which causes for the tower to begin to collapse. Kholdstone warns Link that if he destroys the tower, then he will destroy the map as well, making him realize that the map is etched on the tower's floor.<ref>{{cite book|quote=You've got quite a temper... If you bring the place down, you will destroy the map also! [...] Look '''down''', fool!|book=A Link to the Past|publisher=Nintendo Power|page=8}}</ref><ref>{{cite book|quote=Ah...the floor is the map?! Now...where's Turtle Rock?!|book=A Link to the Past|publisher=Nintendo Power|page=8}}</ref> Before the tower collapses, Link learns the location of Turtle Rock and heads there along with Epheremelda, where they begin to look for the dungeon's entrance.<ref>{{cite book|quote=Following the map he glimpsed in the Ice Tower, Link finally arrived at Turtle Rock with Epheremelda, but...|book=A Link to the Past|publisher=Nintendo Power|page=10}}</ref><ref>{{cite book|quote=Well, where's the door?|book=A Link to the Past|publisher=Nintendo Power|page=10}}</ref> Remembering the words Link heard in the Ice Tower,<ref>{{cite book|quote=Link, you must strike the rock...with thunder!|book=A Link to the Past|publisher=Nintendo Power|page=9}}</ref> the young hero strikes the top of Turtle Rock with the Master Sword to allow a lightning bolt to hit it and thus reveal the entrance. |
||
| + | |||
| + | Inside the lava-infested Turtle Rock,<ref>{{cite book|quote=A lava lake! This place is hot as an inferno!|book=A Link to the Past|publisher=Nintendo Power|page=11}}</ref> Link finds Zelda imprisoned in a crystal<ref>{{cite book|quote=Zelda!! Is it '''really''' you this time[...]?!|book=A Link to the Past|publisher=Nintendo Power|page=12}}</ref>, but he is then attacked by a [[Trinexx|three-headed dragon]].<ref>{{cite book|quote=Link! Watch your back!|book=A Link to the Past|publisher=Nintendo Power|page=12}}</ref> However, Roam, who had been following Link,<ref>{{cite book|quote=Ha ha ha! I followed you all this way...|book=A Link to the Past|publisher=Nintendo Power|page=16}}</ref> arrives just in time to save the young hero from one of the dragon head's attacks, and prepares to prove himself as the true legendary hero.<ref>{{cite book|quote=Now we shall truly see if one of us is the "Legendary Hero"...|book=A Link to the Past|publisher=Nintendo Power|page=16}}</ref> |
||
| + | |||
| + | ===Chapter 11: Ganon's Tower=== |
||
| + | [[File:Roam vs Agahnim.png|thumb|left|Roam dies defeating Agahnim]] |
||
| + | Roam and Link cut off the dragon's ice head, causing its ice and fire to mix and explode.<ref>{{cite book|quote='''Move''' it, hero! Without that head, the monster's fire and ice will mix violently! You can guess what happens next!|book=A Link to the Past|publisher=Nintendo Power|page=1}}</ref> The explosion shatters Zelda's crystal, and Link rushes to her side to save her,<ref>{{cite book|quote='''Zelda!!''' ...Zelda!! Are you okay?!|book=A Link to the Past|publisher=Nintendo Power|page=3}}</ref> infuriating Epheremelda. The four escape Turtle Rock as it collapses, and Roam boasts that the Book of Mudora's prophecy supports him as the Legendary Hero, for he is the one seeking the Silver Arrow, and leaves to find it.<ref>{{cite book|quote=Admit it, Link. It seems to support the Book of Mudora's prophecy that only the enchanted arrow can defeat the one who corrupted this world. You are '''stubborn''' and '''foolish'''... '''I''' will defeat Ganon!|book=A Link to the Past|publisher=Nintendo Power|page=6}}</ref> Zelda tells Link the book has a power which is beyond their comprehension,<ref>{{cite book|quote=The words of the book of Mudora have a power which is beyond our comprehension...|book=A Link to the Past|publisher=Nintendo Power|page=7}}</ref> |
||
| + | and Link remembers that Sahasrahla said only a man who has overcome his own negative thoughts and emotions can become the true hero. Since Roam has not, Link fears that this might actually be his downfall even if he finds the Silver Arrow.<ref>{{cite book|quote=So Roam may be '''right''' about the arrow...but Sahasrahla '''also''' said that only a man who has overcome his own negative thoughts and emotions can become the true hero... Even if Roam does find the arrow, his attitude might be his downfall...|book=A Link to the Past|publisher=Nintendo Power|page=7}}</ref> The young hero goes on to say that they should not worry about Roam, for Link will defeat Ganon by himself if he has to,<ref>{{cite book|quote=Anyway, we shouldn't worry about '''him''', Zelda! '''I''' will defeat Ganon by myself, if I have to!|book=A Link to the Past|publisher=Nintendo Power|page=7}}</ref> leading Zelda to put all her trust in him. <ref>{{cite book|quote=You have shown yourself to be a determined and selfless hero, Link... If anyone can do it, I believe '''you''' can... The life forces of the Hylian Maidens you freed from the crystals will guide us to Ganon's Castle...|book=A Link to the Past|publisher=Nintendo Power|page=7}}</ref> |
||
| + | |||
| + | The two continue on without Roam and eventually find Ganon's Tower, although they are not able to find its entrance.<ref>{{cite book|quote='''That's''' Ganon's Castle?! [...] But how are we to enter that place?!|book=A Link to the Past|publisher=Nintendo Power|page=9}}</ref> Suddenly, Roam appears and admits he has failed to find the arrows. Overwhelmed by his failure, Roam transforms into an eagle and flies up to the tower, worrying Link since Roam's emotions are out of control and could cause him to remain a beast forever.<ref>{{cite book|quote=Roam!! His emotions are out of control... He'll become a beast forever!|book=A Link to the Past|publisher=Nintendo Power|page=10}}</ref> Zelda then asks for the aid of the maidens,<ref>{{cite book|quote=Oh, mystical maidens... Lend us your power...|book=A Link to the Past|publisher=Nintendo Power|page=10}}</ref> |
||
| + | which allows them to enter the pitch-dark tower.<ref>{{cite book|quote=It's pitch dark... I can't see anything!|book=A Link to the Past|publisher=Nintendo Power|page=10}}</ref> Inside, The group is attacked by illusions of Link's past foes,<ref>{{cite book|quote=It--It's Agahnim! It '''can't''' be! I '''destroyed''' him! [...] The Lanmola?! The Moldorm?! They can't be real! I defeat them all!|book=A Link to the Past|publisher=Nintendo Power|page=11}}</ref> and when Roam attacks a specter of Agahnim approaching Zelda,<ref>{{cite book|quote='''You!''' '''I'll''' get it, Zelda!|book=A Link to the Past|publisher=Nintendo Power|page=14}}</ref> he is killed, with Ganon rising from the illusion. |
||
| + | {{clear}} |
||
| + | |||
| + | ===Chapter 12: The Final Battle=== |
||
| + | [[File:Silver Arrow.png|thumb|left|The arrow empowered by the maidens, Zelda, Link, and Roam turns into a Silver Arrow]] |
||
| + | Link attacks Ganon but he is easily thrown back by Ganon's [[trident]]. Zelda takes up Roam's [[crossbow]] as Link is trapped in between the trident. While Ganon mocks Zelda,<ref>{{cite book|quote=What do you mean to do with that '''bow''', Princess?|book=A Link to the Past|publisher=Nintendo Power|page=4}}</ref> Link uses the opportunity to slash the evil thief's trident in half and, as he is falling down, the young hero slashes over Ganon's chest, leaving him paralyzed.<ref>{{cite book|quote=His '''sword'''... I am '''paralyzed'''...|book=A Link to the Past|publisher=Nintendo Power|page=6}}</ref> Zelda begins to ask for the aid of the maidens and fires an ordinary arrow from the crossbow, but as it approaches Ganon, the power of the maidens, Zelda, Link, and Roam, turn the arrow into the Silver Arrow,<ref>{{cite book|quote=It was the '''enchanted arrow'''...|book=A Link to the Past|publisher=Nintendo Power|page=6}}</ref> destroying Ganon. The [[Triforce]] rises from his body, and the Essence of the Triforce tells Link that the Triforce is waiting for a new master now that Ganon has been defeated, asking that the young hero touch it with a wish in his heart.<ref>{{cite book|quote= Welcome, Link... I am the Essence of the Triforce. [...] You have totally destroyed Ganon. The Triforce is waiting for a new master. Its Golden Power is in your hands--touch it with a '''wish''' in your heart.|book=A Link to the Past|publisher=Nintendo Power|page=8}}</ref> As Link touches the Triforce, Epheremelda sadly bids him goodbye,<ref>{{cite book|quote=Good-bye, Link...|book=A Link to the Past|publisher=Nintendo Power|page=9}}</ref> and Link and Zelda are transported back to Hyrule. |
||
| + | |||
| + | [[File:Link and Zelda (ALttP comic).png|thumb|right|Link and Queen Zelda part ways]] |
||
| + | At Hyrule Castle, Link sees a vision of his father, mother and uncle, who congratulate him on his difficult victory and tell him to never forget the efforts of the many generations of knights and Wise Men that preceded him.<ref>{{cite book|quote=Link... You have done well, Link... In the Imprisoning War of years past, great armies risked all to seal Ganon in the Dark World. You, however, accomplished a much more lonely and difficult victory... It was not only by your own power, but also that of the many generations of knights and Wise Men who preceded you. Let the memories of their efforts humble you. Never forget!|book=A Link to the Past|publisher=Nintendo Power|page=11, 12}}</ref> The Dark World vanishes and releases all of the people who had been trapped there, returning the longed-for peace to Hyrule.<ref>{{cite book|quote=Following Ganon's defeat, the Dark World vanished, releasing many who had been trapped there in monstrous form. The longed-for peace once again returned to Hyrule.|book=A Link to the Past|publisher=Nintendo Power|page=12}}</ref> Zelda is crowned the Queen of Hyrule and in turn appoints Link as the Master of the Knights of Hyrule.<ref>{{cite book|quote=Link was appointed as Master of the Knights of Hyrule by the newly-crowned Queen Zelda.|book=A Link to the Past|publisher=Nintendo Power|page=13}}</ref> The young hero is then seen looking at the Master Sword back in its pedestal in the Lost Woods, when he then hears Zelda speak to him from behind. She begins to comment on how although the bond between them was so strong when she was in Ganon's clutches, now that they are both free and at peace, their duties now keep them apart, leaving the queen to feel alone.<ref>{{cite book|quote=It's '''ironic''', isn't it... The psychic link between us was so strong when I was in Ganon's clutches... But now that we are both free, and at peace...you seem so '''distant''', guarding the Triforce... I am '''alone'''.|book=A Link to the Past|publisher=Nintendo Power|page=14}}</ref> As Zelda begins to gallop away on her horse, she confesses to Link that as long as she lives, she will never forget the time when they were together in their dreams.<ref>{{cite book|quote=As long as I '''live''', I shall never '''forget''' the time when we were '''together''' in our '''dreams'''...|book=A Link to the Past|publisher=Nintendo Power|page=14}}</ref> The comic's final scene shows the Master Sword overgrown by foliage as it sleeps, waiting for a new bearer when disaster befalls Hyrule again.<ref>{{cite book|quote=And as the centuries pass, the legendary Master Sword lies waiting in the depths of the Lost Woods, waiting for the time when disaster again befalls Hyrule..waiting to call a '''hero''' to arms.|book=A Link to the Past|publisher=Nintendo Power|page=15}}</ref> |
||
| + | {{clear}} |
||
| + | |||
| + | ==Listings== |
||
| + | ===Characters=== |
||
| + | *[[Link]] |
||
| + | *[[Princess Zelda]] |
||
| + | *[[Ganon]] |
||
| + | *[[Agahnim]] |
||
| + | *[[Sahasrahla]] |
||
| + | *[[Sahasrahla's Wife]] |
||
| + | *[[Librarian]] |
||
| + | *[[Sahasrahla's Friend]] |
||
| + | *[[Maiden]]s |
||
| + | *[[Roam]] |
||
| + | *[[Epheremelda]] |
||
| + | *[[Zora (A Link to the Past Comic)|Zora]] |
||
| + | |||
| + | ===Items=== |
||
| + | *[[Master Sword]] |
||
| + | *[[Silver Arrow]] |
||
| + | *[[Pendants of Virtue]] |
||
| + | *[[Lantern]] |
||
| + | *[[Comfork]] |
||
| + | *[[Firecorn]] |
||
| + | *[[Crossbow]] |
||
| + | *[[Trident]] |
||
| + | |||
| + | ===Enemies=== |
||
| + | *[[Ball and Chain Trooper]] |
||
| + | *[[Castle Guard#A Link to the Past|Soldier]]s |
||
| + | *[[Stalfos]] |
||
| + | *[[Hinox]] |
||
| + | *[[Taurus]] |
||
| + | *[[Thieves]] |
||
| + | *[[Rocklops]] |
||
| + | *[[Lanmola]] |
||
| + | *[[Gleeock]]s |
||
| + | *[[Moldorm]] |
||
| + | *[[Trinexx]] |
||
| + | *[[Wizzrobe]] |
||
| + | *[[Vitreous]] |
||
| + | |||
| + | ==Differences From the Game== |
||
| + | *Sahasrahla inhabits the Eastern Palace rather than just living near it, and gives Link the Pendant of Courage. In the game, Link must defeat the [[Armos Knight]]s to claim the Pendant. |
||
| + | *Death Mountain is on the borders of the Desert of Mystery. In the game Death Mountain is far north and the desert is to the south-west. |
||
| + | *The monster fought in the Tower of Hera is a giant spider as opposed to the [[Moldorm]] fought in the game. However, when the monster's illusion appears in Ganon's Tower, it is still called a Moldorm. |
||
| + | *Link cannot travel freely between worlds and is trapped in the Dark World once Agahnim transports him there. |
||
| + | *Link maintains his form in the Dark World by controlling his emotions, while in the game the [[Moon Pearl]] is needed to maintain human form. |
||
| + | *Link is attacked by monsters called [[Gleeock]]s in the Palace of Darkness. However, the monsters are bright orange lizards with green gems on their heads, and thus physically resemble smaller versions of the [[Helmasaur King]] which is fought in the game. |
||
| + | *The boss of the Swamp Palace may or may not be [[Arrghus]] - the monster is shown as a bright red jellyfish that attacks with tentacles, but no eyeballs are shown. |
||
| + | *The events of the Dark World are heavily abridged - [[Skull Woods]] and [[Thieves' Town]] are entirely removed, and Link only saves two maidens before finding Zelda. Though Link enters Misery Mire and the Ice Palace (referred to as the Ice Tower), no maidens are imprisoned there. The collection and usage of items vital to the game's completion are often removed entirely from the comic, with only the Book of Mudora appearing in the same capacity. |
||
| + | *The monster fought in Turtle Rock in a three-headed dragon with a grey head, a red head that breathes fire and a blue head that breathes ice. Though the three heads and their powers are a reference to the game's boss [[Trinexx]], the dragon is never called Trinexx. |
||
| + | |||
| + | ==Further Notes== |
||
| + | *In the Dark World Link is accompanied by Epheremelda who offers him assistance. This is before ''Ocarina of Time'' introduced [[Navi]] as the first canon [[Fairy Companion]]. |
||
| + | *When sent into the Dark World Link begins to transform into a wolf-like creature. [[Wolf Link|Link would later transform into a wolf]] in ''[[The Legend of Zelda: Twilight Princess|Twilight Princess]]''. |
||
| + | *Zelda assists Link in the battle with Ganon, firing the Silver Arrow to kill him. In some later games, Zelda fires [[Light Arrow]]s to help Link in the same manner. When Zelda deals the final blow in the comic, she does so by aiming at a glowing wound Link carves across Ganon's chest to paralyze him - Ganondorf possesses a similar wound in ''Twilight Princess''. |
||
| + | *Agahnim and Ganon are explicitly shown to be different beings, communicating between worlds in one scene. |
||
| + | |||
| + | {{Refbar}} |
||
| + | |||
| + | {{Media}} |
||
Revision as of 18:07, 22 May 2011
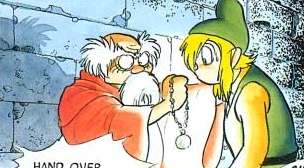
Template:Book
The Legend of Zelda: A Link to the Past is a comic book miniseries by Shotaro Ishinomori based on the game of the same name. It appeared in Nintendo Power beginning in January 1992 and ran for 12 issues, ending in December 1992. It was later published as a graphic novel in 1993. Many portions of the game were omitted, and several new story segments were added to "preserve the elements of surprise and add to the dramatic flow.[1] Several new characters are introduced, most prominently Roam, Epheremelda, the librarian of Kakariko, and an unnamed boy who is friends with Sahasrahla.
In this alternate version of the events in A Link to the Past, Link is beckoned telepathically by Princess Zelda to rescue her from Agahnim's clutches, and eventually from Turtle Rock in the Dark World. Although Link starts out as a simple, bumbling kid, he gradually grows more confident about his abilities and succeeds in rescuing the princess with the help of the friends he makes along his adventure. In the comic, Link and Zelda have a close bond with one another, even going as far as sharing a dream together.
Chapter Summaries
Chapter 1: Hero's Awakening

Agahnim kills Link's uncle
Link is awoken as he is contacted telepathically by Princess Zelda, who asks him to save her from Hyrule Castle's prison.[2] The young hero panics and looks for his uncle only to find that he is missing.[3] Following Zelda's voice to Hyrule Castle, Link sneaks into the castle and sees his uncle dueling Agahnim. Agahnim deals a deadly strike to Link's uncle, saying that anyone who challenges him will meet their doom, and promptly vanishes afterward.[4] Link rushes to his uncle's side and receives his sword and shield from him. Before passing out, Link's Uncle explains that after the young hero rescues Zelda and the people in the Dark World, he might be able to meet his parents.[5]
Meanwhile, Agahnim orders the soldiers to bring Zelda to him before anyone else she has contacted telepathically is able to find and rescue her.[6] Link continues to search for Zelda while she relates to him Agahnim's plan: to use the life force of the descendants of the seven Wise Men to open the door to the Golden Land and unleash the evil power contained there.[7] The young hero eventually finds the princess and, after distracting two Castle Soldiers that were taking her away, Link rescues Zelda and the two escape through a hidden passage to Sanctuary with the use of a nearby lantern.[8]
Upon reaching the Sanctuary, the Old Man explains the consequences of Agahnim's plan.[9] Zelda goes on to say that she feels Link is the legendary hero who appears every one hundred years to protect and save the land of Hyrule against Agahnim's forces,[10] but just then, Agahnim appears and commands that Zelda return to the castle.[11] Although Link steps in to protect the princess, the wizard easily defeats him when the young hero tries to attack him. As he takes Zelda away, Zelda reveals to Link that only the Master Sword can harm Agahnim.[12] The young hero then rushes out of the Sanctuary to find the legendary sword.[13]
Chapter 2: Wise Man's Warning
While Link continues to search for the Master Sword, Agahnim has wanted signs posted around the kingdom calling for Link's arrest for kidnapping Zelda.[14] Before leaving the Sanctuary, the Old Man sends Link to find Sahasrahla, a descendant of the Wise Men who knows more about the location of the Master Sword.[15]
Sahasrahla gives Link the Pendant of Courage
Link finds Sahasrahla's house in Kakariko Village in the care of his wife, but she tells him that Sahasrahla left when he found out that Agahnim was responsible for the missing maidens and does not know where he has gone to.[16] When Link tells her that he is looking for the Master Sword, the old woman tells of ancient scrolls that speak of the prosperous people who once inhabited the land of Hyrule. According to the scrolls they made many powerful weapons, including the ultimate treasure, the Master Sword, crafted specifically to resist evil power and which now rests in the Lost Woods.[17] Upon leaving Sahasrahla's house, a villager, who is actually one of Agahnim's minions, alerts the soldiers to Link's presence,[18] but the young hero manages to escape their grasp and stumbles upon a boy who was asked by Sahasrahla to watch over his wife.[19] After being convinced of Link's good nature,[20] the boy tells him where Saharsahla can be found, and so Link travels to the Eastern Palace. There, he finds the descendant of the wise men, and although he is puzzled as to how someone so young like Link could be searching for the Master Sword,[21] he tells Link he must recover the Pendants of Virtue to claim the legendary weapon. Sahasrahla reveals that he can help Link by giving him the Pendant of Courage, but since the task to finding the remaining two pendants will not be an easy one, he asks whether he will be able to accomplish said task,[22] to which the young hero confidently says yes both for Zelda and his deceased uncle.[23] Just as Sahasrahla hands the Pendant of Courage to Link, the soldiers pursuing Link find him. Empowered by the pendant, he easily dispatches their leader and sends the rest fleeing. The young hero, amazed at the power of the pendant, promises to find the remaining two pendants and use their power to defeat Agahnim.[24]
Chapter 3: Book of Mudora
The soldiers report that Link has the Pendant of Courage to Agahnim, who orders that all those in the Knight's Line must be eliminated at once.[25] He erroneously thought that Link's Uncle, who he defeated at the castle, was the last of the knight's line, but he begins to suspect that Link is also of their bloodline and commands his soldiers to not return until he has been killed.[26] After they leave, Agahnim reassures himself that the prophecy of the legendary Hero is just a folktale, and that the world will be at his hands when the moon is full and he casts the final spell over Princess Zelda.[27]
When Link returns to Kakariko to find clues about the remaining two pendants,[28] he finds the Library has been set on fire by soldiers.[29] Link learns that the librarian, who Link must speak to according to Sahasrahla,[30] is trapped inside the flames.[31] The young hero pours a bucket of water on him and barges in to successfully save the librarian. Inside the House of Books, the librarian theorizes that the soldiers might have been after the Book of Mudora,[32] and explains that it is the key to the ancient Hylian language which mentions that the hero will stand in the desert holding the book.[33] Link takes the Book of Mudora and mentions how Sahasrahla had told him the Pendant of Power was in desert ruins,[34] leading the librarian to claim Link as the legendary Hero of Hyrule and calmly leaving the book in the young hero's hands.[35] Before Link can head out to the desert, Sahasrahla's wife warns Link that traveling through the desert will not be easy since the "fierce winds and shifting sand" have bested even the most capable adventurers.[36] Just then, the young boy who Sahasrahla left in charge of his wife remembers that Sahasrahla showed him a bird that Link can ride on, which is actually a sort of glider with the shape of wings woven by the Hylian Sages.[37] According to the librarian, the wings belonged to the bird who the knights used to take on their campaigns to protect the kingdom and which carried them to battle.[38]
Using the "miracle wings", Link flies over the Desert of Mystery and locates the ruins of the Desert Palace.[39] Using the Book of Mudora to translate the runes he finds,[40] the ruins begin to sink to reveal a scorpion statue that has the Pendant of Power hanging on it.[41] Before Link can approach it, he sinks into the quicksand and resurfaces on top of a Lanmola. Link tries to attack it with his sword but to no avail;[42] however, he manages to retrieve the Pendant of Power from the statue and prepares himself to defeat the Lanmola.[43]
Chapter 4: The Master Sword

Link and Zelda meet in their dreams
Using the Pendant of Power's energy, Link successfully defeats the Lanmola; however, he is left stranded in the desert due to the glider having been ruined by a sandstorm. Left to traverse the desert on foot, Link is guided by Sahasrahla's telepathy to Death Mountain.[44] Link arrives to the mountain and stumbles upon a portal, which activates itself and shows a vision of two people standing with his uncle.[45] Believing them to be his parents,[46] Link reaches for her mother's hand when she extends hers out to the young hero, but Link's hand turns into a claw when it passes the portal's boundary. Sahasrahla warns the power of the Dark World turns the inhabitants into a reflection of their heart, and Link's hatred of Agahnim, although justifiable, would turn him into a beast if he were to enter.[47] Shortly afterward, Zelda appears to Link and explains that they are in a dream, for if two people dream the same thing, they will meet.[48] The princess tells Link to rest and encourages him to not give up while he begins to fall asleep on her lap, complaining about his arm hurting.[49][50] When Link wakes up, he finds that someone has bandaged his arm and is actually standing in front of the Tower of Hera.[51]
Link enters the Tower of Hera and climbs to the top to battle a giant spider, seizing the Pendant of Wisdom from one of its eyes.[52] Upon grabbing the pendant, his arm is instantly healed,[53] and the young hero uses the spider to ride down the tower. With all three pendants in hand, Link enters the Lost Woods and, while speaking telepathically with Sahasrahla, begins to have his doubts about whether the Master Sword will select him as his bearer.[54] Sahasrahla goes on to explain that his parents were Knights of Hyrule but stumbled into the Dark World and, after they disappeared, Link's uncle adopted him to shield him from the intrigues of the Royal Family.[55] Just then, the young hero finds the Master Sword and seizes it from its pedestal, readying himself to have his final battle with Agahnim and rescue the princess.
Chapter 5: An Old Enemy
After defeating three Ball and Chain Troopers with a single Spin Attack, Link decides to lie down and rest for a bit, only to be awoken by Zelda via telepathy.[56] Although the young hero tells Zelda that he must rest,[57] Zelda reminds him that only a single night remains until Agahnim, casts his final incantation on her and causes the entrance to the Dark World to open and overwhelm Hyrule with its evil. She goes on to say that Link cannot forget the sacrifice that his uncle made to stop Agahnim's plot, as well as the fact that his parents were sent to the Dark World for that same reason.[58] Link, now confident with the power of the Master Sword,[59] heads to Kakariko Village with his friends, but finds out that all approaches to the castle are blocked by Agahnim's soldiers.[60] The librarian then comes up with the idea of making a hot air balloon to carry him into the castle.[61]


Link uses an air balloon to reach the castle
Meanwhile, at the castle, Agahnim's preparations to cast the final incantation are complete, but he is soon interrupted by Ganon.[62] He warns the wizard that a "being with intense emotional energy" is approaching the castle,[63] much to Agahnim's surprise.[64] Knowing this, Agahnim decides to wait on casting the incantation until Link arrives so that he can send Zelda into the Dark World right in front of Link.[65] Just then, Link lands on the castle's highest tower and, after easily defeating a few soldiers with the Master Sword's might, he rushes to find Agahnim in the middle of his spell. Sahasrahla contacts Link and tells him not to trust all his power in the Master Sword, for even the legendary blade cannot harm Agahnim's body.[66] Link attacks him anyway, but the Master Sword passes right through the evil wizard,[67] which causes him to turn around and paralyze Link by only looking at him.[68] Agahnim then casts Zelda into the Dark World[69] triumphantly mocking Link that not even the legendary hero could stop them from obtaining the Triforce.[70] As Agahnim continues to ridicule Link for challenging him only to meet his doom,[71] the Master Sword begins to shine while Link is still frozen.
Chapter 6: A Fool in the Shape of a Tree
Link's rage towards Agahnim begins to channel through the Master Sword since the young hero and the legendary blade are as one, which causes for the castle to begin to crumble down.[72] Agahnim and Link begin to battle, and after Sahasrahla reveals to the young hero that the Master Sword was also forged to repel evil magic,[73] Link uses the sword to turn back Agahnim's magic against him and successfully defeat him.[74] Bested by Link, Agahnim reveals that him being killed will not restore the Wise Men's seal, and with his final breath transports Link to the Dark World as Hyrule Castle crumbles to reveal the Pyramid of Power.[75]
Frustrated for having disappointed Zelda again,[76] Link is momentarily transformed into a wolf by his negative emotions, but he manages to control them to remain in human form.[77] He then resumes his search for the princess, determined to find her,[78] but first stumbles into a shrine where he can rest before going on.[79] As Link begins to fall asleep, a small tree that was inside the shrine begins to tell him the story of the Triforce and the Golden Land.[80] The tree goes on to explain that only the first to touch the Triforce will be endowed with its strength, and that the land where they are now used to be the Golden Land where the Triforce was hidden. He speaks of Ganondorf the Thief, who accidentally stumbled upon the entrance to the Golden Land and had his evil wishes granted by the Triforce.[81] After touching the touched the Triforce, Ganondorf achieved ultimate power and transformed the Golden Land into the Dark World, which caused for many men from Hyrule to be drawn to the land of evil only to be converted into monsters because of their impure thoughts and emotions, including the tree himself.[82] The tree makes a final comment that Link must defeat Ganondorf and reclaim the Triforce to restore the Dark World into the Golden Land, at which point Link wakes up, confused, thinking it was a dream.[83][84]
Upon leaving the shrine, Link is confronted by three knights and a Hinox, who ask him about a fairy they are pursuing for her magic powers.[85] When Link tells them he does not have the fairy, the monsters attack him, but the young hero easily defeats them with the use of the Master Sword and by throwing the Hinox's own bombs back at it. After the Hinox explodes, the fairy appears next to Link.
Chapter 7: Zora's Mask
Before Link has a chance to ask the fairy anything, she flies away and leads him to the Zora's Lake, where he encounters a Zola. Thinking it to be a monster, the young hero tries to fight it, but the Zola thanks Link for having saved Epheremelda, the fairy.[86] The Zola explains that he thought he was Romu, the knight who, with the Master Sword, scarred his forehead.[87] After Link is healed by Epheremelda,[88] which is the sole reason the thieves of the Dark World desire her power,[89] the creature introduces itself as Zora. He and Epheremelda tell Link about the ruler of the Dark World and the usurper of the Triforce, Ganon,[90] and how he sent Agahnim to Hyrule to do all the work for him since Ganon cannot leave the Dark World.[91] With Agahnim's magic, he sent the Maidens to the Dark World so Ganon could steal their power, which makes Link realize that Zelda is still alive.[92] Knowing this, Zora tells Link that one of the maidens is imprisoned in the Palace of Darkness nearby; however, he warns the young hero of the explosive materials, known as firecorn, that are kept in there.[93] Link decides to go anyway, for he insists that he must rescue the maiden trapped in the crystal.[94] Before leaving, Zora allows Link to take Epheremelda as a guide and grants him the Zora's Mask to disguise himself and not look so conspicuous as he is sneaking around the palace.[95]
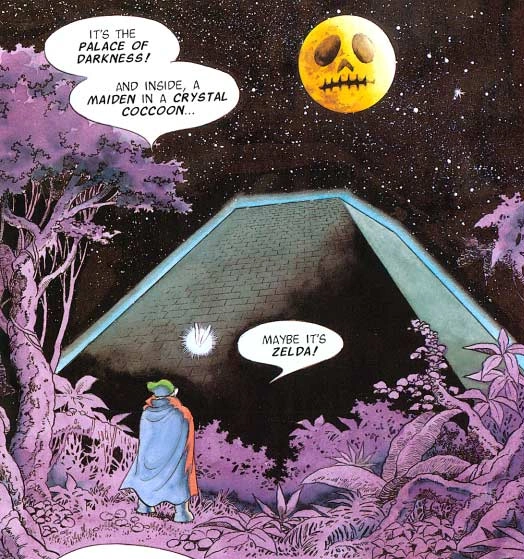

.png)
The Palace of Darkness
The duo arrive to the Palace of Darkness and eventually reach the storeroom with the explosives,[96] and although Link had been able to sneak around with the Zora's Mask without being noticed,[97] he is discovered by a Rocklops.[98] The Rocklops warns Link of what could happen if he set off the firecorns in the palace,[99] but the young hero disregards his warning and takes a Hinox's bomb belt that was wrapped around it.[100] Link then stumbles into the imprisoned crystal, but is attacked by a Gleeock that was called upon by the Rocklops. Although he defeats it easily with the Master Sword, soon more Hinoxs riding Gleeocks begin to head towards him.[101] Link gives Epheremelda ones of the bombs from the Hinox's belt, which eventually denotes the firecorn stockpile and destroys the entire palace. This allows the maiden to be freed from the crystal, who thanks Link and grants him a relic called the Comm-Fork.[102] Before Link can ask her where Zelda is, the maiden disappears,[103] and instead a knight appears in the rubble and demands that the young hero hand over the Master Sword.[104]
Chapter 8: Roam, the Mystery Knight
The knight introduces himself as Roam, who challenges Link for the right to wield the Master Sword.[105] He transforms into a monstrous eagle and proceeds to attack Link, who counters Roam's attack and defeats him.[106] Roam apologizes for having misjudged Link and reveals to him that the ancient Book of Mudora tells that the one who corrupts the Golden Land will be defeated with the Silver Arrow, the sacred item that Roam has been seeking.[107] He continues to explain that he is a descendant of one of the Knights of Hyrule who was a master archer, and when he discovered that Agahnim was sending the seven maidens to the Dark World, he sought after them through the portal near Death Mountain.[108] Because he is in the Dark World, he is transformed into an eagle every time he engages in battle.[109] Link, overjoyed that Roam is also a descendant of the Knights of Hyrule, begins to think that the two of them can join forces to find Zelda.[110] Roam is shocked to hear Zelda has been transported to the Dark World, saying Link is too much of a "weakling" to wield the Master Sword and save the princess.[111] The young hero tries to defend himself by saying he has the three Pendants of Virtue to prove his worth,[112] but Roam is unimpressed and begins to walk away to continue searching for the Silver Arrow.[113] Before disappearing, Roam tells Link that he senses they will have to join forces against Ganon, and advices the young hero to stay alive until then.[114]
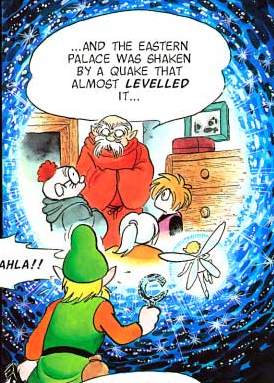

Link using the Comfork to see Sahasrahla in the Light World
After Roam leaves, the Comfork begins to ring and Link sees an image of Sahasrahla and the rest of his friends back in Kakariko,[115] where they are discussing an earthquake that shook the Eastern Palace.[116] Although at first Sahasrahla disregards Link's voice as having been his imagination, Sahasrahla and the others eventually communicate with Link and discover that the Comfork allows them to speak with each other even though they are on different planes of existence.[117][118] Link begins to tell his friends about his journey through the Dark World, and Sahasrahla begins to note similarities between the Dark World and Hyrule on his map of the land,[119] leading him to discover that the Dark World is a warped reflection of the Light World and that the two are somehow connected.[120] He goes on to reveal that the Dark World reflects the inner contents of one's mind, and because the heart of the maiden Link rescued was so pure, she was trapped in a crystal, much like Zelda.[121] Knowing this, Epheremelda begins to ask her fairy friends if they've seen the princess,[122] and one of them comments on how she overheard a monster talking about a girl imprisoned in a crystal near the Swamp Palace.[123]
The duo head out to the palace but discover that the area is completely dried up.[124] Link calls to Sahasrahla for help[125] and asks him to go to the Light World location of the Swamp Palace, where Sahasrahla and the boy accompanying him find a fountain surrounded by statues.[126] The boy, able to see Link in the water of the fountain, warns Link of the monsters behind him,[127] where a Hinox and a Taurus shut the door to trap the young hero inside the palace.[128] As the boy watches the battle between Link and the foes, he accidentally activates the statues that cause water to pour into the fountain. This leads to the Swamp Palace in the Dark World to get flooded, washing away the monsters and Link.
Chapter 9: Wizzrobe's Trap
The Hinox and Taurus end up sinking as they struggle with each other,[129] while Link's Master Sword is dragging him below the surface.[130] Epheremelda tells Link to stay afloat, for the water is almost up to an opening that the fairy had found earlier on.[131] The young hero is then rushed into a new chamber, where he finds the second maiden imprisoned in her crystal. As Link makes his way to the maiden, a large, tentacled monster attacks him. He thrusts himself with the Master Sword into the monster and defeats the creature, which spits out Link from inside and gives him a chance to destroy the floating crystal where the maiden is. The maiden, now freed, thanks Link and tells him that Zelda is imprisoned in a rock shaped like a turtle found at the end of the world, then vanishes.[132] Epheremelda tells Link of a map of the Dark World that is located in the Ice Tower,[133] when suddenly Link hears Zelda contact him telepathically from beyond the wasteland.[134][135] Epheremelda, who cannot hear Zelda's calling, advises Link against going to the wasteland since it is too dangerous, and once they get in there, there will be no way to escape.[136] She recommends that they go find the map first,[137] but Link disregards her suggestion, for he claims that if the wasteland is as dangerous as she says, then he has to rescue Zelda as soon as possible.[138] This angers Epheremelda, who claims that Link never worries about her and that all he ever talks about is Zelda, leading the fairy to indignantly leave Link's side.[139]
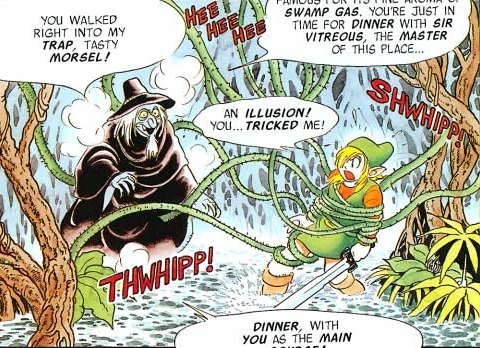
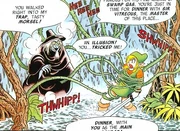
Link caught in the Wizzrobe's trap
Now on his own, Link heads into the wasteland and stumbles into an oasis from where Zelda is calling his name. The young hero ventures in and finds her,[140] but as he remembers the maiden's words of Zelda being inside a turtle rock,[141] the princess turns out to be an illusion made by a Wizzrobe, who promptly captures Link and conjures Vitreous from the swamp to devour him.[142] Just then, a whirlpool is created that engulfs both Vitreous and the Wizzrobe, and from beneath Zora appears to rescue Link. When the young hero asks Zora how he arrived and who told him where he was,[143] Zora explains that Epheremelda had requested that he go rescue Link and that he is able to warp between worlds due to the presence of water.[144]
Chapter 10: To Turtle Rock...and Zelda!
Reunited with Epheremelda, Link travels to the Ice Tower, where they are confronted by Kholdstone. Link reveals that all he wants is to see the map of the Dark World,[145] but Kholdstone mentions that the map is his greatest treasure and will not let anyone see it.[146] The monster unleashes two Stalfos to attack Link, but when the young hero sees that they keep respawning even after defeating them, he begins to focus his power on the Master Sword,[147] which causes for the tower to begin to collapse. Kholdstone warns Link that if he destroys the tower, then he will destroy the map as well, making him realize that the map is etched on the tower's floor.[148][149] Before the tower collapses, Link learns the location of Turtle Rock and heads there along with Epheremelda, where they begin to look for the dungeon's entrance.[150][151] Remembering the words Link heard in the Ice Tower,[152] the young hero strikes the top of Turtle Rock with the Master Sword to allow a lightning bolt to hit it and thus reveal the entrance.
Inside the lava-infested Turtle Rock,[153] Link finds Zelda imprisoned in a crystal[154], but he is then attacked by a three-headed dragon.[155] However, Roam, who had been following Link,[156] arrives just in time to save the young hero from one of the dragon head's attacks, and prepares to prove himself as the true legendary hero.[157]
Chapter 11: Ganon's Tower
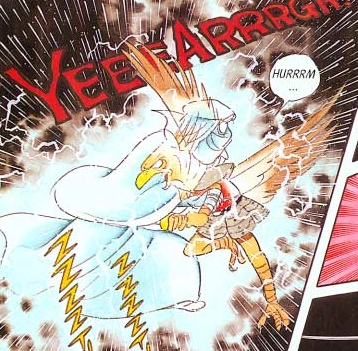
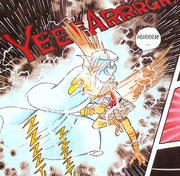
Roam dies defeating Agahnim
Roam and Link cut off the dragon's ice head, causing its ice and fire to mix and explode.[158] The explosion shatters Zelda's crystal, and Link rushes to her side to save her,[159] infuriating Epheremelda. The four escape Turtle Rock as it collapses, and Roam boasts that the Book of Mudora's prophecy supports him as the Legendary Hero, for he is the one seeking the Silver Arrow, and leaves to find it.[160] Zelda tells Link the book has a power which is beyond their comprehension,[161] and Link remembers that Sahasrahla said only a man who has overcome his own negative thoughts and emotions can become the true hero. Since Roam has not, Link fears that this might actually be his downfall even if he finds the Silver Arrow.[162] The young hero goes on to say that they should not worry about Roam, for Link will defeat Ganon by himself if he has to,[163] leading Zelda to put all her trust in him. [164]
The two continue on without Roam and eventually find Ganon's Tower, although they are not able to find its entrance.[165] Suddenly, Roam appears and admits he has failed to find the arrows. Overwhelmed by his failure, Roam transforms into an eagle and flies up to the tower, worrying Link since Roam's emotions are out of control and could cause him to remain a beast forever.[166] Zelda then asks for the aid of the maidens,[167] which allows them to enter the pitch-dark tower.[168] Inside, The group is attacked by illusions of Link's past foes,[169] and when Roam attacks a specter of Agahnim approaching Zelda,[170] he is killed, with Ganon rising from the illusion.
Chapter 12: The Final Battle
The arrow empowered by the maidens, Zelda, Link, and Roam turns into a Silver Arrow
Link attacks Ganon but he is easily thrown back by Ganon's trident. Zelda takes up Roam's crossbow as Link is trapped in between the trident. While Ganon mocks Zelda,[171] Link uses the opportunity to slash the evil thief's trident in half and, as he is falling down, the young hero slashes over Ganon's chest, leaving him paralyzed.[172] Zelda begins to ask for the aid of the maidens and fires an ordinary arrow from the crossbow, but as it approaches Ganon, the power of the maidens, Zelda, Link, and Roam, turn the arrow into the Silver Arrow,[173] destroying Ganon. The Triforce rises from his body, and the Essence of the Triforce tells Link that the Triforce is waiting for a new master now that Ganon has been defeated, asking that the young hero touch it with a wish in his heart.[174] As Link touches the Triforce, Epheremelda sadly bids him goodbye,[175] and Link and Zelda are transported back to Hyrule.

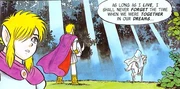
.png)
Link and Queen Zelda part ways
At Hyrule Castle, Link sees a vision of his father, mother and uncle, who congratulate him on his difficult victory and tell him to never forget the efforts of the many generations of knights and Wise Men that preceded him.[176] The Dark World vanishes and releases all of the people who had been trapped there, returning the longed-for peace to Hyrule.[177] Zelda is crowned the Queen of Hyrule and in turn appoints Link as the Master of the Knights of Hyrule.[178] The young hero is then seen looking at the Master Sword back in its pedestal in the Lost Woods, when he then hears Zelda speak to him from behind. She begins to comment on how although the bond between them was so strong when she was in Ganon's clutches, now that they are both free and at peace, their duties now keep them apart, leaving the queen to feel alone.[179] As Zelda begins to gallop away on her horse, she confesses to Link that as long as she lives, she will never forget the time when they were together in their dreams.[180] The comic's final scene shows the Master Sword overgrown by foliage as it sleeps, waiting for a new bearer when disaster befalls Hyrule again.[181]
Listings
Characters
- Link
- Princess Zelda
- Ganon
- Agahnim
- Sahasrahla
- Sahasrahla's Wife
- Librarian
- Sahasrahla's Friend
- Maidens
- Roam
- Epheremelda
- Zora
Items
Enemies
- Ball and Chain Trooper
- Soldiers
- Stalfos
- Hinox
- Taurus
- Thieves
- Rocklops
- Lanmola
- Gleeocks
- Moldorm
- Trinexx
- Wizzrobe
- Vitreous
Differences From the Game
- Sahasrahla inhabits the Eastern Palace rather than just living near it, and gives Link the Pendant of Courage. In the game, Link must defeat the Armos Knights to claim the Pendant.
- Death Mountain is on the borders of the Desert of Mystery. In the game Death Mountain is far north and the desert is to the south-west.
- The monster fought in the Tower of Hera is a giant spider as opposed to the Moldorm fought in the game. However, when the monster's illusion appears in Ganon's Tower, it is still called a Moldorm.
- Link cannot travel freely between worlds and is trapped in the Dark World once Agahnim transports him there.
- Link maintains his form in the Dark World by controlling his emotions, while in the game the Moon Pearl is needed to maintain human form.
- Link is attacked by monsters called Gleeocks in the Palace of Darkness. However, the monsters are bright orange lizards with green gems on their heads, and thus physically resemble smaller versions of the Helmasaur King which is fought in the game.
- The boss of the Swamp Palace may or may not be Arrghus - the monster is shown as a bright red jellyfish that attacks with tentacles, but no eyeballs are shown.
- The events of the Dark World are heavily abridged - Skull Woods and Thieves' Town are entirely removed, and Link only saves two maidens before finding Zelda. Though Link enters Misery Mire and the Ice Palace (referred to as the Ice Tower), no maidens are imprisoned there. The collection and usage of items vital to the game's completion are often removed entirely from the comic, with only the Book of Mudora appearing in the same capacity.
- The monster fought in Turtle Rock in a three-headed dragon with a grey head, a red head that breathes fire and a blue head that breathes ice. Though the three heads and their powers are a reference to the game's boss Trinexx, the dragon is never called Trinexx.
Further Notes
- In the Dark World Link is accompanied by Epheremelda who offers him assistance. This is before Ocarina of Time introduced Navi as the first canon Fairy Companion.
- When sent into the Dark World Link begins to transform into a wolf-like creature. Link would later transform into a wolf in Twilight Princess.
- Zelda assists Link in the battle with Ganon, firing the Silver Arrow to kill him. In some later games, Zelda fires Light Arrows to help Link in the same manner. When Zelda deals the final blow in the comic, she does so by aiming at a glowing wound Link carves across Ganon's chest to paralyze him - Ganondorf possesses a similar wound in Twilight Princess.
- Agahnim and Ganon are explicitly shown to be different beings, communicating between worlds in one scene.
Template:Refbar
- ↑ Template:Cite web
- ↑ Template:Cite book
- ↑ Template:Cite book
- ↑ Template:Cite book
- ↑ Template:Cite book
- ↑ Template:Cite book
- ↑ Template:Cite book
- ↑ Template:Cite book
- ↑ Template:Cite book
- ↑ Template:Cite book
- ↑ Template:Cite book
- ↑ Template:Cite book
- ↑ Template:Cite book
- ↑ Template:Cite book
- ↑ Template:Cite book
- ↑ Template:Cite book
- ↑ Template:Cite book
- ↑ Template:Cite book
- ↑ Template:Cite book
- ↑ Template:Cite book
- ↑ Template:Cite book
- ↑ Template:Cite book
- ↑ Template:Cite book
- ↑ Template:Cite book
- ↑ Template:Cite book
- ↑ Template:Cite book
- ↑ Template:Cite book
- ↑ Template:Cite book
- ↑ Template:Cite book
- ↑ Template:Cite book
- ↑ Template:Cite book
- ↑ Template:Cite book
- ↑ Template:Cite book
- ↑ Template:Cite book
- ↑ Template:Cite book
- ↑ Template:Cite book
- ↑ Template:Cite book
- ↑ Template:Cite book
- ↑ Template:Cite book
- ↑ Template:Cite book
- ↑ Template:Cite book
- ↑ Template:Cite book
- ↑ Template:Cite book
- ↑ Template:Cite book
- ↑ Template:Cite book
- ↑ Template:Cite book
- ↑ Template:Cite book
- ↑ Template:Cite book
- ↑ Template:Cite book
- ↑ Template:Cite book
- ↑ Template:Cite book
- ↑ Template:Cite book
- ↑ Template:Cite book
- ↑ Template:Cite book
- ↑ Template:Cite book
- ↑ Template:Cite book
- ↑ Template:Cite book
- ↑ Template:Cite book
- ↑ Template:Cite book
- ↑ Template:Cite book
- ↑ Template:Cite book
- ↑ Template:Cite book
- ↑ Template:Cite book
- ↑ Template:Cite book
- ↑ Template:Cite book
- ↑ Template:Cite book
- ↑ Template:Cite book
- ↑ Template:Cite book
- ↑ Template:Cite book
- ↑ Template:Cite book
- ↑ Template:Cite book
- ↑ Template:Cite book
- ↑ Template:Cite book
- ↑ Template:Cite book
- ↑ Template:Cite book
- ↑ Template:Cite book
- ↑ Template:Cite book
- ↑ Template:Cite book
- ↑ Template:Cite book
- ↑ Template:Cite book
- ↑ Template:Cite book
- ↑ Template:Cite book
- ↑ Template:Cite book
- ↑ Template:Cite book
- ↑ Template:Cite book
- ↑ Template:Cite book
- ↑ Template:Cite book
- ↑ Template:Cite book
- ↑ Template:Cite book
- ↑ Template:Cite book
- ↑ Template:Cite book
- ↑ Template:Cite book
- ↑ Template:Cite book
- ↑ Template:Cite book
- ↑ Template:Cite book
- ↑ Template:Cite book
- ↑ Template:Cite book
- ↑ Template:Cite book
- ↑ Template:Cite book
- ↑ Template:Cite book
- ↑ Template:Cite book
- ↑ Template:Cite book
- ↑ Template:Cite book
- ↑ Template:Cite book
- ↑ Template:Cite book
- ↑ Template:Cite book
- ↑ Template:Cite book
- ↑ Template:Cite book
- ↑ Template:Cite book
- ↑ Template:Cite book
- ↑ Template:Cite book
- ↑ Template:Cite book
- ↑ Template:Cite book
- ↑ Template:Cite book
- ↑ Template:Cite book
- ↑ Template:Cite book
- ↑ Template:Cite book
- ↑ Template:Cite book
- ↑ Template:Cite book
- ↑ Template:Cite book
- ↑ Template:Cite book
- ↑ Template:Cite book
- ↑ Template:Cite book
- ↑ Template:Cite book
- ↑ Template:Cite book
- ↑ Template:Cite book
- ↑ Template:Cite book
- ↑ Template:Cite book
- ↑ Template:Cite book
- ↑ Template:Cite book
- ↑ Template:Cite book
- ↑ Template:Cite book
- ↑ Template:Cite book
- ↑ Template:Cite book
- ↑ Template:Cite book
- ↑ Template:Cite book
- ↑ Template:Cite book
- ↑ Template:Cite book
- ↑ Template:Cite book
- ↑ Template:Cite book
- ↑ Template:Cite book
- ↑ Template:Cite book
- ↑ Template:Cite book
- ↑ Template:Cite book
- ↑ Template:Cite book
- ↑ Template:Cite book
- ↑ Template:Cite book
- ↑ Template:Cite book
- ↑ Template:Cite book
- ↑ Template:Cite book
- ↑ Template:Cite book
- ↑ Template:Cite book
- ↑ Template:Cite book
- ↑ Template:Cite book
- ↑ Template:Cite book
- ↑ Template:Cite book
- ↑ Template:Cite book
- ↑ Template:Cite book
- ↑ Template:Cite book
- ↑ Template:Cite book
- ↑ Template:Cite book
- ↑ Template:Cite book
- ↑ Template:Cite book
- ↑ Template:Cite book
- ↑ Template:Cite book
- ↑ Template:Cite book
- ↑ Template:Cite book
- ↑ Template:Cite book
- ↑ Template:Cite book
- ↑ Template:Cite book
- ↑ Template:Cite book
- ↑ Template:Cite book
- ↑ Template:Cite book
- ↑ Template:Cite book
- ↑ Template:Cite book
- ↑ Template:Cite book
- ↑ Template:Cite book
- ↑ Template:Cite book
- ↑ Template:Cite book
- ↑ Template:Cite book
- ↑ Template:Cite book