m (Text replace - "{{Japanese|" to "{{Romanize|") |
|||
| Line 1: | Line 1: | ||
| − | {{ |
+ | {{Stamp}} |
| + | {{Dungeons |
||
| − | {{Character |
||
| − | |name = |
+ | |name = Forest Temple |
| − | |image = [[File: |
+ | |image = [[File:Forest Temple.png|200px|The Forest Temple in Spirit Tracks]] |
| − | |caption = |
+ | |caption = The Temple's entrance |
| + | |location = [[Forest Realm]] |
||
| − | |title = The White Sorceress<br>The Sorceress of the Woods |
||
| − | | |
+ | |game = {{ST}} |
| + | |item = [[Whirlwind]]<br>"[[Song of Healing]]" |
||
| − | |gender = Female |
||
| + | |mini-boss = [[Mothula]] |
||
| − | |game = {{HW}}<br>{{HWL}} |
||
| + | |boss = ''Armored Colossus:'' [[Stagnox]] |
||
| − | |counter = [[Cia]] <small>(dark half)</small> |
||
| + | |quest = [[Force Gem]]<br>[[Heart Container]] |
||
| − | |voice actor(s) = [[Wikipedia:Minako Kotobuki|Minako Kotobuki]] |
||
| + | |element= <!-- Before adding, changing, or removing dungeon elements, please see the guidelines detailed on the template's page, located here: http://zeldawiki.org/Template:Element --> {{Element|Forest}}{{Element|Wind}} |
||
| + | |theme music = [[File:Forest, Snow and Ocean Temple ST.ogg|noicon]] |
||
}} |
}} |
||
| − | '''Lana''' (pronounced {{IPA|ˈlɑːnɑː}} {{Respell|LAH|nah}})<ref>{{Cite web|quote=This is the sorceress of light, Lana, who takes to the battlefield her Book of Sorcery. |published=August 4, 2014|url=https://www.youtube.com/watch?v=3_DZtTR3zu0&t=11m54s|title=Hyrule Warriors Direct|site=YouTube}}</ref> is a playable Warrior in {{HW}}. She is a sorceress with light-blue hair armed with a book of magic that she uses to cast barriers to disperse enemies. She is described as a very energetic girl with a vast knowledge of magic and monsters. |
||
| + | The '''Forest Temple''' is a dungeon featured in {{ST}}. It is the first temple within the game that [[Link]] must explore in order to restore its energy to the fragmented [[Tower of Spirits]]. The main item obtained is the [[Whirlwind (Item)|Whirlwind]], and the temple's boss is [[Stagnox]]. |
||
| − | ==Abilities== |
||
| − | ===Gameplay=== |
||
| − | Lana is primarily a spell-caster in battle. She is athletic, capable of bounding and leaping across the battlefield with ease. When using her Tome's barriers she can jump off them in acrobatic feats, traversing battlefields swiftly. |
||
| + | ==Entrance to the Dungeon== |
||
| − | Her starting weapon is the Tome, a book of magic she carries to attack and to cast spells with. When used normally, Lana is able to manipulate the pages of her book to strike her enemies. Its most prominent skill is the conjuration of barriers which can take a variety of shapes. Lana can create walls that surround enemies, shove them away, or even create a cube-shaped barrier that she can roll to plow through hordes. These barriers shatter once they sustain sufficient damage, although Lana can also shatter them at will. Doing so causes damage to many enemies, though Lana can also be harmed. The weapon is of the [[Elemental Effects|Lightning Element]]. |
||
| + | The temple is located northwest of the Forest area of [[Hyrule]], and is accessible after Link and [[Gage]] perform a Lokomo Duet in the [[Forest Sanctuary]], which in turn is found after the young hero crosses a maze in the forest during a train travel. Left of the temple's inner entrance is a statue that teaches Link the [[Song of Healing]]. |
||
| + | ==Themes and Navigation== |
||
| − | Her second weapon is the [[Spear]]. It is primarily a tool for manipulating trees and plant life, allowing Lana to use water and ice spells. She can also conjure [[Great Deku Tree|Deku Trees]] and sprouts with it. Alternatively, it can change form into a [[Deku Leaf]], an over-sized [[Slingshot]], and the [[Deku Shield]]. The Spear lacks significant speed, though the weapon itself is equipped with proper damage. It is associated with the [[Elemental Effects|Water Element]]. |
||
| + | [[File:Whirlwind key.png|thumb|left|Link using the [[Whirlwind]] to reach a key]] |
||
| + | It has the appearance of an Aztec-like pyramid with a giant tree growing atop it. Many elements from {{PH}} are present within the dungeon including the statues that reveal chests within the temple for a small fee. Items such as [[Treasure#Spirit Tracks|Demon Fossils]] and [[Wood Heart|Wooden Hearts]] are found here, as well as the [[Whirlwind]], the main treasure of the temple that is also critical to defeat the boss of the temple. [[Mothula]] serves as the dungeon's mini-boss, while the boss is a large stag beetle-like creature called [[Stagnox]], who has stolen the temple's [[Force Gem]] from its beacon atop the temple and thus is responsible for the deactivation of the temple's energy beacon. |
||
| + | Link defeats the creature atop the temple by using the Whirlwind to turn its weaknesses and attacks on itself, therefore exposing it to his own attacks. Following Stagnox's defeat, the temple's Force Gem is restored to its energy beacon, restoring the temple's energy flow to the Tower of Spirits and causing a segment of the tower to reconnect to the base, completing the hero's first task to restore the tower to its original state. |
||
| − | Her third weapon is the Summoning Gate. Similar to the Spear, Lana uses it to summon creatures to fight for her. Her familiars are mostly enemies such as [[Dodongo]]s, [[Gohma]]s, [[Manhandla]]s, and even [[Argorok]]s. Using her Strong Attack initially will summon a miniature boss monster and be stocked below her life bar. Should Lana use a combo that summons that particular enemy, the finisher will be powered up, such as when she summons Argorok and instead of it merely breathing fire, Lana will proceed to ride it. Overall, the Summoning Gate is a unique weapon with great crowd control, but due to its combos' unwieldy nature and overall low damage it can be difficult to utilize in a situation against a [[Captain (Hyrule Warriors)|Captain]] enemy or a boss. Lana will dance and hum songs while using the Summoning Gate, creating gates for her creatures to appear. It is of the [[Elemental Effects|Fire Element]]. |
||
| ⚫ | |||
| − | === |
+ | ===Minor Traps and Enemies=== |
| ⚫ | |||
| − | In many cutscenes that feature the White Sorceress, she occasionally leaps a great distance after enforcing powerful electricity to strike the ground and destroying a huge amount of enemies. Lana has also displayed the powers to heal her allies at will. After [[Cia]] claimed the full [[Triforce]] and disrupted space and time, Lana creates a magical barrier that acts as a shield to prevent harm, showing one of her many magical powers once more. In "[[Valley of Seers#Darkness Falls|Darkness Falls]]", Lana reveals she can diminish dark barriers as being a sorceress of light. |
||
| + | File:Blastworm Large.png|[[Blastworm]] |
||
| + | File:Bubble Large.png|[[Bubble]] |
||
| + | File:KeyMaster Large.png|[[Key Master]] |
||
| + | File:Purple Fog.png|Purple fog |
||
| + | File:Spinut.png|[[Spinut]] |
||
| + | File:Red Spinut.png|[[Spinut]] |
||
| + | File:Vengas.png|[[Vengas]] |
||
| ⚫ | |||
| + | ==Trivia== |
||
| − | Later on, it is seen that she and Cia share some of the same abilities, including, duplicating themselves or other creatures, and showcasing a ball of energy (lightning or darkness), among other abilities. Though it is not directly stated, Lana and her other half share the right to control the [[Gate of Souls]] one way or another—Cia preformed her act when forcing three other eras into the present time, while Lana herself carries the Gate of Souls as a level three weapon, and also creates multiple Gate of Souls in the Scenario "[[Gerudo Desert (Hyrule Warriors)#Enduring Resolve|Enduring Resolve]]" to bring back the allies of the Hyrulean Forces. |
||
| + | *In the European version of ''Spirit Tracks'', this temple is named Wooded Temple instead of Forest Temple, possibly to avoid confusion with the other Forest Temples of the series. |
||
| + | *The dungeon's boss, Stagnox, may be the mother of all the [[Blastworm]]s seen in the temple. This is supported by the fact that Stagnox releases young Blastworms during one segment of its boss fight. |
||
| − | == |
+ | ==Gallery== |
| + | <gallery> |
||
| − | Lana was originally part of one being, [[Cia]],<ref name="half">{{Cite|I am Cia's... other half. She and I were once the same person.|Lana|HW}}</ref> a powerful sorceress who was tasked with maintaining the balance of the [[Triforce]].<ref>{{Cite|Deep in the forests, far from mortal eyes, a great sorceress watched over the balance of the Triforce.|Narrator|HW}}</ref> Cia, able to observe distant eras of [[Hyrule]] and those who lived in them with her magic,<ref>{{Cite|Through her magic, she could see across ages, able to read the fates of all who lived, but never interfering.|Narrator|HW}}</ref> became infatuated with [[Link]] and in turn jealous of [[Princess Zelda]].<ref>{{Cite|That is, until a unique soul caught her attention... The soul of the Hero of Legend, eternally reborn when Hyrule's need is greatest.|Narrator|HW}}</ref><ref>{{Cite|Through her powers, the sorceress should have seen that the hero was bound to another. Instead she saw only a soul that was unlike any she had known.|Narrator|HW}}</ref> Her preoccupied thoughts left her vulnerable as she was approached by a spiritual fragment of darkness, belonging to [[Ganon]]dorf, who saw an opportunity in using her.<ref>{{Cite|And while the sorceress was preoccupied, a fragment of darkness, locked in its prison, saw an opportunity.|Narrator|HW}}</ref> Due to his interference, Cia became corrupted as the light from her soul was pushed away,<ref>{{Cite|The whispering darkness wormed its way into her heart. It pushed the light away and warped her curiosity into a desperate desire to possess the legendary hero's soul.|Narrator|HW}}</ref><ref>{{Cite|Hmm. I thought I'd separated those two permanently... No matter--I'll just kill them together.|Ganondorf|HW}}</ref> which was physically embodied as the sorceress Lana.<ref>{{Cite|Something took hold of Cia and forced the light from her heart. I'm that light. I'm what was driven out of her.|Lana|HW}}</ref> Like Cia, she too also harbored affections for Link. However, the young sorceress was able to contain her feelings for the hero and accepted that they were not meant to be.<ref name="quote1">{{Cite|You don't always get the person you think you deserve...and I can live with that.|Lana|HW}}</ref> |
||
| + | File:Whirlwind Get.png|Obtaining the Whirlwind in the temple |
||
| + | File:Forest Temple Force Gem.png|The Force Gem of the Forest Temple |
||
| + | File:STForest.png|The true height of the Forest Temple in ''Spirit Tracks'', shown with empty space to represent the spacing of the two [[Nintendo DS]] screens |
||
| + | </gallery> |
||
| + | ==See Also== |
||
| − | While Cia became the corrupted, wicked side of her former self, Lana became the virtuous side. Cia had opened the [[Gate of Souls]] to wage war over Hyrule,<ref>{{Cite|Having pushed the light from her heart, the darkness compelled her to open the Gate of Souls, the doorway of time itself.|Narrator|HW}}</ref> compelled by the darkness to acquire the full Triforce and to revive Ganondorf.<ref>{{Cite|Of course, this evil had its own desires... To use the Triforce to resurrect itself and conquer Hyrule once again.|Narrator|HW}}</ref> Lana had retreated to the forests of [[Faron Woods (Hyrule Warriors)|Faron Woods]], becoming the leader of a band of resistance fighters and determined to end Cia's machinations. |
||
| + | *[[Forest Temple (Ocarina of Time)]] |
||
| + | *[[Forest Temple (Twilight Princess)]] |
||
| − | The [[Forces#Hyrulean Forces|Hyrulean Forces]] later meet Lana at the Faron Woods in "[[Faron Woods (Hyrule Warriors)#The Sorceress of the Woods|The Sorceress of the Woods]]" after hearing rumors of a resistance in the forest led by a young woman.<ref>{{Cite|Impa heard a rumor that a handful of soldiers were holding out against the monsters in Faron Woods. The leader of this resistance was supposedly a young woman.|Narrator|HW}}</ref> They arrive hoping that she is Princess Zelda,<ref>{{Cite|Impa dared to hope that this unknown woman was Zelda.|Narrator|HW}}</ref> who had gone missing shortly after the wars began. Lana becomes of interest when she tells [[Impa]] that she is a sorcerer from the same clan as Cia,<ref>{{Cite|You know the one who started this war? Cia? We come from the same magical clan.|Lana|HW}}</ref> dissembling her identity. Lana says she will only tell more if the Hyrulean Forces help her to defend the forest from the invading [[Forces#Dark Forces|Dark Forces]].<ref>{{Cite|You really want to know? Well... Help me defend the forest.|Lana|HW}}</ref> Link, Impa and [[Sheik]] help Lana to defend the forest from the monster troops and defeat the [[Gohma]] sent by [[Wizzro]]. With the forest base protected, Lana travels with the Hyrulean Forces to the [[Valley of Seers]] where Cia awaits.<ref>{{Cite|Link and Impa decided to join forces with Lana to prevent further tragedy. Although the monsters of Faron Woods had been defeated, Cia still controlled most of Hyrule. Every day more creatures appeared and swarmed the land. Link and Impa fought on against the darkness, sorely missing Zelda's leadership. Only one solution remained--stem the tide of monsters by closing the Gate of Souls. The heroes headed to the Valley of Seers to put an end to the bloodshed.|Narrator|HW}}</ref> |
||
| − | |||
| − | After the [[Valley of Seers#The Sorceress of the Valley|battle]] at the Valley of Seers, Link and Sheik confront Cia, but she is able to steal their [[Triforce of Courage]] and [[Triforce of Wisdom]], respectively. With the full Triforce now in her possession, Cia then uses the Gate of Souls to summon entire worlds from other ages and merges them into present-day Hyrule. To escape the effects of this, Lana flees with the group and has them stand around her, casting a protective barrier around them as they watch the fusion take place. Three of Ganondorf's scattered fragments are freed in this process and return to Cia, leaving only the fragment sealed by the [[Master Sword]], with three Gates of Souls also opening in the new worlds.<ref>{{Cite|The only piece that remains is the one trapped by the Master Sword...|Ganondorf|W}}</ref> The Hyrulean Forces resolve to close these gates and split up, with Lana heading into the [[Era of Twilight]] portal. |
||
| − | |||
| − | In "[[Twilight Field#Land of Twilight|Land of Twilight]]" while stepping into the [[Twilight Field]], Lana comes upon a [[Kakariko Village|small village]] and rescues [[Agitha]] from a group of monsters, who in turn aids the sorceress in her mission by using a [[Goddess Butterfly]] to guide both of them through the [[Twilight]].<ref>{{Cite|Gate of Souls..? Never seen one. But I can take you right to where you want to go! [...] With this Goddess Butterfly, of course! It will guide us through the Twilight Realm.|Agitha|HW}}</ref> The duo soon encounter [[Midna]] and are mistaken by the Twilight Princess as Cia's allies, ensuing in battle before Midna realizes her error and joins the Hyrule Forces' quest to stop Cia.<ref>{{Cite|Fine, take the butterfly, but... Wait. You're not with the witch?|Midna|HW}}</ref><ref>{{Cite|No. Completely the opposite. We're heading to the Gate of Souls to try to stop her.|Lana|HW}}</ref> Following the lead of the Goddess Butterfly, the group arrive to the [[Palace of Twilight (Hyrule Warriors)|Palace of Twilight]] and defeat [[Zant]], with Lana using her powers to close the Gate of Souls.<ref>{{Cite|The heroes followed the Goddess Butterfly, eventually arriving at the Palace of Twilight.|Narrator|HW}}</ref> Cia arrives to the scene soon after and is attacked by Midna for mocking her new appearance, knocking off her mask and revealing her face as identical to Lana's.<ref>{{Cite|Lana, her face... It looks just like yours...|Midna|HW}}</ref> As Cia leaves, Lana is forced to explain her story to Midna. |
||
| − | |||
| − | The Hyrulean Forces later reunite after closing the three Gates, and Lana again explains to everyone that she and Cia are actually the same person.<ref>{{Cite|Cia and I... We're not just from the same clan. We're actually...the same person.|Cia|HW}}</ref> Upon arriving to the [[Temple of the Sacred Sword]], Link and Zelda realize that their Triforce pieces have returned (unbeknownst to them as a means of Cia preventing Ganondorf from taking them), prompting Lana to suggest to counterattack now that Cia's power has diminished.<ref>{{Cite|It's not exactly sure how, but Cia's power has been greatly diminished. If 'were going to counterattack, we have to do it now!|Lana|HW}}</ref> To accomplish this, the Hyrulean Forces aid Link in retrieving the Master Sword and use it to fight against the evil sorceress at the [[Temple of Souls]]. Cia and her Forces are overcome despite the sorceress's immense efforts to stop the heroes, pushing herself to her limits to summon large hordes of monsters.<ref>{{Cite|If I can no longer pull from the darkness in Link's heart... Then I'll pull from my own!|Cia|HW}}</ref><ref>{{Cite|Cia has summoned a great number of monsters!|N/A|HW}}</ref> Concerned for her other half's well-being, Lana pleads Cia to stop using magic that her spirit cannot contain, but the evil sorceress berates her and escapes to the Valley of Seers.<ref>{{Cite|Cia, stop it! You're working with magic that no one can contain!|Lana|HW}}</ref><ref>{{Cite|Silence! I won't be lectured by a happy little goody-goody like you!|Cia|HW}}</ref><ref>{{Cite|She found new ways to fortify her troops using her own life force. The cost to herself was irrelevant, so long as she crushed her enemies.|Narrator|HW}}</ref> When the allies arrive to the valley, Lana is pained to watch Cia continuing to pull from her life force to summon hordes of monsters and asks her once again to stop,<ref>{{Cite|Cia! Stop! Your spirit can't take much more of this!|Lana|Hyrule Warriors}}</ref> but her counterpart refuses to listen and is defeated by Link. Rushing to her side, Lana tries to comfort Cia, who asks her how she is able to contain her feelings despite knowing that Link will never be by her side.<ref>{{Cite|We've seen how this ends... and we both know he doesn't choose you. How do you do it...knowing you get left behind?|Cia|HW}}</ref> Lana explains that she accepts the fact that Zelda and the young hero are destined to always save Hyrule together, and at hearing this, Cia commends her for her strength and fades away, leaving Lana with the [[Triforce of Power]].<ref name="always">{{Cite|No matter what, you two always save Hyrule...together.|Lana|HW}}</ref><ref name="quote1"/><ref>{{Cite|You always were...my better half...|Cia|HW}}</ref> Lana then sends the new Allies back to their respective eras and, with the combined power of Link's, Zelda's and her Triforce pieces, she returns Hyrule back to its original state. Zelda asks Lana if they will ever see her again, but she sadly bids them good-bye and leaves to close the Valley of Seers' Gate of Souls. |
||
| − | |||
| − | The returned peace is short-lived however as Ganondorf's final fragment is freed as a result of the earlier removal of the Master Sword. Now revived, he plots to build an army to take the Triforce. He summons [[Ghirahim]] and Zant, builds his stronghold at [[Gerudo Desert (Hyrule Warriors)|Gerudo Desert]], and quickly advances to take Lana's Triforce piece.<ref>{{Cite|His first target was the Triforce of Power, still in Lana's possession.|Narrator|HW}}</ref> Lana and her troops are overcome even though Impa and her army rush to her aid to defeat Ganondorf's Forces, which forces Lana to split herself into two in a last attempt to flee.<ref>{{Cite|Perhaps... perhaps I have the ability to split myself into copies, just like... Cia...|Lana|HW}}</ref><ref>{{Cite|Hurry, Lana! Get to the Magic Circle before they catch you!|Impa|HW}}</ref> However, Ganondorf beats both of her doubles and seizes the Triforce of Power from her possession,<ref>{{Cite|Knowing she could never defeat him, Lana fled the valley even as the Hyrulean army rushed to her aid. But Ganondorf outmaneuvered her and cut off her retreat, attacking fiercely to retake the Triforce of Power.|Narrator|HW}}</ref> then marching to [[Hyrule Field (Hyrule Warriors)|Hyrule Field]] where he defeats Link and Zelda and acquires the full Triforce. |
||
| − | |||
| − | The Hyrulean Forces regroup and plan to defeat Ganondorf by first defeating his generals Zant and Ghirahim at his desert stronghold. Lana is cornered by enemy troops, and in an act of desperation summons her Allies back from their eras. With the stronghold conquered, the Hyrulean Forces march back to [[Ganon's Tower (Hyrule Warriors)|Ganon's Tower]] to defeat Ganondorf. Lana aids Link in defeating the King of Evil after he transforms into [[Ganon]] by giving part of her life force to empower the [[Light Arrows]].<ref>{{Cite|Any magic I have left... The Light Arrows can have it!|Lana|HW}}</ref> Following Ganon's defeat, the Triforce's pieces are returned to Link, Zelda, and Lana. Using their combined pieces they send Ganon away, bringing peace back to Hyrule. Lana tells Link to return the Master Sword to its temple and insists that only he and Zelda should do it together,<ref>{{Cite|There is one last thing... Return the Master Sword to its place.|Lana|HW}}</ref> bidding the hero good-bye a final time.<ref name="always"/> |
||
| − | |||
| − | ==Etymology== |
||
{{Names |
{{Names |
||
| + | |en= Wooded Temple |
||
| − | |align= left |
||
| ⚫ | |||
| − | |ja= {{Japanese|ラナ|Rana}} |
||
| + | |ja= {{Romanize|森の神殿|Mori no Shinden||3}} |
||
| − | |jaM= Lana |
||
| − | | |
+ | |jaM= Forest Temple |
| + | |esL= Templo de los Bosques |
||
| ⚫ | |||
| + | |esLM= Temple of the Forests |
||
| − | |fr= |
||
| + | |esS= Templo de los Bosques |
||
| − | |frM= |
||
| + | |esSM= Forest Temple |
||
| − | |de= |
||
| + | |frF= Temple sylvestre |
||
| − | |deM= |
||
| + | |frFM= Forest Temple |
||
| − | |it= |
||
| + | |frC= Temple de la forêt |
||
| + | |frCM= Forest Temple |
||
| + | |de= {{de|Waldtempel (Spirit Tracks)|Waldtempel}} |
||
| + | |deM= Forest Temple |
||
| + | |it= Tempio delle Fronde |
||
|itM= |
|itM= |
||
| − | |ko= |
+ | |ko= |
|koM= |
|koM= |
||
| + | }} |
||
| − | |chS= |
||
| − | |chT= }} |
||
| − | |||
| − | ==Gallery== |
||
| ⚫ | |||
| − | File:Hyrule Warriors - Lana Book Artwork.png|Lana wielding the Book of Sorcery |
||
| − | File:HW Lana Deku Spear.png|Lana wielding the Spear |
||
| − | File:Lana Summoning Gate.png|Lana wielding the Summon Gate |
||
| − | File:HW Lana Guardian of Time.png|Lana in the Guardian of Time DLC costume |
||
| − | File:Hyrule Warriors Official Art 2.png|Official artwork depicting Lana with [[Link]] and [[Zelda]] |
||
| − | File:HW Lana Sorceress Tome Model.png|Lana wileding the Sorceress Tome |
||
| − | File:HW Lana - Standard Outfit (Master Quest).png|Costume from the ''Master Quest'' DLC Pack |
||
| − | File:HW Lana - Standard Outfit (Twilight).png|Costume from the ''Twilight Princess'' DLC Pack. |
||
| − | File:HW Lana - Skull Kid's Clothes.png|[[Skull Kid]] costume from the ''Majora's Mask'' DLC Pack |
||
| − | File:HW Lana - Standard Outfit (Boss).png|Costume from the Boss DLC Pack |
||
| − | File:HW Lana - Deku Mask.png|[[Deku Mask]] costume from the ''Majora's Mask'' DLC Pack |
||
| − | File:HWL Lana Wind Waker Costume.png|Costume from the Great Sea Map from ''Hyrule Warriors Legends'' |
||
| − | File:HWL Lana - Standard Outfit (Master Wind Waker).png|Costume from the ''Master Wind Waker'' DLC Pack |
||
| − | File:HW Lana Guardian of Time Closeup.jpg|Closeup of Lana with her Guardian of Time costume |
||
| − | File:HW Lana Portrait 1.png|Lana portrait |
||
| − | File:HW Lana Portrait 2.png|Lana portrait |
||
| − | File:HW Lana Portrait 3.png|Lana portrait |
||
| − | File:HW Lana Portrait 4.png|Lana portrait |
||
| − | File:HW Lana Portrait 5.png|Lana portrait |
||
| − | File:HW Lana as Skull Kid Portrait 1.png|Portrait of Lana wearing the Skull Kid's Clothes |
||
| − | File:HW Lana as Skull Kid Portrait 2.png|Portrait of Lana wearing the Skull Kid's Clothes |
||
| − | File:HW Lana as Skull Kid Portrait 3.png|Portrait of Lana wearing the Skull Kid's Clothes |
||
| − | File:HW Lana as Skull Kid Portrait 4.png|Portrait of Lana wearing the Skull Kid's Clothes |
||
| − | File:HW Lana as Skull Kid Portrait 5.png|Portrait of Lana wearing the Skull Kid's Clothes |
||
| − | File:HW Dark Lana Portrait.png|Dark Lana portrait |
||
| − | File:HW Wizzro Disguised as Lana Portrait 1.png|Portrait of Wizzro disguised as Lana |
||
| − | File:HW Wizzro Disguised as Lana Portrait 2.png|Portrait of Wizzro disguised as Lana |
||
| ⚫ | |||
| − | |||
| − | ===Video Gallery=== |
||
| − | {{Youtube|S9Bj_8UkI-0|200|Lana – Book of Sorcery gameplay}} |
||
| − | {{Youtube|dwQK4dX-fpQ|200|Lana – Spear gameplay}} |
||
| − | |||
| ⚫ | |||
| + | {{DungeonNav2|ST}} |
||
| − | [[Category:Hylians]] |
||
| − | [[Category: |
+ | [[Category:Dungeons in Spirit Tracks]] |
| − | [[Category: |
+ | [[Category:Places in Spirit Tracks]] |
| − | [[Category:Bosses in Hyrule Warriors]] |
||
Revision as of 14:16, 14 May 2016
Template:Stamp Template:Dungeons
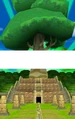
The Forest Temple is a dungeon featured in Spirit Tracks. It is the first temple within the game that Link must explore in order to restore its energy to the fragmented Tower of Spirits. The main item obtained is the Whirlwind, and the temple's boss is Stagnox.
Entrance to the Dungeon
The temple is located northwest of the Forest area of Hyrule, and is accessible after Link and Gage perform a Lokomo Duet in the Forest Sanctuary, which in turn is found after the young hero crosses a maze in the forest during a train travel. Left of the temple's inner entrance is a statue that teaches Link the Song of Healing.
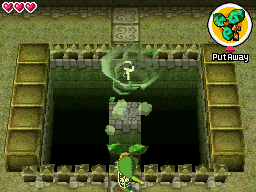
Link using the Whirlwind to reach a key
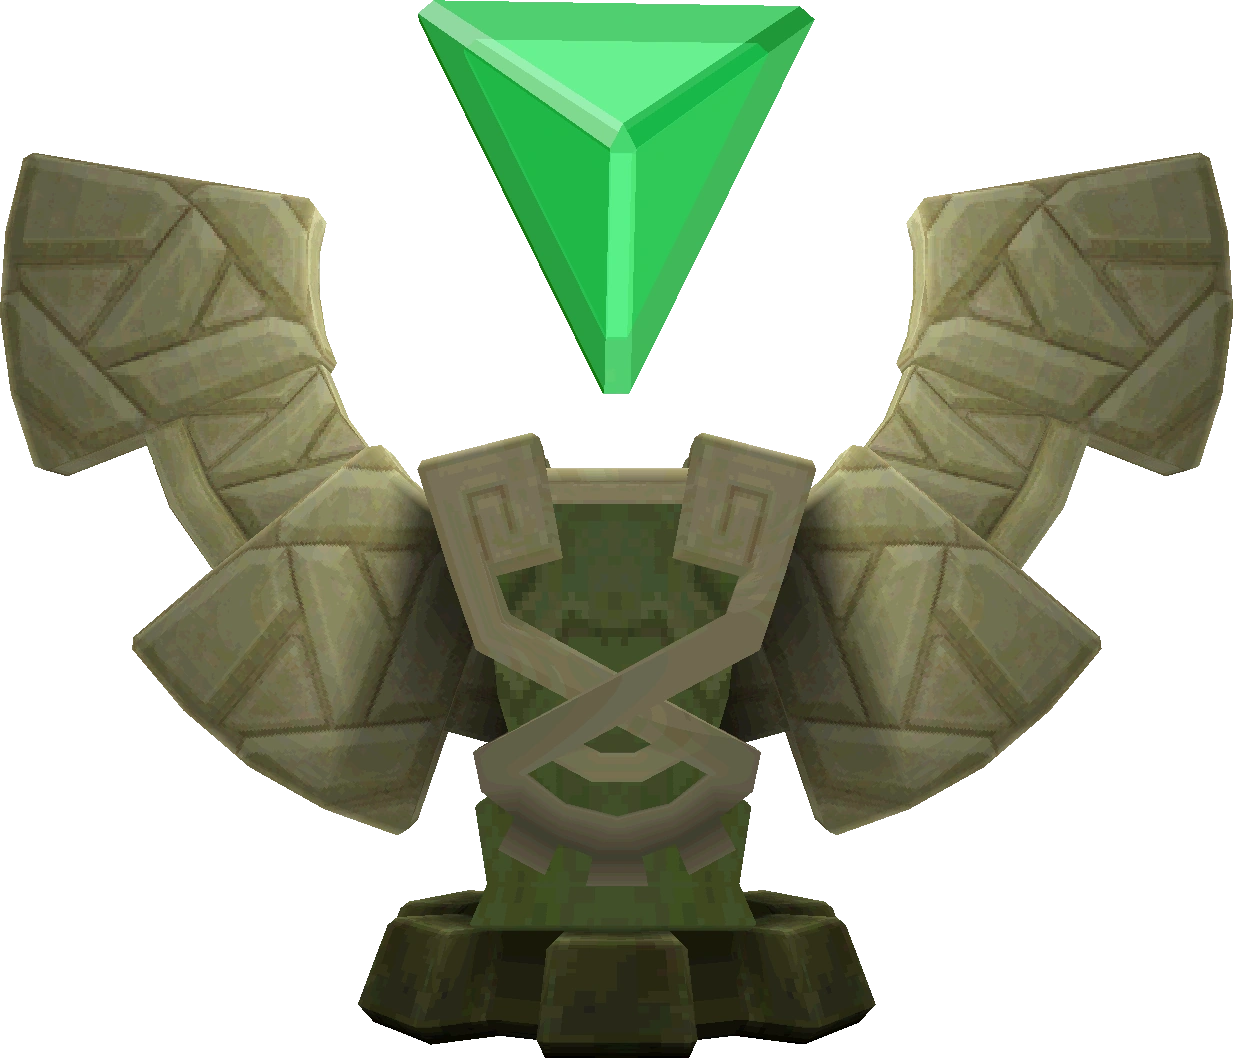
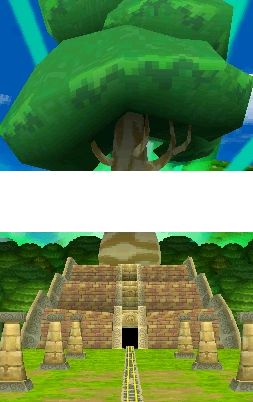
It has the appearance of an Aztec-like pyramid with a giant tree growing atop it. Many elements from Phantom Hourglass are present within the dungeon including the statues that reveal chests within the temple for a small fee. Items such as Demon Fossils and Wooden Hearts are found here, as well as the Whirlwind, the main treasure of the temple that is also critical to defeat the boss of the temple. Mothula serves as the dungeon's mini-boss, while the boss is a large stag beetle-like creature called Stagnox, who has stolen the temple's Force Gem from its beacon atop the temple and thus is responsible for the deactivation of the temple's energy beacon.
Link defeats the creature atop the temple by using the Whirlwind to turn its weaknesses and attacks on itself, therefore exposing it to his own attacks. Following Stagnox's defeat, the temple's Force Gem is restored to its energy beacon, restoring the temple's energy flow to the Tower of Spirits and causing a segment of the tower to reconnect to the base, completing the hero's first task to restore the tower to its original state.
Minor Traps and Enemies
- Blastworm Large.png
- Bubble Large.png
- KeyMaster Large.png
- Purple Fog.png
Purple fog
- Spinut.png
- Red Spinut.png
- Vengas.png
Trivia
- In the European version of Spirit Tracks, this temple is named Wooded Temple instead of Forest Temple, possibly to avoid confusion with the other Forest Temples of the series.
- The dungeon's boss, Stagnox, may be the mother of all the Blastworms seen in the temple. This is supported by the fact that Stagnox releases young Blastworms during one segment of its boss fight.
Gallery
- Whirlwind Get.png
Obtaining the Whirlwind in the temple

The Force Gem of the Forest Temple
The true height of the Forest Temple in Spirit Tracks, shown with empty space to represent the spacing of the two Nintendo DS screens
See Also
| Language | Name | Meaning | |
|---|---|---|---|
| EnglishUK | Wooded Temple | ||
| Japanese | 森の神殿 | Forest Temple | |
| FrenchCA | Temple de la forêt | Forest Temple | |
| FrenchEU | Temple sylvestre | Forest Temple | |
| German | Waldtempel | Forest Temple | |
| Italian | Tempio delle Fronde | ||
| SpanishEU | Templo de los Bosques | Forest Temple | |
| SpanishLA | Templo de los Bosques | Temple of the Forests | |
Dungeons in The Legend of Zelda Series
Parapa Palace · Midoro Palace · Island Palace · Maze Island Palace
Palace on the Sea · Three-Eye Rock Palace ![]() · Great Palace
· Great Palace ![]()
Light World
Sewer Passageway · Eastern Palace · Desert Palace · Tower of Hera · Hyrule Castle Tower ![]()
Dark World
Palace of Darkness · Swamp Palace · Skull Woods · Thieves' Town · Ice Palace · Misery Mire · Turtle Rock · Ganon's Tower ![]()
Palace of the Four Sword![]()
Main Dungeons
Tail Cave · Bottle Grotto · Key Cavern · Angler's Tunnel · Catfish's Maw · Face Shrine · Eagle's Tower · Turtle Rock · Wind Fish's Egg ![]()
Mini-Dungeons
Moblin Cave · Kanalet Castle · Ancient Ruins
Optional Dungeons
Color Dungeon (LADX | LANS) · Chamber Dungeon (LANS)
Child Dungeons
Inside the Deku Tree · Dodongo's Cavern · Inside Jabu-Jabu's Belly
Adult Dungeons'
Forest Temple · Fire Temple · Water Temple · Shadow Temple · Spirit Temple · Ganon's Castle ![]()
Mini-Dungeons
Main Dungeons
Woodfall Temple · Snowhead Temple · Great Bay Temple · Stone Tower Temple
Mini-Dungeons
Swamp Spider House · Pirates' Fortress · Oceanside Spider House · Beneath the Well · Ancient Castle of Ikana
Moon Dungeons ![]()
Main Dungeons
Spirit's Grave · Wing Dungeon · Moonlit Grotto · Skull Dungeon · Crown Dungeon · Mermaid's Cave · Jabu-Jabu's Belly · Ancient Tomb · Black Tower (Turret) ![]() · Room of Rites(OoS | OoA)
· Room of Rites(OoS | OoA)
Mini-Dungeons
Maku Road · Great Moblin's Keep · Ambi's Palace · Black Tower (Rescue Zelda) ![]() · Hero's Cave
· Hero's Cave![]()
Main Dungeons
Gnarled Root Dungeon · Snake's Remains · Poison Moth's Lair · Dancing Dragon Dungeon · Unicorn's Cave · Ancient Ruins · Explorer's Crypt · Sword & Shield Maze · Onox's Castle ![]() · Room of Rites(OoS | OoA)
· Room of Rites(OoS | OoA)
Mini-Dungeons
Chambers of Insight · Sea of Trees · Talus Cave · Death Mountain · Vaati's Palace ![]()
Anniversary Edition
Main Dungeons
Forsaken Fortress · Dragon Roost Cavern · Forbidden Woods · Tower of the Gods
Earth Temple · Wind Temple · Ganon's Tower
Mini-Dungeons
Whereabouts of the Wind — Lake Hylia · Cave of No Return · Hyrule Castle
Eastern Hyrule — The Coast · Village of the Blue Maiden · Eastern Temple
Death Mountain — Death Mountain Foothills · The Mountain Path · Tower of Flames
Near the Fields — The Field · The Swamp · Infiltration of Hyrule Castle
The Dark World — Lost Woods · Kakariko Village · Temple of Darkness
Desert of Doubt — Desert of Doubt · Desert Temple · Pyramid
Frozen Hyrule — Frozen Hyrule · Temple of Ice · Tower of Winds
Realm of the Heavens — Realm of the Heavens · The Dark Cloud · Palace of Winds
Main Dungeons
Deepwood Shrine ![]() · Cave of Flames · Fortress of Winds · Temple of Droplets
· Cave of Flames · Fortress of Winds · Temple of Droplets ![]() · Palace of Winds · Dark Hyrule Castle
· Palace of Winds · Dark Hyrule Castle ![]()
Mini-Dungeons
Main Dungeons
Forest Temple · Goron Mines · Lakebed Temple · Arbiter's Grounds ![]() · Snowpeak Ruins
· Snowpeak Ruins
Temple of Time · City in the Sky · Palace of Twilight ![]() · Hyrule Castle
· Hyrule Castle
Mini-Dungeons
Lantern Caverns · Cave of Ordeals · Cave of Shadows (TPHD)
Dungeons
Temple of Fire · Temple of Wind · Temple of Courage · Ghost Ship · Goron Temple · Temple of Ice · Mutoh's Temple
Master Dungeon
Dungeons
Forest Temple · Snow Temple · Ocean Temple · Fire Temple · Sand Temple
Master Dungeon
Mini-Dungeon
Lost at Sea Station · Tunnel to the Tower · Take 'Em All On!![]()
Main Dungeons
Skyview Temple · Earth Temple · Lanayru Mining Facility · Ancient Cistern · Sandship · Fire Sanctuary · Sky Keep
Mini-Dungeons
Hyrule
Eastern Palace · Tower of Hera · House of Gales · Inside Hyrule Castle ![]()
Desert Palace ![]()
Lorule
Ice Ruins · Swamp Palace · Thieves' Hideout · Dark Palace
Skull Woods · Turtle Rock · Lorule Castle ![]()
Woodlands — Deku Forest · Buzz Blob Cave · Moblin Base · Forest Temple
Riverside — Secret Fortress · Abyss of Agony · Cove of Transition · Water Temple
Volcano — Blazing Trail · Hinox Mine · Den of Flames · Fire Temple
Ice Cavern — Frozen Plateau · Snowball Ravine · Silver Shrine · Ice Temple
Fortress — Sealed Gateway · Bomb Storage · Training Ground · The Lady's Lair
The Dunes — Infinity Dunes · Stone Corridors · Gibdo Mausoleum · Desert Temple
The Ruins — Illusory Mansion · Palace Noir · Lone Labyrinth · Grim Temple
Sky Realm — Floating Garden · Deception Castle · Dragon Citadel · Sky Temple
Forest Zone · Flooded Zone · Scorching Zone · Frozen Zone · Fortified Zone · Desert Zone · Shadow Zone · Baneful Zone
Main Dungeons
Divine Beast Vah Ruta · Divine Beast Vah Rudania · Divine Beast Vah Medoh · Divine Beast Vah Naboris · Hyrule Castle · Final Trial![]() (TCB)
(TCB)
Mini-Dungeons
Trial of the Sword (TMT ) · Yiga Clan Hideout
Ancient Shrines
Akh Va'quot ·
Bosh Kala ·
Chaas Qeta ·
Daag Chokah ·
Dagah Keek ·
Dah Kaso ·
Dah Hesho ·
Daka Tuss ·
Dako Tah ·
Daqa Koh ·
Daqo Chisay ·
Dila Maag ·
Dow Na'eh ·
Dunba Taag ·
Gee Ha'rah ·
Gorae Torr ·
Ha Dahamar ·
Hawa Koth ·
Hia Miu ·
Hila Rao ·
Ishto Soh ·
Ja Baij ·
Jee Noh ·
Jitan Sa'mi ·
Joloo Nah ·
Ka'o Makagh ·
Kaam Ya'tak ·
Kah Mael Shrine ·
Kah Okeo Shrine ·
Kah Yah Shrine ·
Kam Urog Shrine ·
Katah Chuki ·
Katosa Aug ·
Kay Noh ·
Kaya Wan ·
Kayra Mah ·
Ke'nai Shakah ·
Keeha Yoog ·
Keh Namut ·
Kema Kosassa ·
Kema Zoos ·
Keo Ruug ·
Ketoh Wawai ·
Korgu Chideh ·
Korsh O'hu ·
Kuh Takkar ·
Kuhn Sidajj ·
Lakna Rokee ·
Lanno Kooh ·
Maag Halan ·
Maag No'rah ·
Maka Rah ·
Mezza Lo ·
Mijah Rokee ·
Mirro Shaz ·
Misae Suma ·
Mo'a Keet ·
Mogg Latan ·
Monya Toma ·
Mozo Shenno ·
Muwo Jeem ·
Myahm Agana ·
Namika Ozz ·
Ne'ez Yohma ·
Noya Neha ·
Oman Au ·
Owa Daim ·
Pumaag Nitae ·
Qua Raym ·
Qaza Tokki ·
Qukah Nata ·
Raqa Zunzo ·
Ree Dahee ·
Rin Oyaa ·
Ritaag Zumo ·
Rok Uwog ·
Rona Kachta ·
Rota Ooh ·
Rucco Maag ·
Saas Ko'sah ·
Sah Dahaj ·
Sasa Kai ·
Sha Gehma ·
Sha Warvo ·
Shada Naw ·
Shae Katha ·
Shae Loya ·
Shae Mo'sah ·
Shai Utoh ·
Shai Yota ·
Shee Vaneer ·
Shee Venath ·
Sheem Dagoze ·
Sheh Rata ·
Sho Dantu ·
Shoda Sah ·
Shoqa Tatone ·
Shora Hah ·
Soh Kofi ·
Suma Sahma ·
Ta'loh Naeg ·
Tah Muhl ·
Tahno O'ah ·
Tawa Jinn ·
Tena Ko'sah ·
Tho Kayu ·
To Quomo ·
Toh Yahsa ·
Toto Sah ·
Tu Ka'loh ·
Tutsuwa Nima ·
Voo Lota ·
Wahgo Katta ·
Ya Naga ·
Yah Rin ·
Zalta Wa ·
Ze Kahso ·
Zuna Kai
Ancient Shrines (TCB)
Etsu Korima · Kamia Omuna · Kee Dafunia · Keive Tala · Kiah Toza · Kihiro Moh · Mah Eliya · Noe Rajee · Rinu Honika · Rohta Chigah · Ruvo Korbah · Sato Koda · Sharo Lun · Shira Gomar · Takama Shiri · Yowaka Ita
Main Dungeons
Wind Temple · Fire Temple · Water Temple · Lightning Temple · Hyrule Castle · Spirit Temple · Gloom's Lair
Level 1 — Ordon Target Practice · Gerudo Stalfos: Defender · Arbiter's Grounds: Ranger
Level 2 — Goron Target Practice · Zora River: Defender · Skull Shooting
Level 3 — Kakariko Target Practice · Fruit Balloons · The Great Bridge: Defender
Level 4 — Zora River Target Practice · Hyrule Castle: Defender · Skulltula Forest: Ranger
Level 5 — Oocca Target Practice · Gerudo Moldorm: Defender · The Shootout
Level 6 — Ordon Target Practice 2 · Bridge of Eldin: Defender · Snowpeak Ruins: Ranger
Level 7 — Underground Target Practice · City in the Sky: Defender · Temple of Time: Ranger
Level 8 — Horseback Target Practice · Snowpeak Ruins: Defender · Darknut Battle
Finale — Ranch Target Practice · Sacred Grove: Defender · Fossil Stallord Battle