(Updating) |
Weirdguy42 (talk | contribs) m (Added German name and meaning) |
||
| Line 1: | Line 1: | ||
| + | {{boss|name = Heatoise |
||
| − | {{Object |
||
| ⚫ | |||
| − | |name = Power Generator |
||
| + | |imageback = |
||
| ⚫ | |||
| − | | |
+ | |game = {{ST}} |
| + | |dungeon = [[Fire Temple (Spirit Tracks)|Fire Temple]] |
||
| − | |game = {{SS}} |
||
| + | |type = mini |
||
| − | |uses = Revealing the entrance to the [[Lanayru Mining Facility]] |
||
| + | |weakness = [[Bow]] (after mini-boss fight), [[Winder]]s |
||
| + | |spoils = |
||
}} |
}} |
||
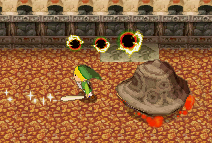
| − | The '''Power Generator''' is the source of energy for the mechanism that opens the entrance to the [[Lanayru Mining Facility]] in {{SS}}.<ref>{{Cite|This is the power generator for the mechanism that opens the entrance to Lanayru Mining Facility, zrrpt!|Ancient Robot|SS}}</ref> |
||
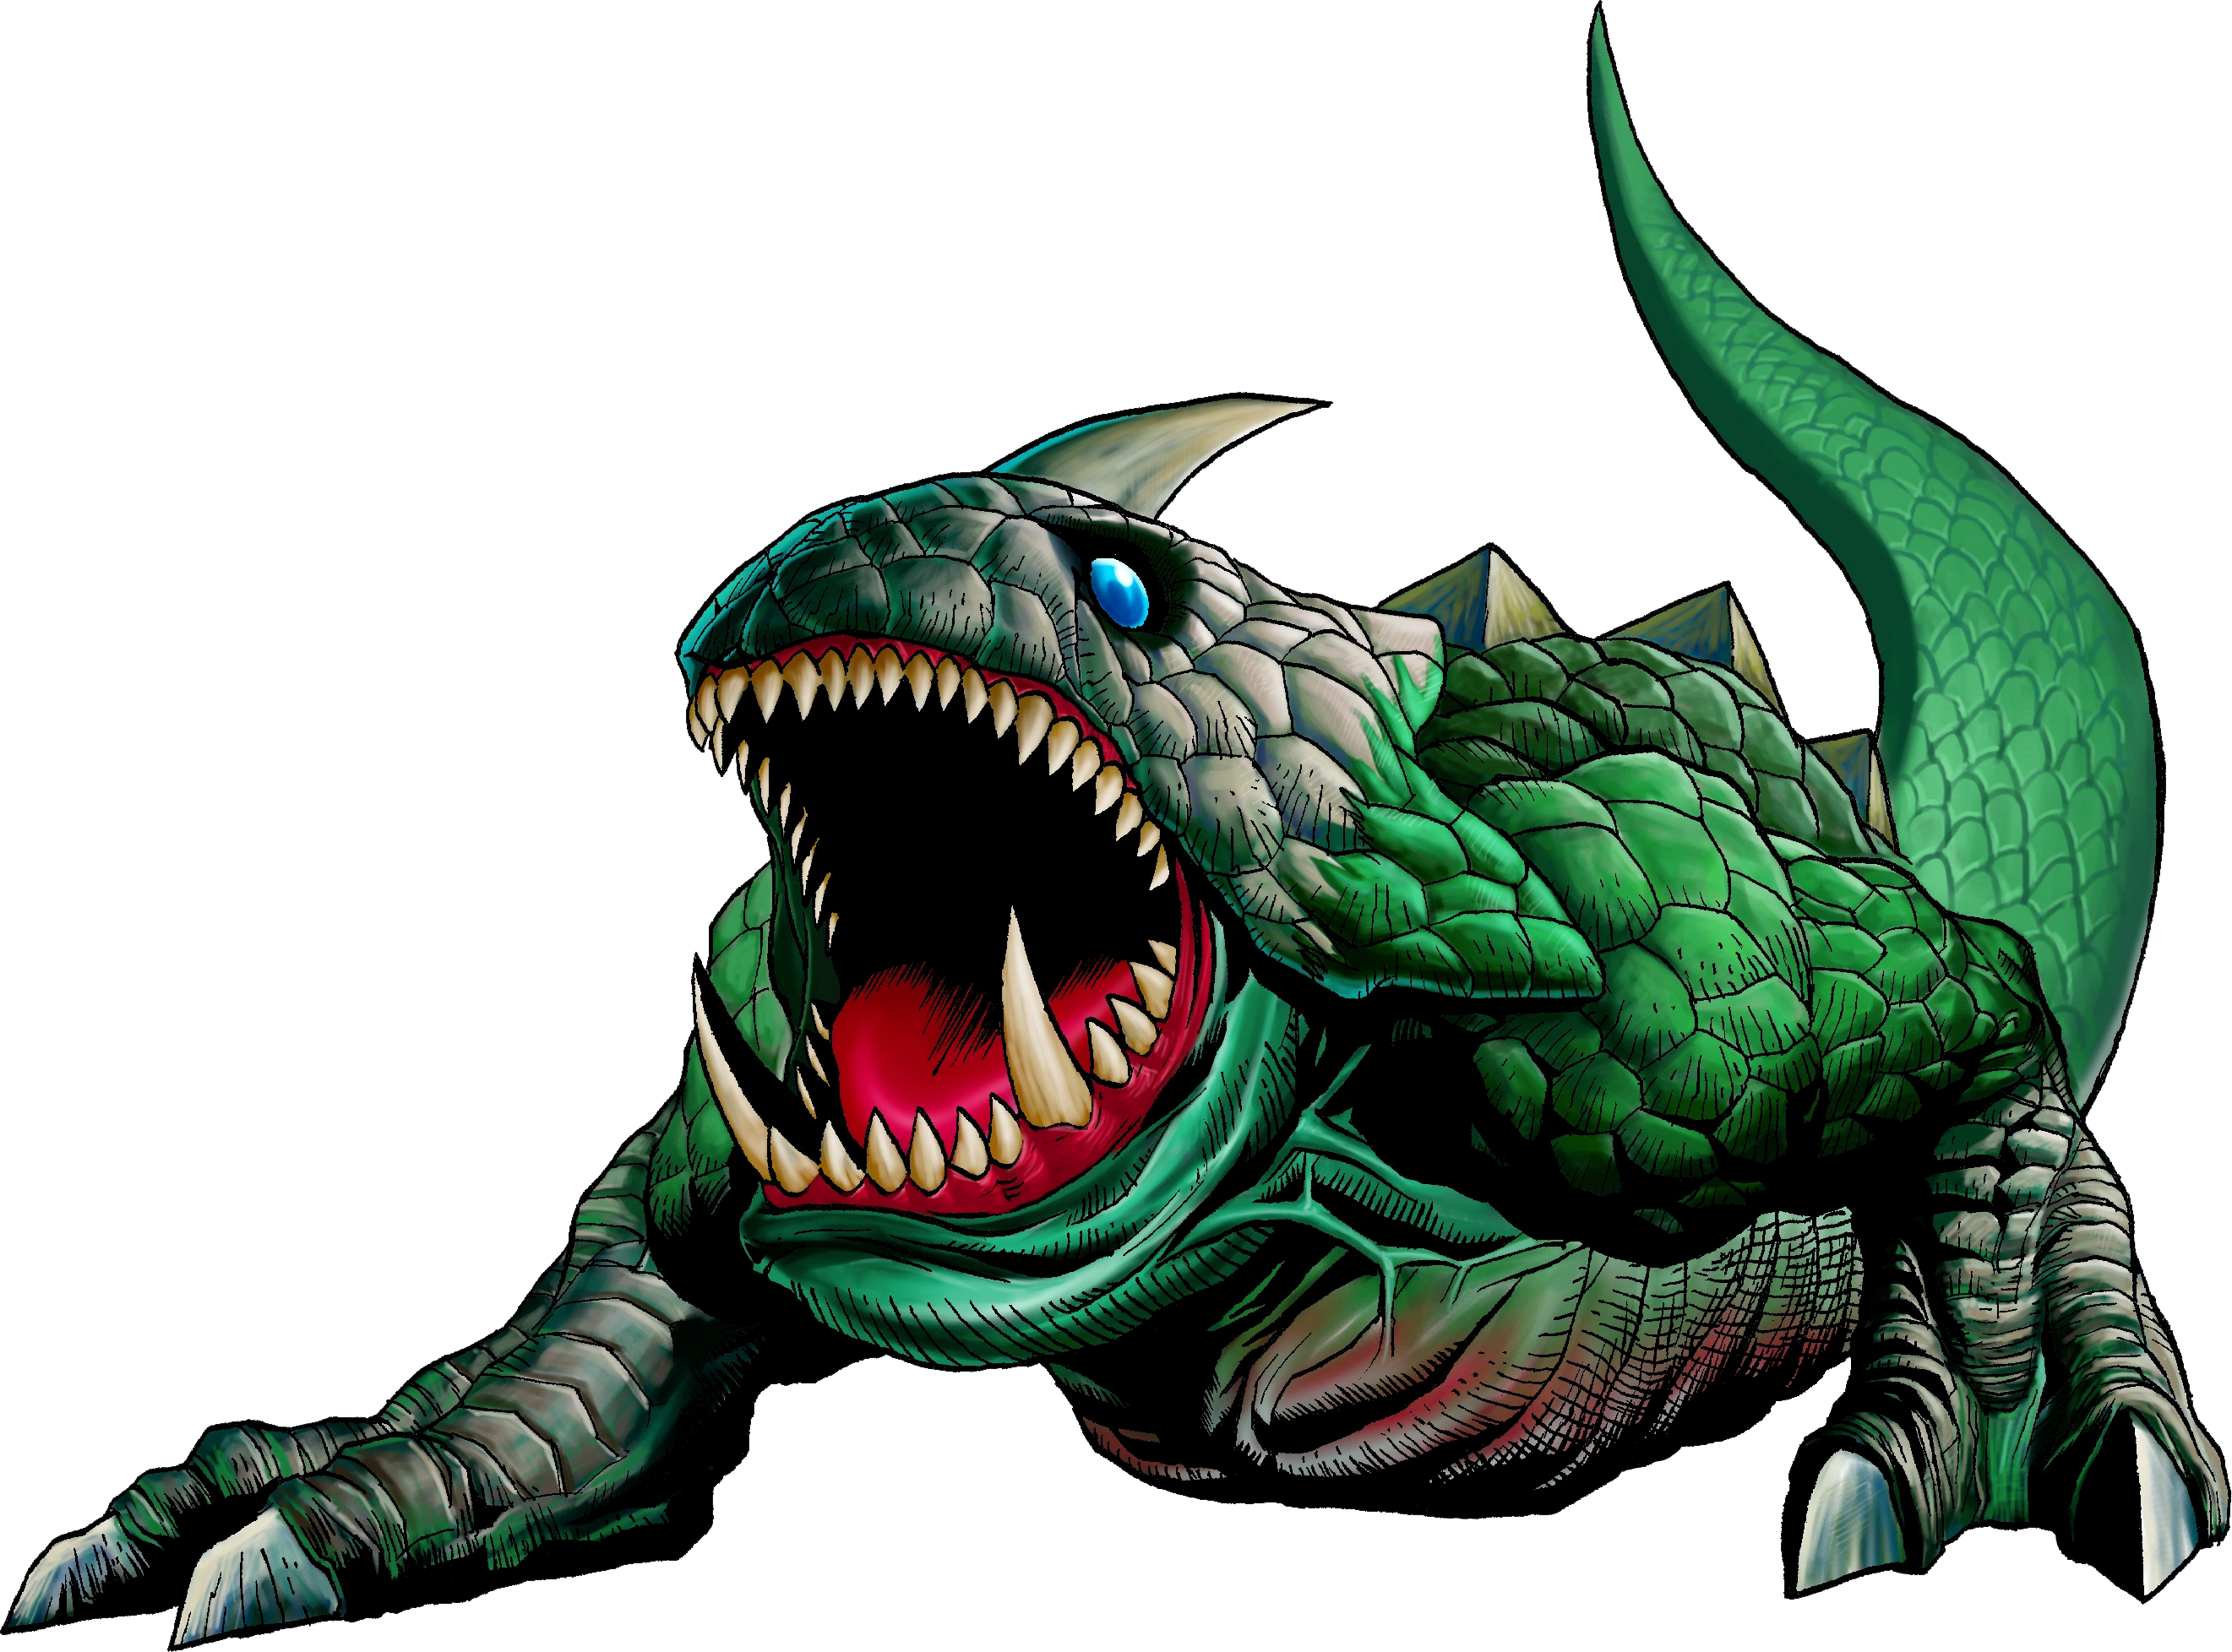
| + | The '''Heatoise''' first appears as a mini-boss in the [[Fire Temple (Spirit Tracks)|Fire Temple]] in {{ST}}. |
||
| − | ==Location and Uses== |
||
| − | The Power Generator is located in the northern portion of the [[Lanayru Desert]]. The generator will not work until the nearby '''Power Nodes''' are activated. Once these nodes are turned on, the three dials on the generator must be set correctly to reveal the mining facility from beneath the desert.<ref>{{Cite|But it won't budge until you activate the remote power nodes and set those {{Color|SS Red|three dials}} to access them correctly.|Ancient Robot|SS}}</ref> |
||
| + | ==Strategy== |
||
| − | The three Power Nodes are scattered around the north desert. Like the Power Generator, the nodes are only usable in the past time. To activate a Power Node, [[Link]] must stab his Sword inside and turn it to the left, then push in the node.<ref>{{Cite|And don't let me catch you stabbing or fiddling with this device, bzzt!|Ancient Robot|SS}}</ref> The water Power Node is located in the western side of the north desert, hidden by a bombable wall. The thunder Power Node is hidden inside a cave found in the north, also sealed by a bombable wall. The fire Power Node is located in a building to the southeast, by the stone cache. With all three nodes activated, Link must return to the Power Generator and set the three dials according to the locations of the Power Nodes.<ref>{{Cite|The symbols on this power generator correspond to the symbols on the three remote power nodes you activated. Logic suggests that they are connected.|Fi|SS}}</ref> If all three dials are set correctly, the Lanayru Mining Facility will surge from beneath the desert. |
||
| + | Usually accompanied by a [[Winder]], when hit or provoked the Heatoise will put its limbs and head into its shell and spin towards Link. The object to defeating a Heatoise without the bow and arrows is to cause the Heatoise to spin into the Winder, which stuns the Heatoise during which time [[Link]] can strike it with his [[sword]]. With a bow, Link simply has to shoot its head with arrows. |
||
| + | |||
| + | ==Trivia== |
||
| + | *Heatoise is similar to a {{Wp|tortoise}} that can stand in abnormally hot conditions as opposed to cool conditions like near an ocean. |
||
| + | *The Heatoise is similar in appearance to the [[Terrorpin]]s and the [[Snapper (Majora's Mask)|Snappers]] from {{MM}}. They also attack in a similar manner. |
||
| + | *The battle style is similar to that of {{smw|Super Mario Galaxy}}'s boss, {{smw|Topmaniac}}. |
||
==Etymology== |
==Etymology== |
||
| + | Heatoise's name is a combination of heat and tortoise, in reference to the animal it is based on and its location in the Fire Temple. |
||
{{Names |
{{Names |
||
| − | |align= |
+ | |align=left |
| − | |en= |
+ | |en= Heatoise |
|enM= |
|enM= |
||
| − | |ja= |
+ | |ja= |
|jaM= |
|jaM= |
||
|es= |
|es= |
||
| − | |esM= |
+ | |esM= |
| − | |esL= Generador |
||
| ⚫ | |||
|esS= |
|esS= |
||
|esSM= |
|esSM= |
||
| ⚫ | |||
| ⚫ | |||
|fr= |
|fr= |
||
|frM= |
|frM= |
||
| − | |frC= Générateurs auxiliaires |
||
| − | |frCM= Auxiliary generators |
||
|frF= |
|frF= |
||
|frFM= |
|frFM= |
||
| − | | |
+ | |frC= |
| − | | |
+ | |frCM= |
| + | |de= {{de|Schnapper}} |
||
| ⚫ | |||
| + | |deM= Snapper |
||
| + | |it= Caloruga |
||
|itM= |
|itM= |
||
| + | |pt= |
||
| + | |ptM= |
||
| + | |ptP= |
||
| + | |ptPM= |
||
| + | |ptB= |
||
| + | |ptBM= |
||
| + | |nl= |
||
| + | |nlM= |
||
| + | |ru= |
||
| + | |ruM= |
||
|ko= |
|ko= |
||
| − | |koM= |
+ | |koM= |
| + | |ch= |
||
| + | |chM= |
||
| + | |chT= |
||
| + | |chTM= |
||
| + | |chS= |
||
| + | |chSM= }} |
||
==Gallery== |
==Gallery== |
||
<gallery> |
<gallery> |
||
| + | File:Heatoise Strategy.png|Link leading a Heatoise into a Winder |
||
| − | File:Power Node Locations.png|The locations of the three Power Nodes |
||
| − | File:Water Power Node.png|Link activating a Power Node |
||
| − | File:Power Generator 2.png|Link setting the three dials on the Power Generator |
||
</gallery> |
</gallery> |
||
| − | {{ |
+ | {{Bosses|ST}} |
| + | {{SaurianEnemy}} |
||
| − | |||
| + | {{FireEnemy}} |
||
| ⚫ | |||
| + | [[Category:Mini-Bosses]] |
||
| ⚫ | |||
| + | [[Category:Bosses in Spirit Tracks]] |
||
Revision as of 15:13, 7 February 2017
Template:Boss
The Heatoise first appears as a mini-boss in the Fire Temple in Spirit Tracks.
Strategy
Usually accompanied by a Winder, when hit or provoked the Heatoise will put its limbs and head into its shell and spin towards Link. The object to defeating a Heatoise without the bow and arrows is to cause the Heatoise to spin into the Winder, which stuns the Heatoise during which time Link can strike it with his sword. With a bow, Link simply has to shoot its head with arrows.
Trivia
- Heatoise is similar to a tortoise that can stand in abnormally hot conditions as opposed to cool conditions like near an ocean.
- The Heatoise is similar in appearance to the Terrorpins and the Snappers from Majora's Mask. They also attack in a similar manner.
- The battle style is similar to that of Super Mario Galaxy's boss, Topmaniac.
Etymology
Heatoise's name is a combination of heat and tortoise, in reference to the animal it is based on and its location in the Fire Temple.
| Language | Name | Meaning | |
|---|---|---|---|
| EnglishUK | Heatoise | ||
| German | Schnapper | Snapper | |
| Italian | Caloruga | ||
Gallery

Link leading a Heatoise into a Winder
Mazura · Jermafenser · Rebonack · Carock · Gooma · Barba · Thunderbird ![]() · Link's Shadow
· Link's Shadow
Light World
Ball and Chain Trooper ![]() · Six Armos Knights · Lanmola Trio · Moldorm · Agahnim
· Six Armos Knights · Lanmola Trio · Moldorm · Agahnim ![]()
Dark World
Helmasaur King · Arrghus · Mothula · Blind the Thief · Kholdstare · Vitreous · Trinexx · Ganon
Super Helmasaur · Super Arrghus · Super Mothula · Super Blind · Dark Links![]()
Bosses
Moldorm · Genie · Slime Eye · Angler Fish (2D) · Slime Eel · Facade · Evil Eagle (2D) · Hot Head · Shadow Nightmares
Guardians
Rolling Bones ![]() · King Moblin
· King Moblin ![]() · Hinox
· Hinox ![]() · Dodongo Snakes x2
· Dodongo Snakes x2 ![]() · Lanmola
· Lanmola ![]() · Cue Ball
· Cue Ball ![]() · Master Stalfos x4 · Gohma Twins · Armos Knight
· Master Stalfos x4 · Gohma Twins · Armos Knight ![]() · Smasher
· Smasher ![]() · Grim Creeper · Turtle Rock · Blaino
· Grim Creeper · Turtle Rock · Blaino
Bosses
Gohma · King Dodongo · Barinade · Phantom Ganon · Volvagia · Morpha · Bongo Bongo · Twinrova · Ganondorf · Ganon
Middle Bosses
Lizalfos · Big Octo · Stalfos · Meg · Flare Dancer · White Wolfos · Dark Link · Dead Hand · Gerudo Thief · Iron Knuckle · Dynalfos
Bosses
Odolwa · Goht · Gyorg · Twinmold · Majora ![]()
Middle Bosses
Dinolfos · Gekko · Wizzrobe · Gerudo Pirate · Wart · Gekko and Mad Jelly
Captain Keeta · Iron Knuckle · Sharp · Igos du Ikana · Garo Master · Gomess · Eyegore
Bosses
Aquamentus · Dodongo · Mothula · Gohma · Digdogger · Manhandla · Gleeok · Medusa Head · General Onox ![]()
Sub-Bosses
Brother Goriyas · Facade ![]() · Omuai · Agunima · Great Moblin
· Omuai · Agunima · Great Moblin ![]() · Syger · Vire
· Syger · Vire ![]() · Poe Sisters · Frypolar
· Poe Sisters · Frypolar
Bosses
Pumpkin Head · Head Thwomp (2D) · Shadow Hag · Eyesoar · Smog · Octogon · Possessed Nayru · Plasmarine · Ramrock · Veran ![]()
Sub-Bosses
Giant Ghini · Swoop · Subterror · Armos Warrior · Great Moblin ![]() · Smasher · Vire
· Smasher · Vire ![]() · Angler Fish (2D) · Blue Stalfos
· Angler Fish (2D) · Blue Stalfos
Bosses
Gohma · Kalle Demos · Gohdan · Helmaroc King · Jalhalla · Molgera · Puppet Ganon ![]() · Ganondorf
· Ganondorf
Minibosses
Green Bokoblin · Moblin · Mothula · Darknut · Cyclos · Phantom Ganon · Stalfos · Wizzrobe · Mighty Darknut · Big Octo![]()
Bosses
Phantom Ganon ![]() · Stone Arrghus · Helmaroc King · Big Poe · Big Moldorm x2 · Frostare · Vaati · Ganon
· Stone Arrghus · Helmaroc King · Big Poe · Big Moldorm x2 · Frostare · Vaati · Ganon
Sub-Bosses
Chief Soldier · Shadow Link ![]() · Manhandla · Dodongos · Big Dark Stalfos · Gohma · Big Dodongo
· Manhandla · Dodongos · Big Dark Stalfos · Gohma · Big Dodongo
Bosses
Big Green Chuchu ![]() · Gleerok · Mazaal · Big Octorok
· Gleerok · Mazaal · Big Octorok ![]() · Gyorg Pair · Vaati
· Gyorg Pair · Vaati ![]()
Sub-Bosses
Madderpillar ![]() · Dark Nut · Big Blue Chuchu
· Dark Nut · Big Blue Chuchu ![]() · Red Dark Nut · Black Knight
· Red Dark Nut · Black Knight
Bosses
Diababa · Fyrus · Morpheel · Stallord · Blizzeta · Armogohma · Argorok · Zant · Puppet Zelda · Ganon · Ganondorf ![]()
Sub-Bosses
Ook · King Bulblin · Dangoro · Twilit Carrier Kargarok · Twilit Bloat · Deku Toad · Death Sword · Darkhammer · Darknut · Aeralfos · Phantom Zant
Bosses
Stagnox · Fraaz · Phytops · Cragma · Byrne · Skeldritch · Demon Train · Chancellor Cole · Malladus
Stagnox II · Fraaz II · Phytops II · Cragma II · Skeldritch II · Dark Link![]()
Sub-Bosses
Mothula · Geozard · Rocktite · Ice Keese · Freezard · White Wolfos · Geozard Chief · Big Blin ![]() · Snapper · Helmet Chuchu · Metal Chuchu · Stalfos · Heatoise · Stalfos Warrior · Gerune · Ergtorok ·
· Snapper · Helmet Chuchu · Metal Chuchu · Stalfos · Heatoise · Stalfos Warrior · Gerune · Ergtorok ·
Bosses
Ghirahim ![]() · Scaldera · Moldarach · The Imprisoned
· Scaldera · Moldarach · The Imprisoned ![]() · Koloktos · Tentalus · Levias
· Koloktos · Tentalus · Levias ![]() · Bilocyte
· Bilocyte ![]() · Demise
· Demise
Sub-Bosses
Stalfos · Lizalfos · Stalmaster · Moldarach · LD-002G Scervo · Dark Lizalfos · Magmanos · Moldorm · Dreadfuse
Bosses
Yuga ![]() · Moldorm · Margomill · Gemesaur King · Arrghus · Knucklemaster · Stalblind · Zaganaga · Dharkstare · Grinexx · Yuga Ganon
· Moldorm · Margomill · Gemesaur King · Arrghus · Knucklemaster · Stalblind · Zaganaga · Dharkstare · Grinexx · Yuga Ganon
Sub-Bosses
Armos · Red Stalfos · Heedles · Green & Red Goriyas · Gigabari · Gibdos & Purple Mini-Moldorms · Red Eyegores · Flying Tiles & Devalants · Big Pengator & Pengators · Fire Gimos · Moldorm · Lorule Ball and Chain Soldier · Arrghus
StreetPass Bosses
Bosses
Margoma · Arrghus · Moldorm · Blizzagia · The Lady's Pets ![]() · Stalchampion · Prismantus · The Lady
· Stalchampion · Prismantus · The Lady
Shadow Link x3![]()
Mini-Bosses
Electric Blob King · Electric Blob Queen · Hinox Brothers · Freezlord · Vulture Vizier · Grim Repoe · Gigaleon
Bosses
Windblight Ganon · Fireblight Ganon · Master Kohga · Thunderblight Ganon · Waterblight Ganon · Calamity Ganon · Dark Beast Ganon ![]()
Sub-Bosses
Stone Talus · Igneo Talus · Frost Talus · Molduga · Hinox · Blue Hinox · Black Hinox · Stalnox · Igneo Talus Titan · Molduking
Bosses
Colgera · Mucktorok · Marbled Gohma · Queen Gibdo · Phantom Ganon · Seized Construct · The Demon King's Army · Demon King Ganondorf · Demon Dragon ![]()
Sub-Bosses
Flame Gleeok · Frost Gleeok · Sludge Like · Thunder Gleeok · King Gleeok · Yunobo · Frox · Flux Construct · Moragia · Molduga · Hinox · Stalnox · Frost Talus · Igneo Talus · Stone Talus · Battle Talus · Stone Talus (Luminous) · Ganondorf · Master Kohga · Phantom Ganon
| |||||||||||||||||||||||
Template:FireEnemy