Champion of Nayru@legacy41970505 (talk | contribs) m (Merge with Demise? (Previous edit referred to Theory not Trivia)) |
MannedTooth (talk | contribs) m (Text replacement - "File:Tingle Trophy.png" to "File:SSBM Tingle Trophy Model.png") |
||
| Line 1: | Line 1: | ||
| + | {{noncanon}} |
||
| + | '''Trophies''' are collectible items in {{SSBM}}. There are 293 Trophies in all, 30 of which are {{Series|The Legend of Zelda|''Zelda''-related}}. |
||
| + | ==Trophies from ''The Legend of Zelda''== |
||
| − | == Headline text == |
||
| + | {| class=wikitable sortable align=center width=100% cellspacing=0 border=1 cellpadding=3 style="text-align:center; border-collapse:collapse;" |
||
| − | {{merge|Demise}} |
||
| + | |- |
||
| − | {{quote|I've let a mere boy make a fool out of me for the last time. You stand before a demon... or should I say, a '''weapon''' without mercy!|''Demon Lord [[Ghirahim]]''}} |
||
| + | !width="inherited"|# |
||
| + | !width="inherited"|Trophy |
||
| + | !width="inherited"|First Game / Move |
||
| + | !width="inherited"|Description |
||
| + | !width="inherited"|How to Unlock |
||
| + | |- |
||
| + | |7 |
||
| + | |[[File:SSBM Link Trophy Model.png|100px]]<br>[[Link]] |
||
| + | |{{TLoZ}}<br>07/87 |
||
| + | |align=left|Even in his youth, Link was already becoming the warrior who would carry the destiny of [[Hyrule]] (and many other lands) on his shoulders. His epic struggles against the forces of darkness are written in legend, and he is bound to the [[Princess Zelda]] and the archfiend [[Ganon]]dorf by the awesome power of the [[Triforce]]. |
||
| + | |Complete Classic Mode as Link |
||
| + | |- |
||
| + | |8 |
||
| + | |[[File:SSBM Link (Smash) Trophy Model.png|100px]]<br>Link [Smash] |
||
| + | |B: [[Bow]]<br>Smash B: [[Boomerang]] |
||
| + | |align=left|Burdened with a [[shield]], a heavy [[sword]], and plenty of equipment, Link is not a very mobile character. Nevertheless, he's skilled with the blade, and his varied supply of missile weapons makes him a powerful fighter. To master Link, you must control the pace by balancing your long-range attacks with head-to-head swordplay. |
||
| + | |Complete Adventure Mode as Link |
||
| + | |- |
||
| + | |9 |
||
| + | |[[File:SSBM Link (Smash) Trophy Red Model.png|100px]]<br>Link [Smash] |
||
| + | |Up & B: [[Spin Attack]]<br>Down & B: [[Bomb]] |
||
| + | |align=left|Link's [[Bow]], [[Boomerang]], and [[Bomb]]s all take time to wield, so you may want to try drawing them in midair to prevent your foes from attacking you while you're vulnerable. The Spin Attack can score consecutive midair hits, and the final slash is very powerful. Link's Bombs are his trump card, but he can't pull one out if he's carrying another item. |
||
| + | |Complete All-Star Mode as Link |
||
| + | |- |
||
| + | |40 |
||
| + | |[[File:SSBM Zelda Trophy Model.png|100px]]<br>[[Princess Zelda|Zelda]] |
||
| + | |{{TLoZ}}<br>07/87 |
||
| + | |align=left|The crown princess of Hyrule. Zelda entrusted Link with the future of Hyrule after a revelation came to her in the world of dreams. She knows much about the Triforce; in fact, the only person who likely knows more about Triforce lore is Ganondorf himself, whom Zelda evaded in ‘‘[[The Legend of Zelda: Ocarina of Time]]’’ by transforming into her alter ego, [[Sheik]]. |
||
| + | |Complete Classic Mode as Zelda or Sheik |
||
| + | |- |
||
| + | |41 |
||
| + | |[[File:SSBM Zelda (Smash) Trophy Model.png|100px]]<br>Zelda [Smash] |
||
| + | |B: [[Nayru's Love]]<br>Smash B: [[Din's Fire]] |
||
| + | |align=left|Zelda is a bit slow and, because of her light frame, easy to send flying. On the other hand, her magical skills lend her reliable and explosive attack power. Zelda's easier to use if you focus on waiting and countering rather than pressing attacks. She can use [[Nayru's Love]] to reflect projectile attacks or as an offensive weapon. |
||
| + | |Complete Adventure Mode as Zelda or Sheik |
||
| + | |- |
||
| + | |42 |
||
| + | |[[File:SSBM Zelda (Smash) Trophy Blue Model.png|100px]]<br>Zelda [Smash] |
||
| + | |Up & B: [[Farore's Wind]]<br>Down & B: [[ssb:Transform|Transform]] |
||
| + | |align=left|Zelda's midair Lightning Kick centers immense magical power in the ball of her foot. If she strikes perfectly, the attack is as strong as can be. If her aim is slightly off, it'll be exceedingly weak. [[Farore's Wind]] again utilizes Zelda's magical prowess, this time by transporting her great distances. It's vital to know the lay of the land before using this move. |
||
| + | |Complete All-Star Mode as Zelda or Sheik |
||
| + | |- |
||
| + | |43 |
||
| + | |[[File:SSBM Sheik Trophy Model.png|100px]]<br>[[Sheik]] |
||
| + | |{{OoT}}<br>11/98 |
||
| + | |align=left|This is Zelda's alter ego. Using a variation of the name of the ancient [[Sheikah]] tribe, she appears before Link and teaches him melodies instrumental to his success. It's believed that she's not just a quick-change artist, but rather that she is able to instantaneously alter her clothing and her eye and skin color by using her magical skills. |
||
| + | |Complete Classic Mode as Zelda or Sheik |
||
| + | |- |
||
| + | |44 |
||
| + | |[[File:SSBM Sheik (Smash) Trophy Model.png|100px]]<br>Sheik [Smash] |
||
| + | |B: [[ssb:Needle Storm|Needle Storm]]<br>Smash B: [[ssb:Chain|Chain]] |
||
| + | |align=left|Strategically switching between Zelda and Sheik is key. Compared to her Zelda form, Sheik is nimble and has gorgeous moves, but she lacks a strong knockout attack. The number of needles thrown in [[ssb:Needle Storm|Needle Storm]] is based on how long you hold the B Button before releasing it. Use the Control Stick to wave the [[ssb:Chain|Chain]] after brandishing it. |
||
| + | |Complete Adventure Mode as Zelda or Sheik |
||
| + | |- |
||
| + | |45 |
||
| + | |[[File:SSBM Sheik (Smash) Trophy White Model.png|100px]]<br>Sheik [Smash] |
||
| + | |Up & B: [[ssb:Vanish|Vanish]]<br>Down & B: [[ssb:Transform|Transform]] |
||
| + | |align=left|The best strategy to use when playing as Sheik is to let her flow from one powerful attack into another, like a river of quicksilver. Zelda has some techniques with more punch, however, so in one-on-one battles, use [[ssb:Transform|Transform]] as needed. Sheik only travels a short way when using [[ssb:Vanish|Vanish]], but the move comes with a small explosion that damages foes around her. |
||
| + | |Complete All-Star Mode as Zelda or Sheik |
||
| + | |- |
||
| + | |64 |
||
| + | |[[File:SSBM Ganondorf Trophy Model.png|100px]]<br>[[Ganon]]dorf |
||
| + | |{{OoT}}<br>11/98 |
||
| + | |align=left|Said to be the sole man born to the [[Gerudo]] tribe in a hundred years, Ganondorf aspired to conquer the world. He plundered a piece of the sacred [[Triforce]] from the [[Temple of Time]] when Link pulled the [[Master Sword]] from its [[Pedestal of Time|pedestal]]. With the Triforce of Power in Ganondorf's possession, [[Hyrule]] was plunged into darkness until Link and Zelda defeated the fiend. |
||
| + | |Complete Classic Mode as Ganondorf |
||
| + | |- |
||
| + | |65 |
||
| + | |[[File:Ganondorf (Smash) Trophy Model.png|100px]]<br>Ganondorf [Smash] |
||
| + | |B: [[ssb:Warlock Punch|Warlock Punch]]<br>Smash B: [[ssb:Gerudo Dragon|Gerudo Dragon]] |
||
| + | |align=left|Since he's slow and can't jump very high, Ganondorf relies mainly on his immense physical strength to overwhelm his enemies. His great weight also makes him a difficult foe to send offscreen. Ganondorf's [[ssb:Warlock Punch|Warlock Punch]] is slow but absurdly powerful, and when he strikes with his [[ssb:Gerudo Dragon|Gerudo Dragon]], enemies rise skyward enveloped in dark flames. |
||
| + | |Complete Adventure Mode as Ganondorf |
||
| + | |- |
||
| + | |66 |
||
| + | |[[File:SSBM Ganondorf (Smash) Trophy Purple Model.png|100px]]<br>Ganondorf [Smash] |
||
| + | |Up & B: [[ssb:Dark Dive|Dark Dive]]<br>Down & B: [[ssb:Wizard's Foot|Wizard's Foot]] |
||
| + | |align=left|Ganondorf's slow speed works against him in single combat, but in melees, his crazy power lets him earn his keep with innumerable [[ssb:KO|KO]]s. Ganondorf can't strike quickly, but each blow he lands adds up. Ganondorf is at his quickest when he uses the [[ssb:Wizard's Foot|Wizard's Foot]], and his [[ssb:Dark Dive|Dark Dive]] blasts foes in a burst of dark energy. |
||
| + | |Complete All-Star Mode as Ganondorf |
||
| + | |- |
||
| + | |70 |
||
| + | |[[File:SSBM Young Link Trophy Model.png|100px]]<br>[[Young Link]] |
||
| + | |{{TLoZ}}<br>07/87 |
||
| + | |align=left|Link's younger incarnation is often considered to be the true Link: he was a young boy in the very first ''Legend of Zelda'' game, and he has appeared as a youth in most of the subsequent games. Since his debut on the original NES in 1987, Link's appearance has changed over and over again, each time adding to the mystique of his incomparable story. |
||
| + | |Complete Classic Mode as Young Link |
||
| + | |- |
||
| + | |71 |
||
| + | |[[File:SSBM Young Link (Smash) Trophy Model.png|100px]]<br>Young Link [Smash] |
||
| + | |B: [[ssb:Fire Bow|Fire Bow]]<br>Smash B: [[Boomerang]] |
||
| + | |align=left|Young Link is lighter and faster than his older self, and his [[Kokiri Sword|Kokiri sword]] packs less punch. Even though his [[Boomerang]] has a shorter range, he has greater control over it. He's a smaller target, and while his [[Hookshot]] has less reach than older Link's, you can still use it in midair as a last ditch attempt to grab a ledge. |
||
| + | |Complete Adventure Mode as Young Link |
||
| + | |- |
||
| + | |72 |
||
| + | |[[File:SSBM Young Link (Smash) Trophy Blue Model.png|100px]]<br>Young Link [Smash] |
||
| + | |Up & B: [[Spin Attack]]<br>Down & B: [[Bomb]] |
||
| + | |align=left|With a youthful spring in his step, Young Link can perform amazing wall-jumps. Once he hits a wall, tap the Control stick in the opposite direction to send him leaping upward; you can practice to your heart's content in [[ssb:Target Test|Target Test]]. His [[Spin Attack]] can strike multiple times even on the ground, and although it's hard to discern, so do his [[Bomb]]s. |
||
| + | |Complete All-Star Mode as Young Link |
||
| + | |- |
||
| + | |87 |
||
| + | |[[File:SSBM Heart Container Trophy Model.png|100px]]<br>[[Heart Container]] |
||
| + | |{{TLoZ}}<br>07/87 |
||
| + | |align=left|Heart Containers drift toward the ground slowly and replenish 100 percentage points of health. In ''The Legend of Zelda'', these items beefed up Link's life meter; in most cases, Link found them in the possession of bosses or hidden in secret areas. Heart Containers are often scattered across the land in [[Piece of Heart|several fragments]]. |
||
| + | |Play 100 VS Matches |
||
| + | |- |
||
| + | |111 |
||
| + | |[[File:SSBM Bunny Hood Trophy Model.png|100px]]<br>[[Bunny Hood]] |
||
| + | |{{OoT}}<br>11/98 |
||
| + | |align=left|Don the Bunny Hood to improve your agility drastically, allowing you to jump great distances and move at high speed. The ears are a cute accessory: they're even adorable on characters they don't quite suit. The Bunny Hood was key in ''[[The Legend of Zelda: Majora's Mask]]'', where it made Link move at one-and-a-half times his normal speed. |
||
| + | |Get a combined total of 125 combos for all characters in [[ssb:Training Mode|Training Mode]] |
||
| + | |- |
||
| + | |156 |
||
| + | |[[File:SSBM Lon Lon Milk Trophy Model.png|100px]]<br>[[Lon Lon Milk]] |
||
| + | |{{OoT}}<br>11/98 |
||
| + | |align=left|The pride of [[Lon Lon Ranch]] is this delicious and nutritious milk. When Link played "[[Epona's Song]]" for Lon Lon Cows, they would perk up and provide him with a bottle full of the tasty beverage. The fact that Link sometimes used bottles that had housed [[bug]]s is a matter of questionable hygiene. In ''Super Smash Bros. Melee'', Young Link drinks milk instead of taunting. |
||
| + | |Get a total time under 25 minutes in [[ssb:Target Test|Target Test]] |
||
| + | |- |
||
| + | |170 |
||
| + | |[[File:SSBM Tingle Trophy Model.png|100px]]<br>[[Tingle]] |
||
| + | |{{MM}}<br>10/00 |
||
| + | |align=left|Tingle is a mysterious middle-aged man who thinks he's "the very reincarnation of a [[fairy]]." His bizarre behavior and unique speech are just little pieces of his vibrant personality. Tingle travels by way of a small hot-air balloon, making maps of the lands below him. Pop his balloon, and Tingle will fall to earth to sell his [[map]]s. |
||
| + | |{{Exp|Can be collected during Snag the Trophies in Classic Mode, picked up up in Adventure or All-Star mode, or using the Lottery to win them|Random}} |
||
| + | |- |
||
| + | |171 |
||
| + | |[[File:Moon Trophy.png|100px]]<br>[[Moon (Object)|Moon]] |
||
| + | |{{MM}}<br>10/00 |
||
| + | |align=left|High in the sky above the [[Clock Town Tower]], a menacing moon slowly sinks towards the city. Shrouded in mystery and feared by all, it threatens to devour everything and everyone in a cataclysm of fire. Strangely, inside the moon is a beautiful, pristine plain broken by a single tree. The moon breaks after Link defeats [[Majora's Mask (Object)|Majora's Mask]]. |
||
| + | |{{Exp|Can be collected during Snag the Trophies in Classic Mode, picked up up in Adventure or All-Star mode, or using the Lottery to win them|Random}} |
||
| + | |- |
||
| + | |172 |
||
| + | |[[File:Turtle Trophy.png|100px]]<br>[[Turtle]] |
||
| + | |{{MM}}<br>10/00 |
||
| + | |align=left|When Link played the "[[New Wave Bossa Nova]]", what masqueraded as a lone island rose out of the waters of the [[Great Bay Coast]] and revealed itself to be a giant turtle. This mighty terrapin is ancient and wise beyond belief. It sensed Link's destiny and braved the stormy seas in order to transport him to the [[Great Bay Temple]]. |
||
| + | |{{Exp|Can be collected during Snag the Trophies in Classic Mode, picked up up in Adventure or All-Star mode, or using the Lottery to win them|Random}} |
||
| + | |- |
||
| + | |173 |
||
| + | |[[File:Four Giants Trophy.png|100px]]<br>[[Four Giants]] |
||
| + | |{{MM}}<br>10/00 |
||
| + | |align=left|"[[Southern Swamp|Swamp]]... [[Snowhead|Mountain]]... [[Great Bay|Ocean]]... [[Ikana Canyon|Valley]]... The four who are there..." Link summons these four giant guardians to aid in his battle against the [[Skull Kid]], who's possessed by Majora's Mask. They appear from the four compass points to catch the moon, which is about to crash into [[Clock Town]]. Without abandoning the innocent Skull Kid, they're able to protect the town. |
||
| + | |{{Exp|Can be collected during Snag the Trophies in Classic Mode, picked up up in Adventure or All-Star mode, or using the Lottery to win them|Random}} |
||
| + | |- |
||
| + | |174 |
||
| + | |[[File:Master Sword Trophy.png|100px]]<br>[[Master Sword]] |
||
| + | |{{OoT}}{{exp|Corrected to A Link to the Past in the PAL release}}<br>11/98 |
||
| + | |align=left|The Master Sword varies a bit between titles in the Legend of Zelda series, but it's generally the most powerful blade that Link can carry. It's a magical weapon that can be wielded only by a true hero, and, as its name implies, it's the weapon of choice in decisive battles. At the end of ''The Legend of Zelda: Ocarina of Time'', Link returned it to its stone pedestal. |
||
| + | |{{Exp|Can be collected during Snag the Trophies in Classic Mode, picked up up in Adventure or All-Star mode, or using the Lottery to win them|Random}} |
||
| + | |- |
||
| + | |196 |
||
| + | |[[File:ReDead Trophy.png|100px]]<br>[[ReDead]] |
||
| + | |{{OoT}}<br>11/98 |
||
| + | |align=left|Seven years after Ganondorf took control of Hyrule, [[ReDead]]s roamed the ruins of [[Castle Town]], moaning. At first, Link was shocked at the state of the town, and the apparent lack of survivors. He later learned that the townsfolk had evacuated to safety, and that the ReDeads were just magic animated into hideous humanoid shapes. |
||
| + | |{{Exp|Can be collected during Snag the Trophies in Classic Mode, picked up up in Adventure or All-Star mode, or using the Lottery to win them|Random}} |
||
| + | |- |
||
| + | |197 |
||
| + | |[[File:Octorok Trophy.png|100px]]<br>[[Octorok]] |
||
| + | |{{TLoZ}}<br>07/87 |
||
| + | |align=left|These common enemies made their debut in the very first ''Legend of Zelda'' game and have been a staple of every game in the series since. They shoot rocks from their mouths at high velocity, but the projectiles are simple to block and do very little damage. Octoroks have low stamina, so they don't pose much of a threat to good fighters. |
||
| + | |{{Exp|Can be collected during Snag the Trophies in Classic Mode, picked up up in Adventure or All-Star mode, or using the Lottery to win them|Random}} |
||
| + | |- |
||
| + | |198 |
||
| + | |[[File:Like Like Trophy.png|100px]]<br>[[Like Like]] |
||
| + | |{{TLoZ}}<br>07/87 |
||
| + | |align=left|In ''The Legend of Zelda'', these slow-footed monsters inhaled Link and ate his [[shield]], just beating out [[Wallmaster]]s for the coveted title of "Most Aggravating Enemies Ever." Supposedly, their name comes from an old, almost indecipherable Hyrulian proverb: "Shield-eaters and world leaders have many likes alike. |
||
| + | |{{Exp|Can be collected during Snag the Trophies in Classic Mode, picked up up in Adventure or All-Star mode, or using the Lottery to win them|Random}} |
||
| + | |- |
||
| + | |219 |
||
| + | |[[File:Goron Trophy.png|100px]]<br>[[Goron]] |
||
| + | |{{OoT}}<br>11/98 |
||
| + | |align=left|Most Gorons inhabit the stony slopes of [[Death Mountain]]. They can achieve incredible land speeds by curling up into balls and rolling: they also curl up into small balls to sleep. They're a gentle and calm people, but their leader, [[Darunia]], is impassioned and brave. Gorons use strong and dexterous fingers to make blades and bombs. |
||
| + | |{{Exp|Can be collected during Snag the Trophies in Classic Mode, picked up up in Adventure or All-Star mode, or using the Lottery to win them|Random}} |
||
| + | |- |
||
| + | |220 |
||
| + | |[[File:Marin Trophy.png|100px]]<br>[[Marin]] |
||
| + | |{{LA}}<br>8/93 |
||
| + | |align=left|Marin is a young girl who cares for Link after a shipwreck washes him up on the shores of [[Koholint Island]]. She's a talented harpist, well liked for her kind and gentle nature. She holds fast to the ideals of truth and honor; if Link happens to steal something during his adventure, she greets him with a shout of "THIEF!" |
||
| + | |Earn all secret levels and characters |
||
| + | |- |
||
| + | |221 |
||
| + | |[[File:Majora's Mask Trophy.png|100px]]<br>[[Majora's Mask (Object)|Majora's Mask]] |
||
| + | |{{MM}}<br>10/00 |
||
| + | |align=left|A lonely [[Skull Kid]] put on Majora's Mask and unknowingly allowed a great evil to invade the land of [[Termina]]. The mask manifested its evil power into the fearsome looking moon, and the Skull Kid became merely a puppet under its malevolent power. In the ultimate battle with Link, Majora's Mask transformed into three separate forms. |
||
| + | |Clear [[ssb:Event 47|Event 47]] |
||
| + | |- |
||
| + | |222 |
||
| + | |[[File:Ocarina of Time Trophy.png|100px]]<br>[[Ocarina of Time (Item)|Ocarina of Time]] |
||
| + | |{{OoT}}<br>11/98 |
||
| + | |align=left|This ocarina, the treasure of the House of Hyrule, was entrusted to Link by Zelda when she fled from Ganondorf's insurrection. When used in conjunction with three [[Spiritual Stones]], it opened the way to where the Master Sword rested. In ''Majora's Mask'', it gave Link limited control over time, but it has other uses: it's fun to play as a musical instrument. |
||
| + | |{{Exp|Can be collected during Snag the Trophies in Classic Mode, picked up up in Adventure or All-Star mode, or using the Lottery to win them|Random}} |
||
| ⚫ | |||
| + | ==See Also== |
||
| − | {{Item |
||
| + | * [[Trophies in Super Smash Bros. Brawl]] |
||
| − | |name = Demise's sword |
||
| + | * [[Trophies in Super Smash Bros. for Nintendo 3DS/Wii U]] |
||
| − | |type = Enemy Weapon |
||
| − | |image = [[File:antimastersword.png|150px]] |
||
| − | |caption = |
||
| − | |game = {{SS}} |
||
| − | |other = |
||
| − | |cost = |
||
| − | |uses = Demise's weapon of choice, Ghirahim's true form. |
||
| − | |comp = |
||
| ⚫ | |||
| ⚫ | |||
| − | '''Demise's sword'''<ref>{{cite|Master, should your sword come into contact with Demise's sword once it has electrified, you will receive a painful shock.|Fi|SS}}</ref> is the blade wielded by [[Demise]] in the finale of {{SS}}. It is [[Ghirahim]]'s true form; as the servant of the Demon King, and he has the capability of returning to the blade, like [[Fi]] and the [[Master Sword]]. It bears an upside-down [[Triforce]] on the blade as well. |
||
| − | |||
| − | ==Story== |
||
| − | [[File:Ghirahim_Final_Form.png|100px|left|Ghirahim's Final Form]] |
||
| − | Throughout {{SS}}, Ghirahim pursues [[Princess Zelda#Skyward Sword|Zelda]] in attempt to revive Demise from his imprisonment. As [[Link]] progresses farther in the game, Ghirahim's appearance begins to gain dark marks in several places. In the final stretch, in order to fully revive Demise, Ghirahim takes on his true form which bears great resemblance to [[Fi]], strongly emphasizing that he is in fact the spirit of a sword. When Demise is fully revived, he summons the sword from Ghirahim, his true form, and Ghirahim is sent into the sword. In the end, when Demise is defeated, the sword dissolves, likely taking Ghirahim with it. |
||
| − | |||
| − | ==Size, Abilities, and Characteristics== |
||
| − | [[File:DemonBoss_BlackMasterSword.png|250px|right|Demise carrying his blade]] |
||
| − | The blade is significantly larger in comparison to the [[Master Sword]]. It is capable of sending [[Link]] flying backwards in one strike and when lifted in the air during the presence of a severe thunderstorm, it can absorb lightning bolts to charge up and send electric shocks when stricken with a metal object, as well as beams. |
||
| − | |||
| − | ==Design== |
||
| − | Demise's sword is almost completely black with a red aura surrounding it. The hilt bears resemblance to the [[Master Sword]], with a red jewel as opposed to the Master Sword's golden one. The blade differs from the Master Sword in terms of shape and size, but it bears an upside-down [[Triforce]] emblem. |
||
| − | {{clear}} |
||
| − | |||
| − | ==Gallery== |
||
| − | <gallery> |
||
| − | File:SSDemiseSwordConcept.jpg|Concept art of Demise's sword from [[Hyrule Historia]] |
||
| − | </gallery> |
||
| − | |||
| − | {{Ref}} |
||
| − | |||
| − | {{Swords}} |
||
| ⚫ | |||
| − | {{de}} |
||
Revision as of 17:25, 24 April 2017
Trophies are collectible items in Super Smash Bros. Melee. There are 293 Trophies in all, 30 of which are Template:Series.
Trophies from The Legend of Zelda
| # | Trophy | First Game / Move | Description | How to Unlock |
|---|---|---|---|---|
| 7 | 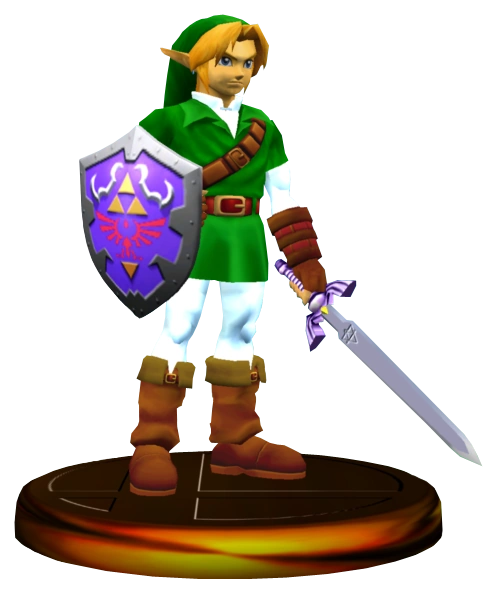 Link |
The Legend of Zelda 07/87 |
Even in his youth, Link was already becoming the warrior who would carry the destiny of Hyrule (and many other lands) on his shoulders. His epic struggles against the forces of darkness are written in legend, and he is bound to the Princess Zelda and the archfiend Ganondorf by the awesome power of the Triforce. | Complete Classic Mode as Link |
| 8 | 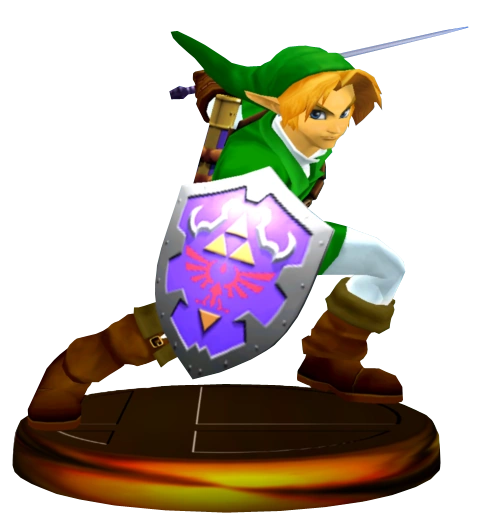 Link [Smash] |
B: Bow Smash B: Boomerang |
Burdened with a shield, a heavy sword, and plenty of equipment, Link is not a very mobile character. Nevertheless, he's skilled with the blade, and his varied supply of missile weapons makes him a powerful fighter. To master Link, you must control the pace by balancing your long-range attacks with head-to-head swordplay. | Complete Adventure Mode as Link |
| 9 | 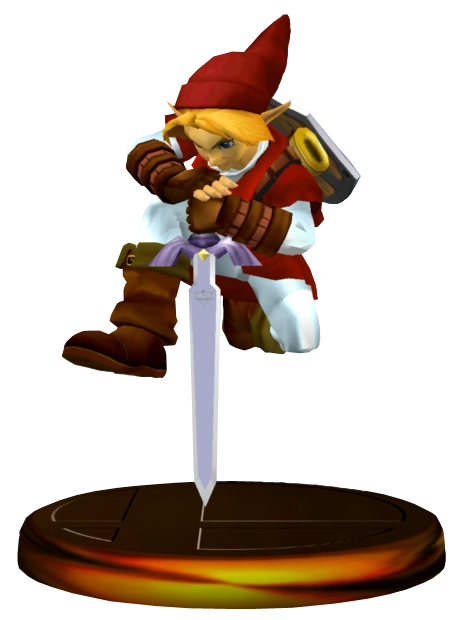 Link [Smash] |
Up & B: Spin Attack Down & B: Bomb |
Link's Bow, Boomerang, and Bombs all take time to wield, so you may want to try drawing them in midair to prevent your foes from attacking you while you're vulnerable. The Spin Attack can score consecutive midair hits, and the final slash is very powerful. Link's Bombs are his trump card, but he can't pull one out if he's carrying another item. | Complete All-Star Mode as Link |
| 40 | 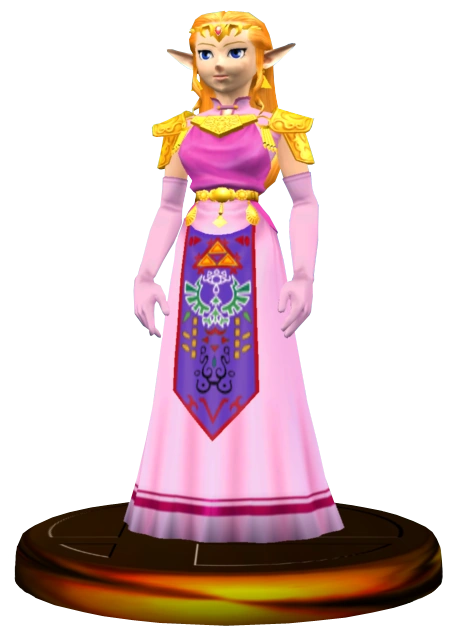 Zelda |
The Legend of Zelda 07/87 |
The crown princess of Hyrule. Zelda entrusted Link with the future of Hyrule after a revelation came to her in the world of dreams. She knows much about the Triforce; in fact, the only person who likely knows more about Triforce lore is Ganondorf himself, whom Zelda evaded in ‘‘The Legend of Zelda: Ocarina of Time’’ by transforming into her alter ego, Sheik. | Complete Classic Mode as Zelda or Sheik |
| 41 | 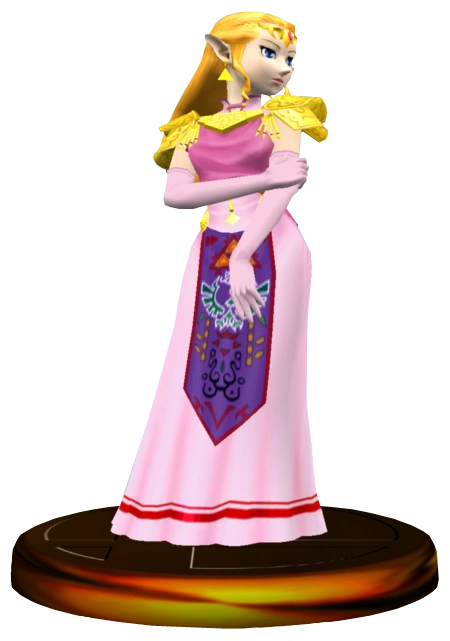 Zelda [Smash] |
B: Nayru's Love Smash B: Din's Fire |
Zelda is a bit slow and, because of her light frame, easy to send flying. On the other hand, her magical skills lend her reliable and explosive attack power. Zelda's easier to use if you focus on waiting and countering rather than pressing attacks. She can use Nayru's Love to reflect projectile attacks or as an offensive weapon. | Complete Adventure Mode as Zelda or Sheik |
| 42 | 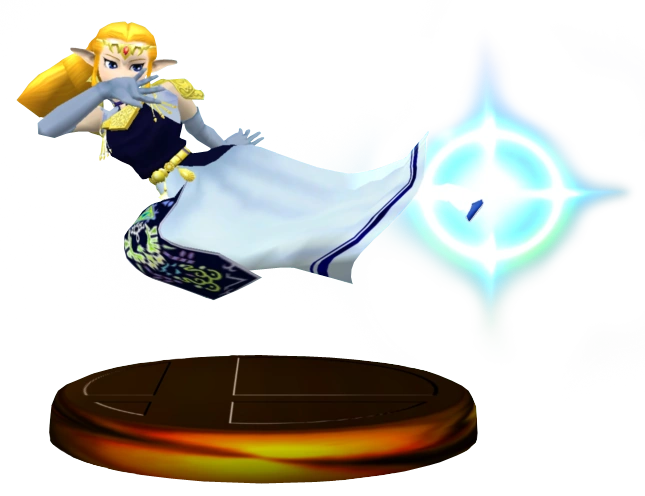 Zelda [Smash] |
Up & B: Farore's Wind Down & B: Transform |
Zelda's midair Lightning Kick centers immense magical power in the ball of her foot. If she strikes perfectly, the attack is as strong as can be. If her aim is slightly off, it'll be exceedingly weak. Farore's Wind again utilizes Zelda's magical prowess, this time by transporting her great distances. It's vital to know the lay of the land before using this move. | Complete All-Star Mode as Zelda or Sheik |
| 43 |  Sheik |
Ocarina of Time 11/98 |
This is Zelda's alter ego. Using a variation of the name of the ancient Sheikah tribe, she appears before Link and teaches him melodies instrumental to his success. It's believed that she's not just a quick-change artist, but rather that she is able to instantaneously alter her clothing and her eye and skin color by using her magical skills. | Complete Classic Mode as Zelda or Sheik |
| 44 | 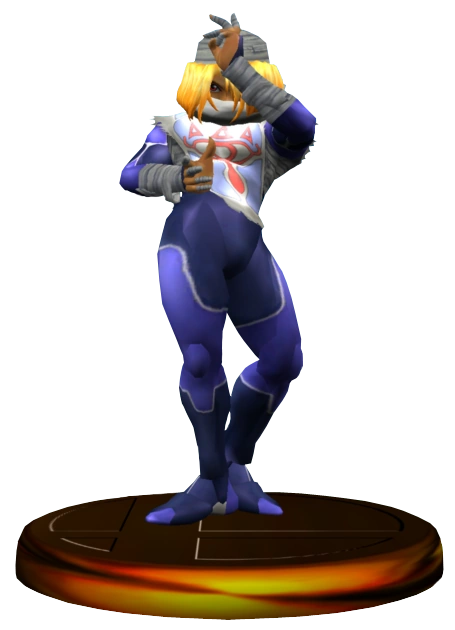 Sheik [Smash] |
B: Needle Storm Smash B: Chain |
Strategically switching between Zelda and Sheik is key. Compared to her Zelda form, Sheik is nimble and has gorgeous moves, but she lacks a strong knockout attack. The number of needles thrown in Needle Storm is based on how long you hold the B Button before releasing it. Use the Control Stick to wave the Chain after brandishing it. | Complete Adventure Mode as Zelda or Sheik |
| 45 | 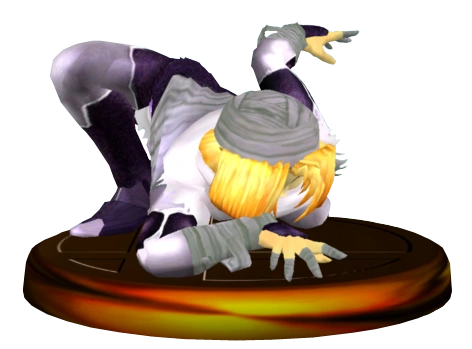 Sheik [Smash] |
Up & B: Vanish Down & B: Transform |
The best strategy to use when playing as Sheik is to let her flow from one powerful attack into another, like a river of quicksilver. Zelda has some techniques with more punch, however, so in one-on-one battles, use Transform as needed. Sheik only travels a short way when using Vanish, but the move comes with a small explosion that damages foes around her. | Complete All-Star Mode as Zelda or Sheik |
| 64 | 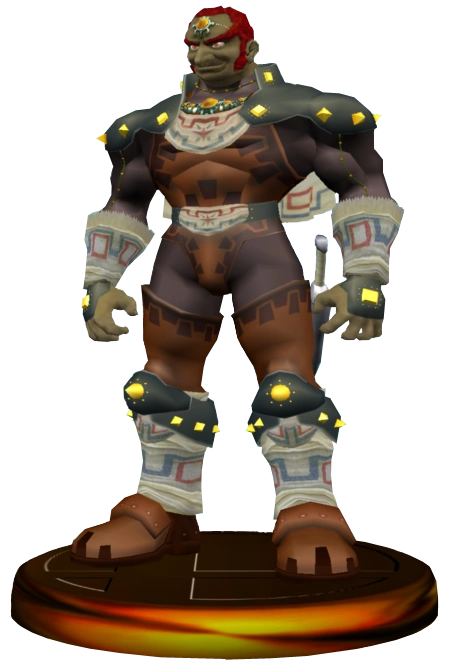 Ganondorf |
Ocarina of Time 11/98 |
Said to be the sole man born to the Gerudo tribe in a hundred years, Ganondorf aspired to conquer the world. He plundered a piece of the sacred Triforce from the Temple of Time when Link pulled the Master Sword from its pedestal. With the Triforce of Power in Ganondorf's possession, Hyrule was plunged into darkness until Link and Zelda defeated the fiend. | Complete Classic Mode as Ganondorf |
| 65 | File:Ganondorf (Smash) Trophy Model.png Ganondorf [Smash] |
B: Warlock Punch Smash B: Gerudo Dragon |
Since he's slow and can't jump very high, Ganondorf relies mainly on his immense physical strength to overwhelm his enemies. His great weight also makes him a difficult foe to send offscreen. Ganondorf's Warlock Punch is slow but absurdly powerful, and when he strikes with his Gerudo Dragon, enemies rise skyward enveloped in dark flames. | Complete Adventure Mode as Ganondorf |
| 66 | 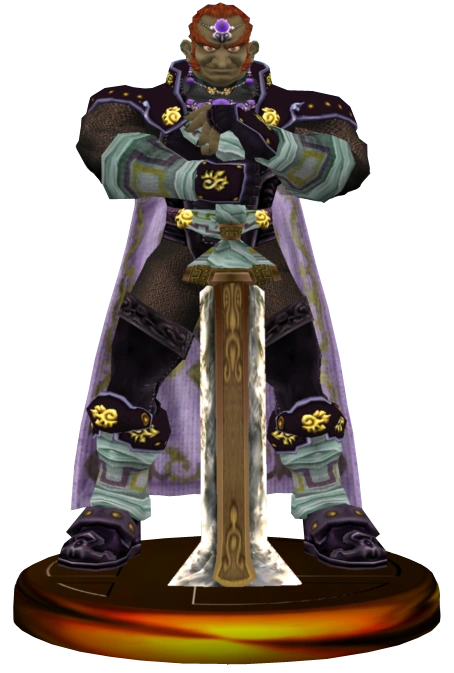 Ganondorf [Smash] |
Up & B: Dark Dive Down & B: Wizard's Foot |
Ganondorf's slow speed works against him in single combat, but in melees, his crazy power lets him earn his keep with innumerable KOs. Ganondorf can't strike quickly, but each blow he lands adds up. Ganondorf is at his quickest when he uses the Wizard's Foot, and his Dark Dive blasts foes in a burst of dark energy. | Complete All-Star Mode as Ganondorf |
| 70 | 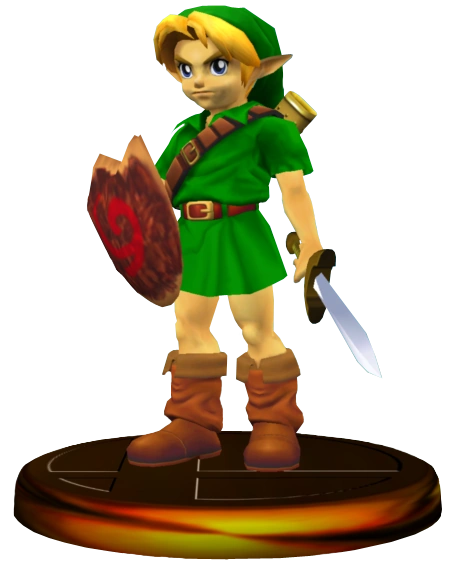 Young Link |
The Legend of Zelda 07/87 |
Link's younger incarnation is often considered to be the true Link: he was a young boy in the very first Legend of Zelda game, and he has appeared as a youth in most of the subsequent games. Since his debut on the original NES in 1987, Link's appearance has changed over and over again, each time adding to the mystique of his incomparable story. | Complete Classic Mode as Young Link |
| 71 | 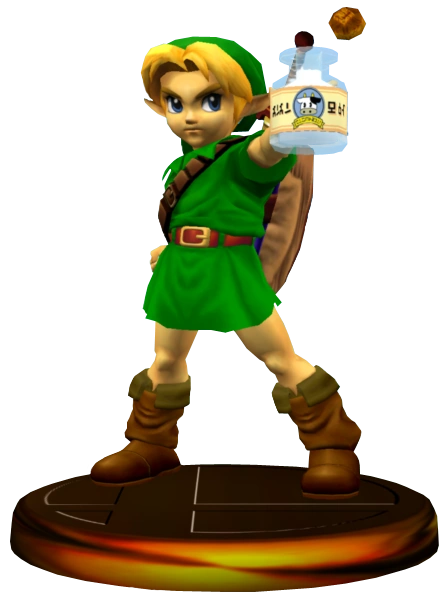 Young Link [Smash] |
B: Fire Bow Smash B: Boomerang |
Young Link is lighter and faster than his older self, and his Kokiri sword packs less punch. Even though his Boomerang has a shorter range, he has greater control over it. He's a smaller target, and while his Hookshot has less reach than older Link's, you can still use it in midair as a last ditch attempt to grab a ledge. | Complete Adventure Mode as Young Link |
| 72 | 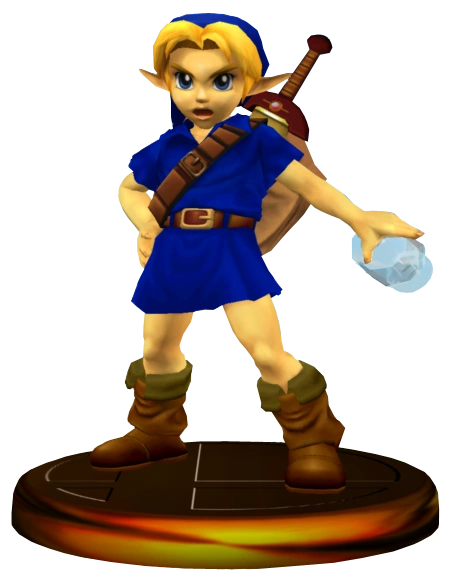 Young Link [Smash] |
Up & B: Spin Attack Down & B: Bomb |
With a youthful spring in his step, Young Link can perform amazing wall-jumps. Once he hits a wall, tap the Control stick in the opposite direction to send him leaping upward; you can practice to your heart's content in Target Test. His Spin Attack can strike multiple times even on the ground, and although it's hard to discern, so do his Bombs. | Complete All-Star Mode as Young Link |
| 87 |  Heart Container |
The Legend of Zelda 07/87 |
Heart Containers drift toward the ground slowly and replenish 100 percentage points of health. In The Legend of Zelda, these items beefed up Link's life meter; in most cases, Link found them in the possession of bosses or hidden in secret areas. Heart Containers are often scattered across the land in several fragments. | Play 100 VS Matches |
| 111 | 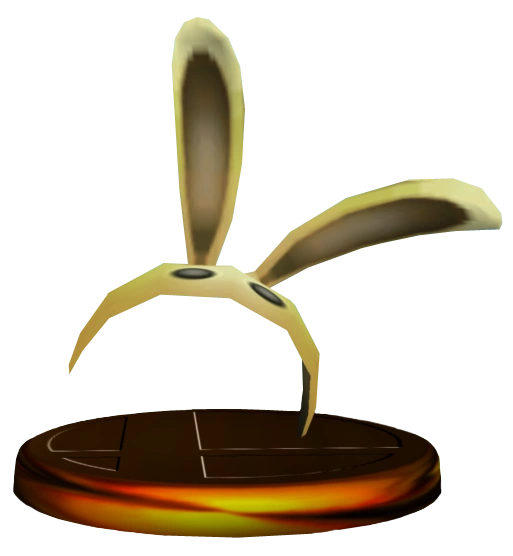 Bunny Hood |
Ocarina of Time 11/98 |
Don the Bunny Hood to improve your agility drastically, allowing you to jump great distances and move at high speed. The ears are a cute accessory: they're even adorable on characters they don't quite suit. The Bunny Hood was key in The Legend of Zelda: Majora's Mask, where it made Link move at one-and-a-half times his normal speed. | Get a combined total of 125 combos for all characters in Training Mode |
| 156 | 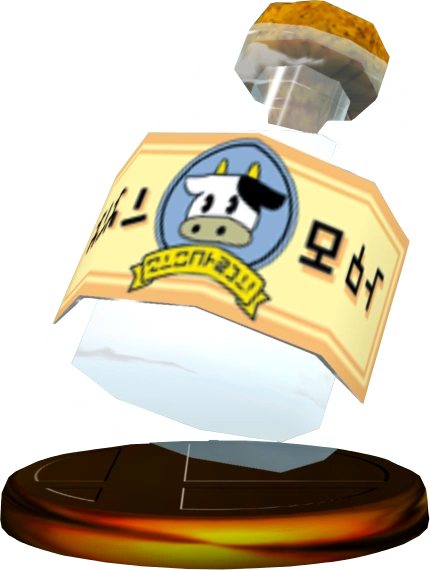 Lon Lon Milk |
Ocarina of Time 11/98 |
The pride of Lon Lon Ranch is this delicious and nutritious milk. When Link played "Epona's Song" for Lon Lon Cows, they would perk up and provide him with a bottle full of the tasty beverage. The fact that Link sometimes used bottles that had housed bugs is a matter of questionable hygiene. In Super Smash Bros. Melee, Young Link drinks milk instead of taunting. | Get a total time under 25 minutes in Target Test |
| 170 | 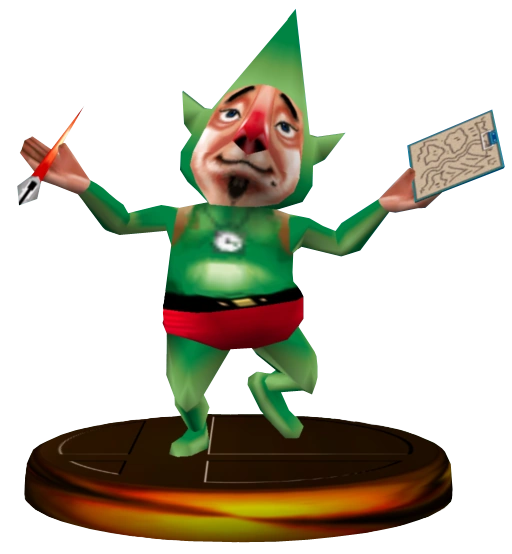 Tingle |
Majora's Mask 10/00 |
Tingle is a mysterious middle-aged man who thinks he's "the very reincarnation of a fairy." His bizarre behavior and unique speech are just little pieces of his vibrant personality. Tingle travels by way of a small hot-air balloon, making maps of the lands below him. Pop his balloon, and Tingle will fall to earth to sell his maps. | Random |
| 171 | File:Moon Trophy.png Moon |
Majora's Mask 10/00 |
High in the sky above the Clock Town Tower, a menacing moon slowly sinks towards the city. Shrouded in mystery and feared by all, it threatens to devour everything and everyone in a cataclysm of fire. Strangely, inside the moon is a beautiful, pristine plain broken by a single tree. The moon breaks after Link defeats Majora's Mask. | Random |
| 172 | File:Turtle Trophy.png Turtle |
Majora's Mask 10/00 |
When Link played the "New Wave Bossa Nova", what masqueraded as a lone island rose out of the waters of the Great Bay Coast and revealed itself to be a giant turtle. This mighty terrapin is ancient and wise beyond belief. It sensed Link's destiny and braved the stormy seas in order to transport him to the Great Bay Temple. | Random |
| 173 | File:Four Giants Trophy.png Four Giants |
Majora's Mask 10/00 |
"Swamp... Mountain... Ocean... Valley... The four who are there..." Link summons these four giant guardians to aid in his battle against the Skull Kid, who's possessed by Majora's Mask. They appear from the four compass points to catch the moon, which is about to crash into Clock Town. Without abandoning the innocent Skull Kid, they're able to protect the town. | Random |
| 174 | File:Master Sword Trophy.png Master Sword |
Ocarina of Time 11/98 |
The Master Sword varies a bit between titles in the Legend of Zelda series, but it's generally the most powerful blade that Link can carry. It's a magical weapon that can be wielded only by a true hero, and, as its name implies, it's the weapon of choice in decisive battles. At the end of The Legend of Zelda: Ocarina of Time, Link returned it to its stone pedestal. | Random |
| 196 | File:ReDead Trophy.png ReDead |
Ocarina of Time 11/98 |
Seven years after Ganondorf took control of Hyrule, ReDeads roamed the ruins of Castle Town, moaning. At first, Link was shocked at the state of the town, and the apparent lack of survivors. He later learned that the townsfolk had evacuated to safety, and that the ReDeads were just magic animated into hideous humanoid shapes. | Random |
| 197 | File:Octorok Trophy.png Octorok |
The Legend of Zelda 07/87 |
These common enemies made their debut in the very first Legend of Zelda game and have been a staple of every game in the series since. They shoot rocks from their mouths at high velocity, but the projectiles are simple to block and do very little damage. Octoroks have low stamina, so they don't pose much of a threat to good fighters. | Random |
| 198 | File:Like Like Trophy.png Like Like |
The Legend of Zelda 07/87 |
In The Legend of Zelda, these slow-footed monsters inhaled Link and ate his shield, just beating out Wallmasters for the coveted title of "Most Aggravating Enemies Ever." Supposedly, their name comes from an old, almost indecipherable Hyrulian proverb: "Shield-eaters and world leaders have many likes alike. | Random |
| 219 | File:Goron Trophy.png Goron |
Ocarina of Time 11/98 |
Most Gorons inhabit the stony slopes of Death Mountain. They can achieve incredible land speeds by curling up into balls and rolling: they also curl up into small balls to sleep. They're a gentle and calm people, but their leader, Darunia, is impassioned and brave. Gorons use strong and dexterous fingers to make blades and bombs. | Random |
| 220 | File:Marin Trophy.png Marin |
Link's Awakening 8/93 |
Marin is a young girl who cares for Link after a shipwreck washes him up on the shores of Koholint Island. She's a talented harpist, well liked for her kind and gentle nature. She holds fast to the ideals of truth and honor; if Link happens to steal something during his adventure, she greets him with a shout of "THIEF!" | Earn all secret levels and characters |
| 221 | File:Majora's Mask Trophy.png Majora's Mask |
Majora's Mask 10/00 |
A lonely Skull Kid put on Majora's Mask and unknowingly allowed a great evil to invade the land of Termina. The mask manifested its evil power into the fearsome looking moon, and the Skull Kid became merely a puppet under its malevolent power. In the ultimate battle with Link, Majora's Mask transformed into three separate forms. | Clear Event 47 |
| 222 | File:Ocarina of Time Trophy.png Ocarina of Time |
Ocarina of Time 11/98 |
This ocarina, the treasure of the House of Hyrule, was entrusted to Link by Zelda when she fled from Ganondorf's insurrection. When used in conjunction with three Spiritual Stones, it opened the way to where the Master Sword rested. In Majora's Mask, it gave Link limited control over time, but it has other uses: it's fun to play as a musical instrument. | Random |
_Trophy_Model.png)