MannedTooth (talk | contribs) m (Text replacement - "File:LanmolaBlue.png" to "File:TLoZ Lanmola Blue Sprite.png") |
MannedTooth (talk | contribs) m (Text replacement - "File:LanmolaRed.png" to "File:TLoZ Lanmola Red Sprite.png") |
||
| Line 12: | Line 12: | ||
==Strategy== |
==Strategy== |
||
===''The Legend of Zelda''=== |
===''The Legend of Zelda''=== |
||
| − | [[File: |
+ | [[File:TLoZ Lanmola Red Sprite.png|left|30px]] |
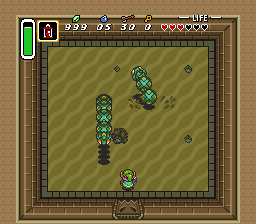
In {{TLoZ}}, Lanmolas are only found in the [[Death Mountain Labyrinth]] in both Quests and are powerful foes. They come in red and blue varieties, with the latter ones being faster. Like the [[Moldorm]]s in the game, the Lanmolas grow shorter by one segment with each blow, but only the tail part of their body is weak at first; the head can only be harmed once the remaining segments have been destroyed. Their fast movement, multiple legs and their weakness in the tail actually makes them more akin to [[Moldorm]]s of later games. |
In {{TLoZ}}, Lanmolas are only found in the [[Death Mountain Labyrinth]] in both Quests and are powerful foes. They come in red and blue varieties, with the latter ones being faster. Like the [[Moldorm]]s in the game, the Lanmolas grow shorter by one segment with each blow, but only the tail part of their body is weak at first; the head can only be harmed once the remaining segments have been destroyed. Their fast movement, multiple legs and their weakness in the tail actually makes them more akin to [[Moldorm]]s of later games. |
||
| Line 62: | Line 62: | ||
==Gallery== |
==Gallery== |
||
<gallery> |
<gallery> |
||
| − | File: |
+ | File:TLoZ Lanmola Red Sprite.png|Red Lanmola in ''The Legend of Zelda'' |
File:TLoZ Lanmola Blue Sprite.png|Blue Lanmola in ''The Legend of Zelda'' |
File:TLoZ Lanmola Blue Sprite.png|Blue Lanmola in ''The Legend of Zelda'' |
||
File:Lanmolas.png|Lanmola artwork from ''The Legend of Zelda'' |
File:Lanmolas.png|Lanmola artwork from ''The Legend of Zelda'' |
||
Revision as of 16:32, 17 March 2017
Template:Boss Lanmolas are powerful, centipede-like[1] foes found in several Zelda titles. While they were originally normal enemies, they began to serve larger roles in subsequent games in the series, acting as boss or mini-boss. Their first appearance shows them as having an elongated segmented body, with two appendages per segment and a single eye complete with iris; later games show them as clearly having two compound eyes and no appendages, giving them a more worm-like appearance. Template:TLoZManual
Strategy
The Legend of Zelda
In The Legend of Zelda, Lanmolas are only found in the Death Mountain Labyrinth in both Quests and are powerful foes. They come in red and blue varieties, with the latter ones being faster. Like the Moldorms in the game, the Lanmolas grow shorter by one segment with each blow, but only the tail part of their body is weak at first; the head can only be harmed once the remaining segments have been destroyed. Their fast movement, multiple legs and their weakness in the tail actually makes them more akin to Moldorms of later games.
A Link to the Past
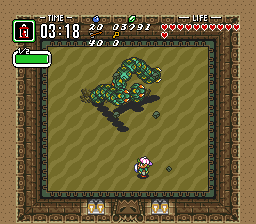
A group of three Lanmolas are the bosses of the Desert Palace in A Link to the Past. In this game, they hide underground and occasionally surface to attack, then return to the underground. When they burrow out of the ground, they send bits of rock flying in several directions. The sword is the most common method of dealing with them; however, arrows and the Ice Rod are both effective as well. After two are defeated, the last one will begin to move faster, and creates more bits of rock upon surfacing. Once the final one has been taken care of, Link gets the Pendant of Power and a Heart Container.
Another group of three Lanmolas later return in Ganon's Tower as a mini-boss, where they are fought the same way as before. This time, however, there is a Stone Statue in the room that will occasionally fire beams at Link.
Link's Awakening
In Link's Awakening, a Lanmola appears as a mini-boss guarding the Angler Key in the Yarna Desert. It attacks in the same fashion as those encountered in A Link to the Past, but this time it fights in a patch of quicksand. If Link sinks into the center of the pit, Link will fall into a cave and, after returning, all damage dealt to the Lanmola will be reversed.
One of the final Nightmare's forms is known as Lanmola, but it is fought very differently. It behaves more akin to the Lanmolas of the original The Legend of Zelda, and must be defeated with a powerful attack to the head, like the Magic Rod.
Other Appearances
Ancient Stone Tablets
Three Lanmolas also appear as the boss of Level 5 in Week 3 of Ancient Stone Tablets. Unlike A Link to the Past, the it is possible to obtain the Level 3 Sword in the dungeon before fighting them.
A Link to the Past comic
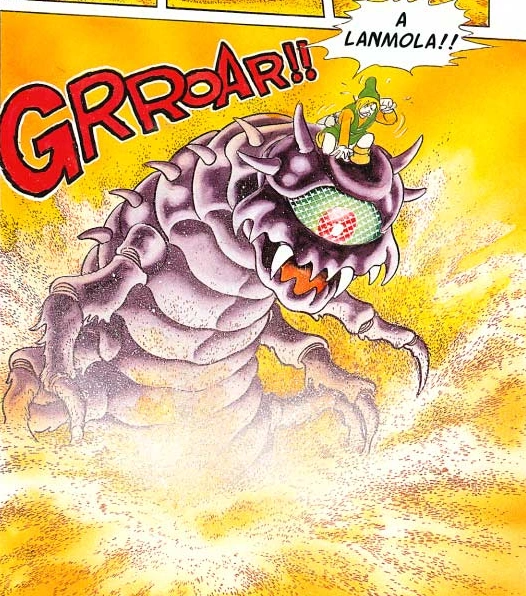
In the A Link to the Past comic, a Lanmola appears after Link, using the Book of Mudora in the Desert of Mystery, reveals a scorpion statue that has the Pendant of Power hanging on it. Before Link can approach it, he sinks into the quicksand and resurfaces on top of a Lanmola. Link tries to attack it with his sword but its skin is too hard to cause any damage to it.[2] However, after the Lanmola launches him in the air, he lands on top of the scorpion statue and retrieves the Pendant of Power.[3] With the pendant's energy in his hand, Link successfully defeats the Lanmola by striking the foe's underbelly with the sword.
Link's Awakening Manga
Template:Sectstub Lanmola appears in chapter 3 of the Template:Manga. Link is able to defeat it with a Spin Attack after using his Shield as footing to compensate for the loose sand surrounding him.
Etymology
| Language | Name | Meaning | |
|---|---|---|---|
| Japanese | ラネモーラ (Ranemōra) | Lanemola | |
| French | Lanmola | ||
| German | Lanmola | ||
Gallery

Red Lanmola in The Legend of Zelda

Blue Lanmola in The Legend of Zelda
- Lanmolas.png
Lanmola artwork from The Legend of Zelda
- RedLanmolaLoZArt.png
Red Lanmola artwork from The Legend of Zelda
- BlueLanmolaLoZArt.png
Blue Lanmola artwork from The Legend of Zelda
- Lanmola ALttP.png
Lanmola in A Link to the Past
- LanmolasALttP.png
Lanmolas artwork from A Link to the Past

Battle against Lanmolas in A Link to the Past
- Lanmola LA.png
Lanmola in Link's Awakening
- Shadow5(Lanmola).gif
The Lanmola form of the Nightmare in Link's Awakening

Lanmola from A Link to the Past comic
Lanmola in Ancient Stone tablets
References
Mazura · Jermafenser · Rebonack · Carock · Gooma · Barba · Thunderbird ![]() · Link's Shadow
· Link's Shadow
Light World
Ball and Chain Trooper ![]() · Six Armos Knights · Lanmola Trio · Moldorm · Agahnim
· Six Armos Knights · Lanmola Trio · Moldorm · Agahnim ![]()
Dark World
Helmasaur King · Arrghus · Mothula · Blind the Thief · Kholdstare · Vitreous · Trinexx · Ganon
Super Helmasaur · Super Arrghus · Super Mothula · Super Blind · Dark Links![]()
Bosses
Moldorm · Genie · Slime Eye · Angler Fish (2D) · Slime Eel · Facade · Evil Eagle (2D) · Hot Head · Shadow Nightmares
Guardians
Rolling Bones ![]() · King Moblin
· King Moblin ![]() · Hinox
· Hinox ![]() · Dodongo Snakes x2
· Dodongo Snakes x2 ![]() · Lanmola
· Lanmola ![]() · Cue Ball
· Cue Ball ![]() · Master Stalfos x4 · Gohma Twins · Armos Knight
· Master Stalfos x4 · Gohma Twins · Armos Knight ![]() · Smasher
· Smasher ![]() · Grim Creeper · Turtle Rock · Blaino
· Grim Creeper · Turtle Rock · Blaino
Bosses
Gohma · King Dodongo · Barinade · Phantom Ganon · Volvagia · Morpha · Bongo Bongo · Twinrova · Ganondorf · Ganon
Middle Bosses
Lizalfos · Big Octo · Stalfos · Meg · Flare Dancer · White Wolfos · Dark Link · Dead Hand · Gerudo Thief · Iron Knuckle · Dynalfos
Bosses
Odolwa · Goht · Gyorg · Twinmold · Majora ![]()
Middle Bosses
Dinolfos · Gekko · Wizzrobe · Gerudo Pirate · Wart · Gekko and Mad Jelly
Captain Keeta · Iron Knuckle · Sharp · Igos du Ikana · Garo Master · Gomess · Eyegore
Bosses
Aquamentus · Dodongo · Mothula · Gohma · Digdogger · Manhandla · Gleeok · Medusa Head · General Onox ![]()
Sub-Bosses
Brother Goriyas · Facade ![]() · Omuai · Agunima · Great Moblin
· Omuai · Agunima · Great Moblin ![]() · Syger · Vire
· Syger · Vire ![]() · Poe Sisters · Frypolar
· Poe Sisters · Frypolar
Bosses
Pumpkin Head · Head Thwomp (2D) · Shadow Hag · Eyesoar · Smog · Octogon · Possessed Nayru · Plasmarine · Ramrock · Veran ![]()
Sub-Bosses
Giant Ghini · Swoop · Subterror · Armos Warrior · Great Moblin ![]() · Smasher · Vire
· Smasher · Vire ![]() · Angler Fish (2D) · Blue Stalfos
· Angler Fish (2D) · Blue Stalfos
Bosses
Gohma · Kalle Demos · Gohdan · Helmaroc King · Jalhalla · Molgera · Puppet Ganon ![]() · Ganondorf
· Ganondorf
Minibosses
Green Bokoblin · Moblin · Mothula · Darknut · Cyclos · Phantom Ganon · Stalfos · Wizzrobe · Mighty Darknut · Big Octo![]()
Bosses
Phantom Ganon ![]() · Stone Arrghus · Helmaroc King · Big Poe · Big Moldorm x2 · Frostare · Vaati · Ganon
· Stone Arrghus · Helmaroc King · Big Poe · Big Moldorm x2 · Frostare · Vaati · Ganon
Sub-Bosses
Chief Soldier · Shadow Link ![]() · Manhandla · Dodongos · Big Dark Stalfos · Gohma · Big Dodongo
· Manhandla · Dodongos · Big Dark Stalfos · Gohma · Big Dodongo
Bosses
Big Green Chuchu ![]() · Gleerok · Mazaal · Big Octorok
· Gleerok · Mazaal · Big Octorok ![]() · Gyorg Pair · Vaati
· Gyorg Pair · Vaati ![]()
Sub-Bosses
Madderpillar ![]() · Dark Nut · Big Blue Chuchu
· Dark Nut · Big Blue Chuchu ![]() · Red Dark Nut · Black Knight
· Red Dark Nut · Black Knight
Bosses
Diababa · Fyrus · Morpheel · Stallord · Blizzeta · Armogohma · Argorok · Zant · Puppet Zelda · Ganon · Ganondorf ![]()
Sub-Bosses
Ook · King Bulblin · Dangoro · Twilit Carrier Kargarok · Twilit Bloat · Deku Toad · Death Sword · Darkhammer · Darknut · Aeralfos · Phantom Zant
Bosses
Stagnox · Fraaz · Phytops · Cragma · Byrne · Skeldritch · Demon Train · Chancellor Cole · Malladus
Stagnox II · Fraaz II · Phytops II · Cragma II · Skeldritch II · Dark Link![]()
Sub-Bosses
Mothula · Geozard · Rocktite · Ice Keese · Freezard · White Wolfos · Geozard Chief · Big Blin ![]() · Snapper · Helmet Chuchu · Metal Chuchu · Stalfos · Heatoise · Stalfos Warrior · Gerune · Ergtorok ·
· Snapper · Helmet Chuchu · Metal Chuchu · Stalfos · Heatoise · Stalfos Warrior · Gerune · Ergtorok ·
Bosses
Ghirahim ![]() · Scaldera · Moldarach · The Imprisoned
· Scaldera · Moldarach · The Imprisoned ![]() · Koloktos · Tentalus · Levias
· Koloktos · Tentalus · Levias ![]() · Bilocyte
· Bilocyte ![]() · Demise
· Demise
Sub-Bosses
Stalfos · Lizalfos · Stalmaster · Moldarach · LD-002G Scervo · Dark Lizalfos · Magmanos · Moldorm · Dreadfuse
Bosses
Yuga ![]() · Moldorm · Margomill · Gemesaur King · Arrghus · Knucklemaster · Stalblind · Zaganaga · Dharkstare · Grinexx · Yuga Ganon
· Moldorm · Margomill · Gemesaur King · Arrghus · Knucklemaster · Stalblind · Zaganaga · Dharkstare · Grinexx · Yuga Ganon
Sub-Bosses
Armos · Red Stalfos · Heedles · Green & Red Goriyas · Gigabari · Gibdos & Purple Mini-Moldorms · Red Eyegores · Flying Tiles & Devalants · Big Pengator & Pengators · Fire Gimos · Moldorm · Lorule Ball and Chain Soldier · Arrghus
StreetPass Bosses
Bosses
Margoma · Arrghus · Moldorm · Blizzagia · The Lady's Pets ![]() · Stalchampion · Prismantus · The Lady
· Stalchampion · Prismantus · The Lady
Shadow Link x3![]()
Mini-Bosses
Electric Blob King · Electric Blob Queen · Hinox Brothers · Freezlord · Vulture Vizier · Grim Repoe · Gigaleon
Bosses
Windblight Ganon · Fireblight Ganon · Master Kohga · Thunderblight Ganon · Waterblight Ganon · Calamity Ganon · Dark Beast Ganon ![]()
Sub-Bosses
Stone Talus · Igneo Talus · Frost Talus · Molduga · Hinox · Blue Hinox · Black Hinox · Stalnox · Igneo Talus Titan · Molduking
Bosses
Colgera · Mucktorok · Marbled Gohma · Queen Gibdo · Phantom Ganon · Seized Construct · The Demon King's Army · Demon King Ganondorf · Demon Dragon ![]()
Sub-Bosses
Flame Gleeok · Frost Gleeok · Sludge Like · Thunder Gleeok · King Gleeok · Yunobo · Frox · Flux Construct · Moragia · Molduga · Hinox · Stalnox · Frost Talus · Igneo Talus · Stone Talus · Battle Talus · Stone Talus (Luminous) · Ganondorf · Master Kohga · Phantom Ganon
Template:WormEnemy Template:SandEnemy